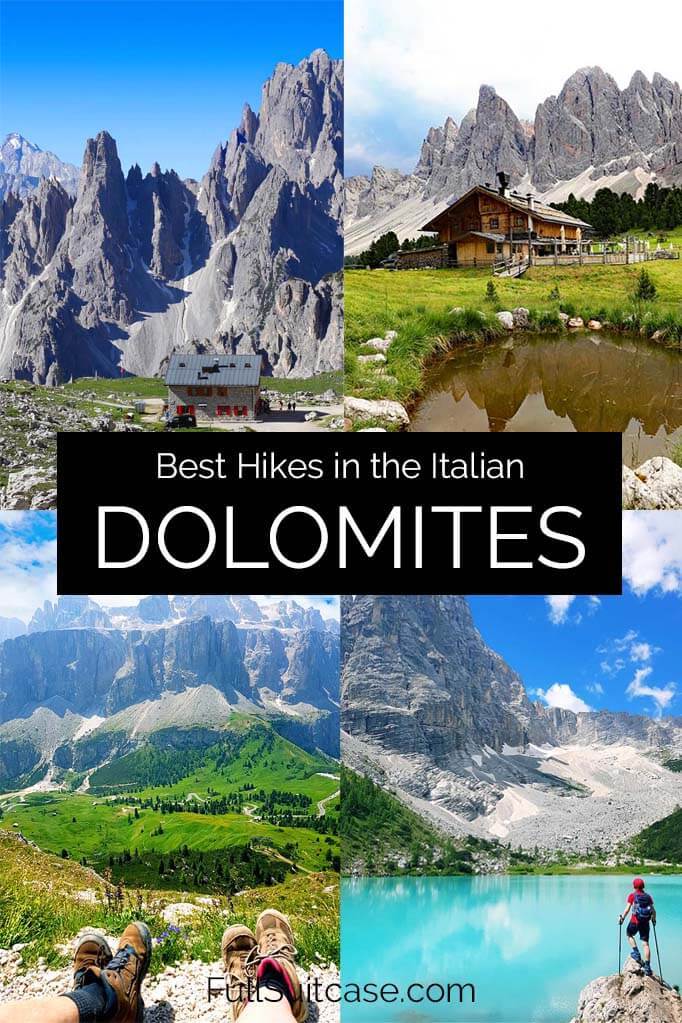
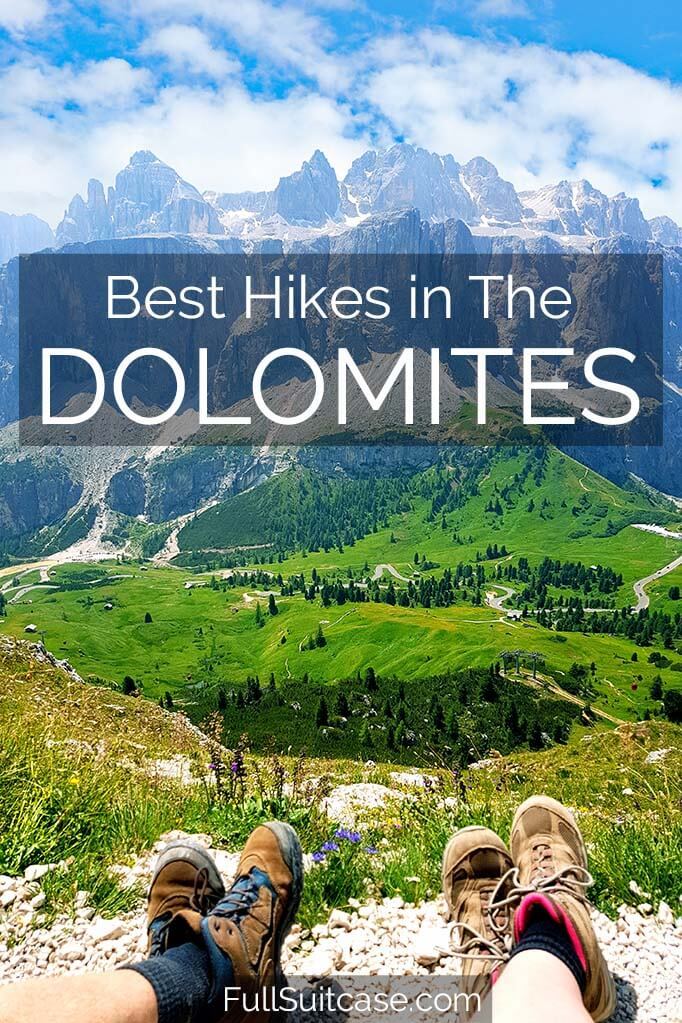
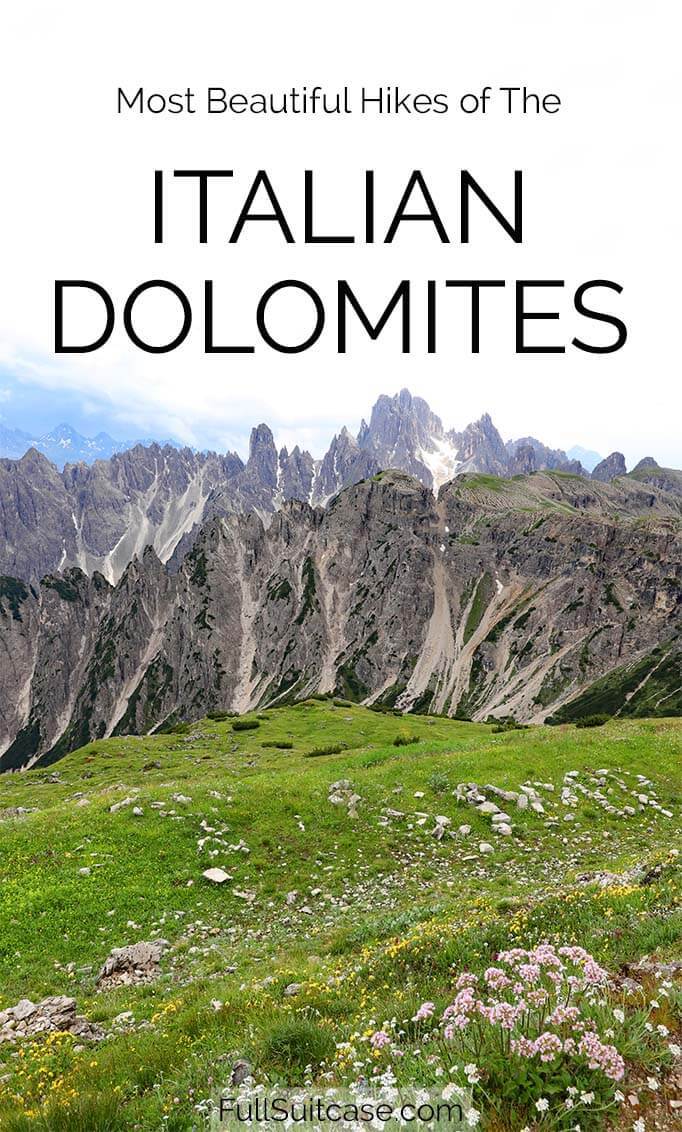
7 Absolute Best Hikes in the Dolomites, Italy (+Map & Tips)

This site contains affiliate links, which means that we may earn a small commission, at no cost to you, for qualifying purchases. It supports the work that goes into keeping this content free. Thanks for reading! More info: Privacy Policy.
Planning to go hiking in the Dolomites, Italy, and wondering where exactly to go and which hikes to choose? In this guide, we share the VERY BEST hikes in the Dolomites that are worth your time the most, a MAP indicating the best Dolomites hiking trails, and useful TIPS for your trip. Find out!
The Italian Dolomites is a dream destination for mountain lovers. But with thousands of kilometers of hiking trails, each more beautiful than the other, how in the world do you choose where to go… We had this exact same question when planning our Dolomites hiking trip in summer – what are the most beautiful, the best hikes in the Dolomites?
I consulted numerous websites on the Dolomites hiking, tourism boards, travel guides, and internet forums trying to choose the best Dolomites hiking trails for our trip. I was looking for relatively easy hikes (half a day – to a day) with the most spectacular scenery. Furthermore, each hike had to be doable with children.
We hiked in the Dolomites with our three kids age 7, 7, and 9, so we were only interested in day hikes and not long treks or multi-day hut hikes. To be completely honest, I must say that our kids are really good hikers. But still, if a 7-year old can do it, then I think it’s safe to say that it’s doable for most people in good physical condition.
To save you hours and days of research, I’m sharing all my findings and our experience hiking in the Dolomites in this post. This is in no way a complete Dolomites hiking guide, rather a small selection of some of the very best hiking trails in the Dolomites, just our absolute favorites.
You could spend the whole summer exploring the best places in the Dolomites, visiting the most beautiful lakes in the region, and hiking in the Dolomites admiring jaw-dropping amazing sceneries … However, if you are visiting for the first time and want to see some of the best mountain scenery, then this Dolomites hiking guide is a good place to start.
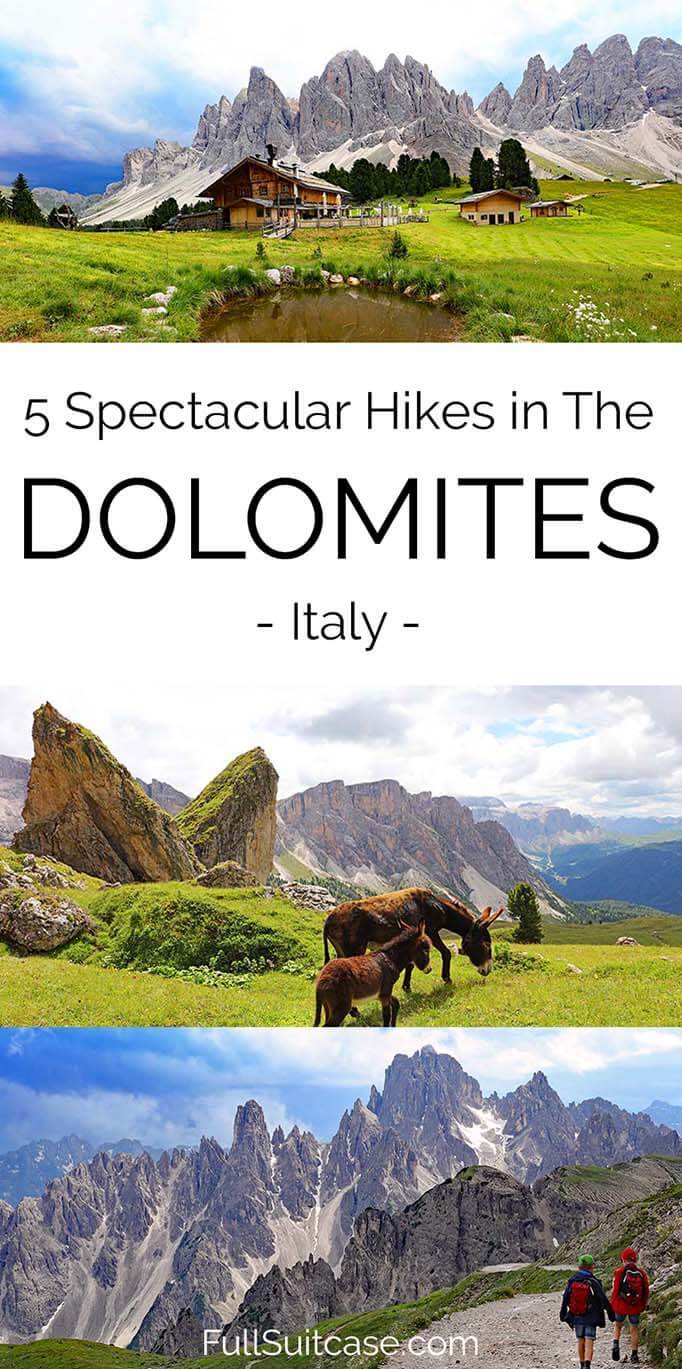
Update: We have just returned from yet another Dolomites hiking trip. After having discovered so many more amazing places in the region, it was time to update this Dolomites hiking article with two more really nice hikes that I would recommend the most. Still, I’m trying to keep this list as short as possible, listing only the nicest, most beautiful hikes in the Dolomites that are truly worth your time the most.
So originally 5, this list now contains 7 best hikes and you can’t go wrong with any of them. These hikes are not long and not too strenuous and we did them all with our kids. Take a look below!
All the hikes mentioned in this article are rather short and quite easy, except for the Rifugio Puez hike (which is quite long), and Lago di Sorapis hike (which is a bit more challenging). Still, they are both doable even with kids. Each hike offers plenty of shorter alternatives, while still giving you access to some of the most beautiful landscapes of Italian Dolomites.
I’m confident to recommend each and every single one of these walks – the mountain scenery along these Dolomites hikes is simply phenomenal. In addition, as I said, the majority of these hikes are really doable for everyone.
Good to know: Please note that this is a Dolomites hiking guide for the summer months only (June – September). While most trails will be accessible from approximately mid May till mid October, it’s advisable to check trail conditions in advance if you travel in the shoulder season.
For each hike, I included practical information, such as distance, duration, difficulty level, as well as some useful tips based on our personal experience. You will see that my selection of the most beautiful hikes in the Dolomites is quite varied, not only in terms of location and scenery but also the duration and difficulty level. So there is truly something for everyone. Find out!
TIP: At the end of this guide, I also included some useful information and practical tips for hiking in the Dolomites. You’ll also find our recommendations for the best base to stay in the region. To make your travel planning easier, I also created a map showing the starting point of each hike. You can click on the links above to jump straight to these sections or scroll down and read the entire article.
READ ALSO: Dolomites Itinerary Suggestions (for any trip from 1 to 10 days)

These are some of the VERY BEST hikes in the Dolomites:
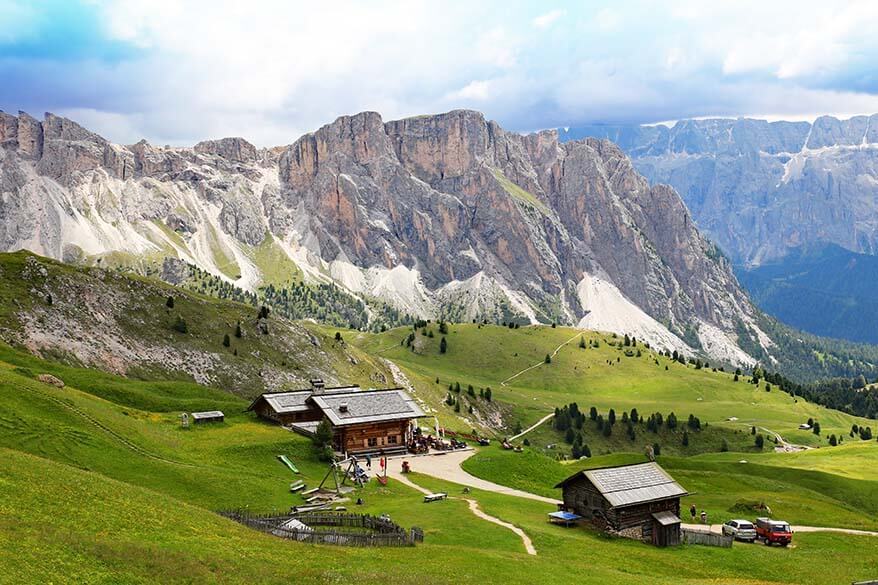
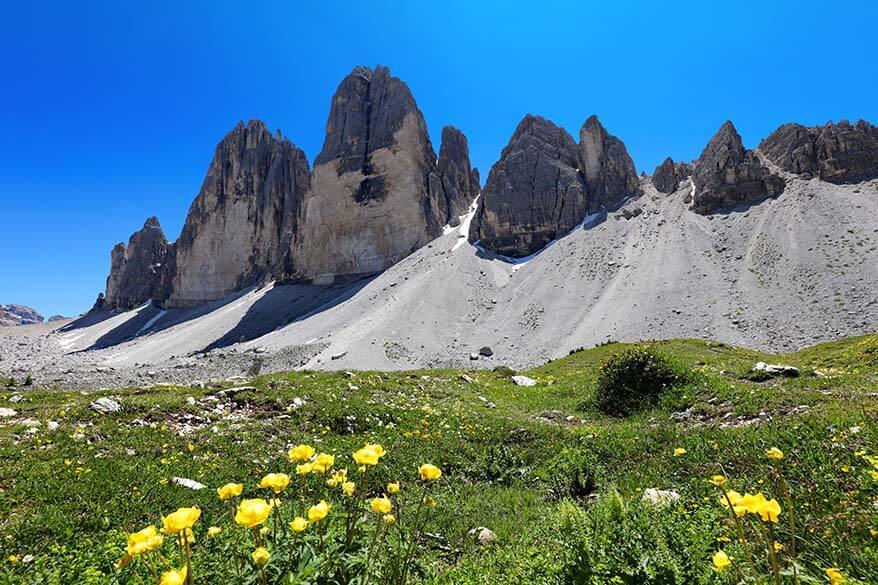
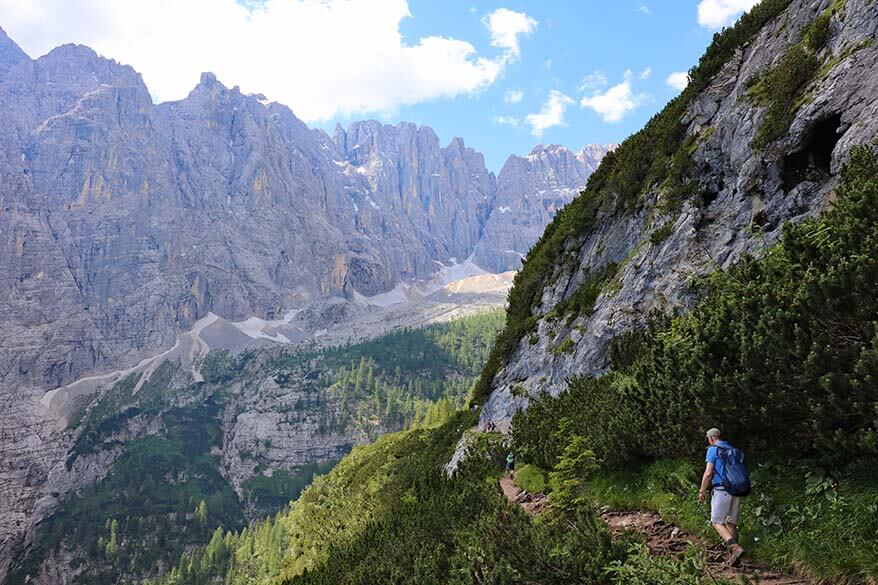
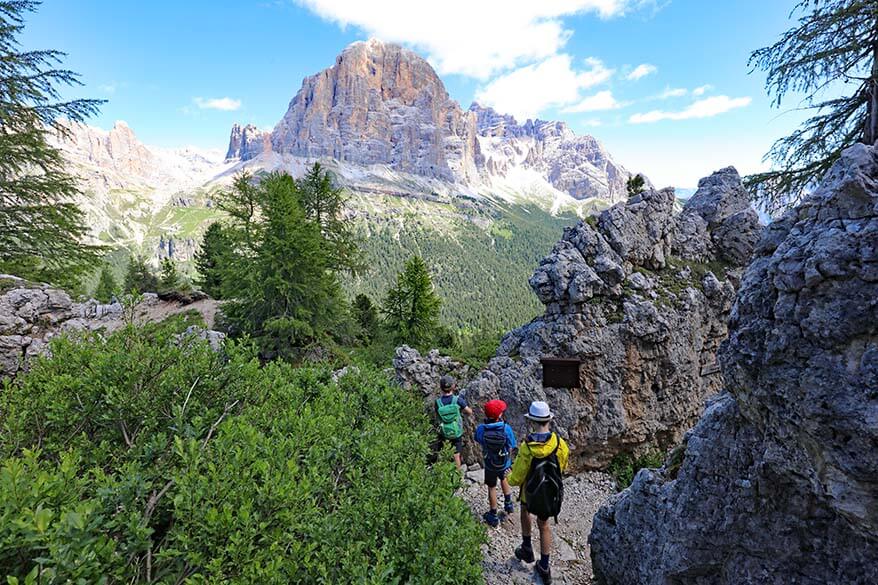
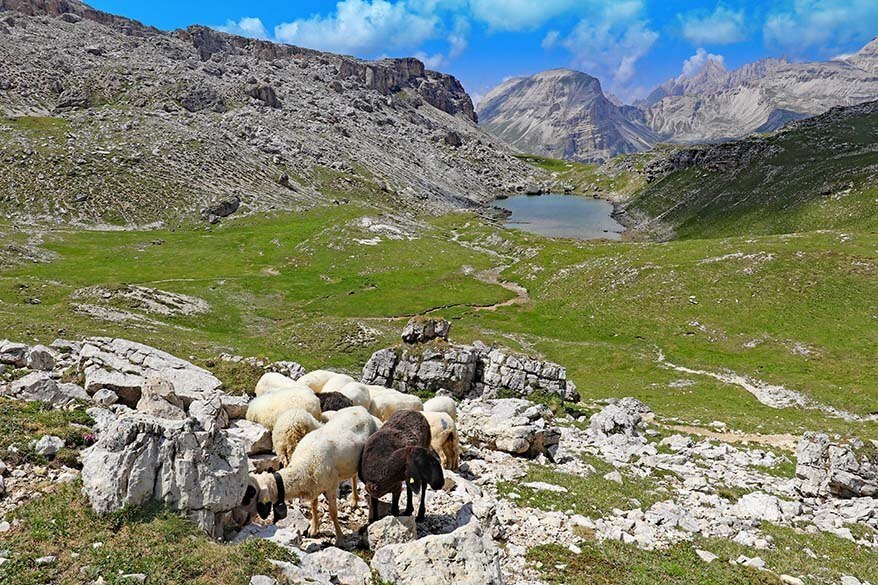
1. Adolf Munkel Trail
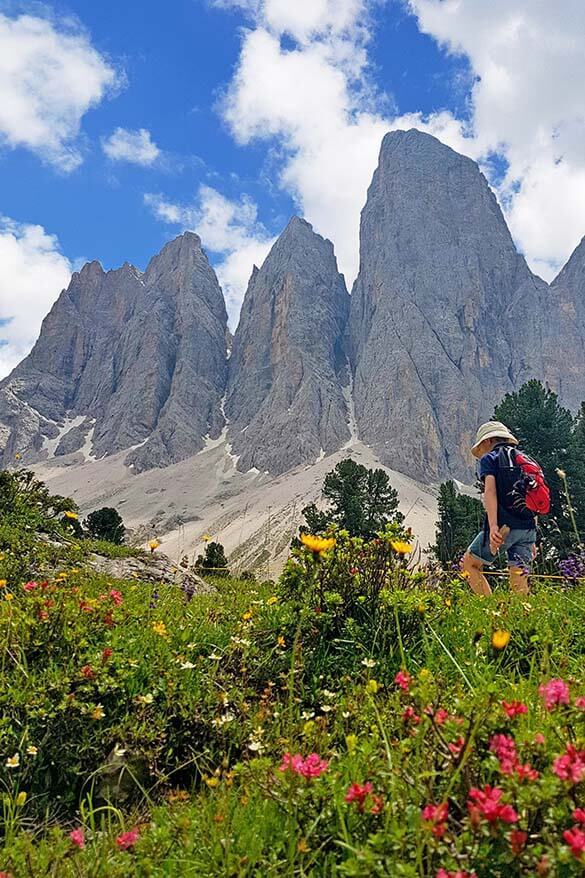
Adolf Munkel Trail in Odle – Geisler mountain group is one of the most spectacular hiking trails in the Dolomites and our family’s favourite. What makes it my number one suggestion for Dolomites hiking is that you get to see the most incredible scenery without too much effort.
Adolf Munkel trail is a circular hike that starts at the parking area in Zans in Val di Funes/Villnöss Valley. You will be hiking in the Nature Park Puez-Odle in the Odle Masssif, part of the UNESCO world heritage site. Zanser Alm parking area is large, but fills up quickly, so it’s best to arrive early in the morning, or late in the afternoon.
The starting point of this hike is trail no.6 in the direction of Tschantschenon. It begins at the big building (Jausenstation Info Zans), at the main entrance of the car parking area. Follow the wide gravel road direction southeast, where you’ll soon pass three little restaurants/b&b’s. The rest of the trail is really well indicated, so no need to worry about getting lost.
The first part of this hike is a bit boring, it goes uphill, and there is little shade, so it can get hot in summer. But don’t let this discourage you. Soon you will reach a bridge, where you turn right following the Adolf Munkel Weg, trail no. 35 towards Geisler Alm, and from there the scenery just gets better and better. Hiking here is easy and rewarding.
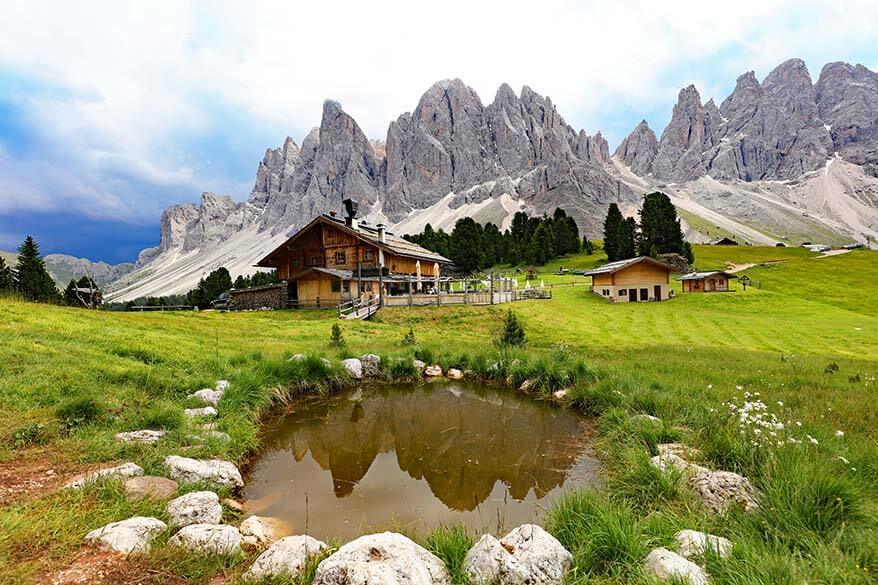
As you follow the Adolf Munkel trail, you’ll come to a point to the intersection with the trail no.36A, in the direction of Geisler Alm – the picturesque Geislerhütte. You can either turn here, or continue a bit further along trail no.35 till you reach the next intersection. Follow trail no.36 to Gschnagenhardtalm alpine pasture where you’ll find a nice mountain hut. From here you follow trail no. 36 further and also end up at the Geisler Alm.
There were really bad thunderstorms in this area the day when we visited, so we opted for what looked the safer option at that moment and headed straight to Geisler Alm. However, the small detour to Gschnagenhardtalm is really worth it, so if the weather is good, I recommend that you take this route and see both the mountain huts in the most spectacular setting.
Geisler Alm is a beautiful place to relax and spend an hour or two. There is a restaurant here, a big playground for the children, and a really nice outdoor seating area that will make you want to linger a bit longer than you planned. You can have lunch or at least some Tyrolean apple strudel and absorb some of the best views of the Dolomites.
When and if you can finally force yourself to leave, continue along trail no.36 in the direction of Dussler Alm, and from there back to the car parking at Zanser Alm.
- Duration: 3 hrs.
- Distance: 9 km.
- Difficulty: Easy-moderate.
- Facilities: There are several mountain huts/ restaurants along this trail.
- Accessible by public transport: Yes. Take a bus in Chiusa in the direction of Zanserhütte.
- Parking fee: Yes. Also, when Zans parking is full, access by car may only be possible with an online reservation.
Alternative trails:
- You can just take trail no. 36 from the parking area straight to Geisler Alm. Hiking isn’t very spectacular here and the biggest part goes through the forest, but it’s the quickest way to get to the mountain huts where you have the best scenery of the whole trail.
- You can also take a longer version of the Adolf Munkel Trail (13km, 4,5hrs in total). Starting point is the same as above, but instead of turning off on trail no.36, you stay on trail no. 35 to Malga Brogles. From there you follow trail no. 28 and then trails no.34, 33B, and 33 back to the parking area. Alternatively, follow trail no.28 and then no.29 back to the trail no.35 in the direction that you came from, and then hike to the above-mentioned mountain huts, before walking back to the parking.
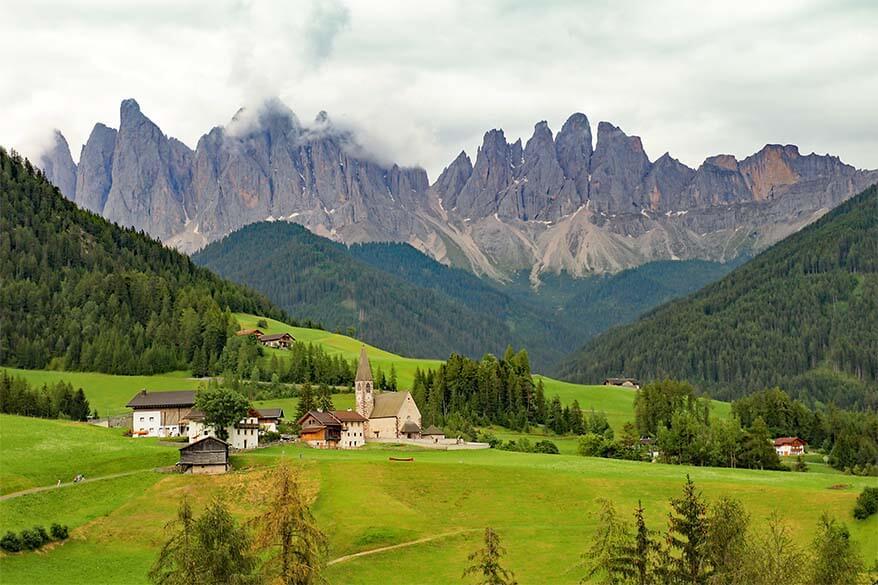
TIP: Don’t miss one of the most iconic photography spots of the Dolomites, that of the church of St. Magdalena. It is also located in Villnöss valley and is just a short stop that you can easily do after completing the Adolf Munkel Trail hike.
There are several ways to get there. You can either hike to the viewpoint on the panorama path Villnöss from St. Peter village (6km, 2hr hike), walk there from St. Magdalena village itself (it’s quite steep as the road goes uphill), or drive the narrow village road to the viewpoint.
Driving is, of course, the easiest option, but keep in mind that the road here is really narrow. Furthermore, there are quite some tourists walking on the road and you can’t actually park the car here as the road is too narrow. So if you are fit enough to walk, just go there on foot. I indicated the location of this viewpoint on the map below.
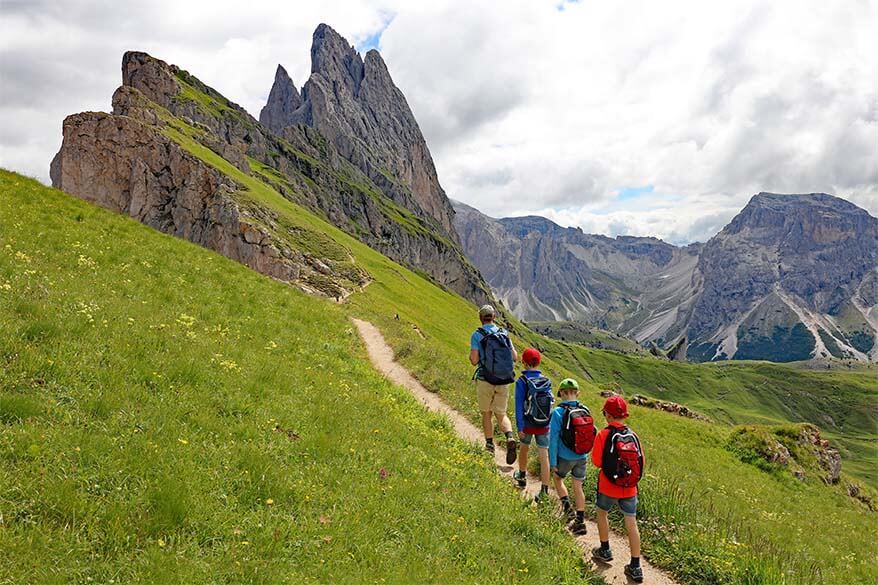
2. Seceda – Pieralongia – (optional) Col Raiser
If you are looking for another Dolomite hiking trail with amazing views and little effort, then I cannot recommend the Seceda – Pieralongia area highly enough!
There are several hiking options here, and there is no way I can describe them all. But if you are looking for shorter walks in the Dolomites that offer beautiful scenery, this area is as good as it gets.
We were by car and therefore opted for a circular Pieralongia hike that starts and ends at Seceda cable car station in Ortisei. Alternatively, you can start the hike at Seceda, but end it at Col Raiser, from where you can take the cable car down to St. Cristina. This option requires a bit more hiking, but it’s pretty much all downhill
If I were to go back here, I’d probably go with this second option because you see more diverse scenery. It’s a bit more complicated when it comes to logistics. But all the towns of Val Gardena are well connected by bus (and it’s free with a guest card -more info here), so this would be a really nice option if you are staying nearby. That way you can leave your car at the hotel for the day.
No matter which option you choose, probably the nicest part of this hike is between Seceda and Pieralongia.
As you exit the cable car at Seceda, you’ll see the distinct shape of Seceda Mountain in the distance. Your destination, Pieralongia, is in the same direction. Just follow hiking trail no. 1 and then 2B and you’ll soon see the peculiar sharp long rocks of Pieralongia.

The scenery here is amazing, but if you want a good view in the other direction as well, you may take a short turn off to the left along hiking trail no. 6. Here you have a nice view of the Northern part of the Puez-Odle Nature Park. After this scenic detour, continue further along 2B in the direction of Pieralongia.
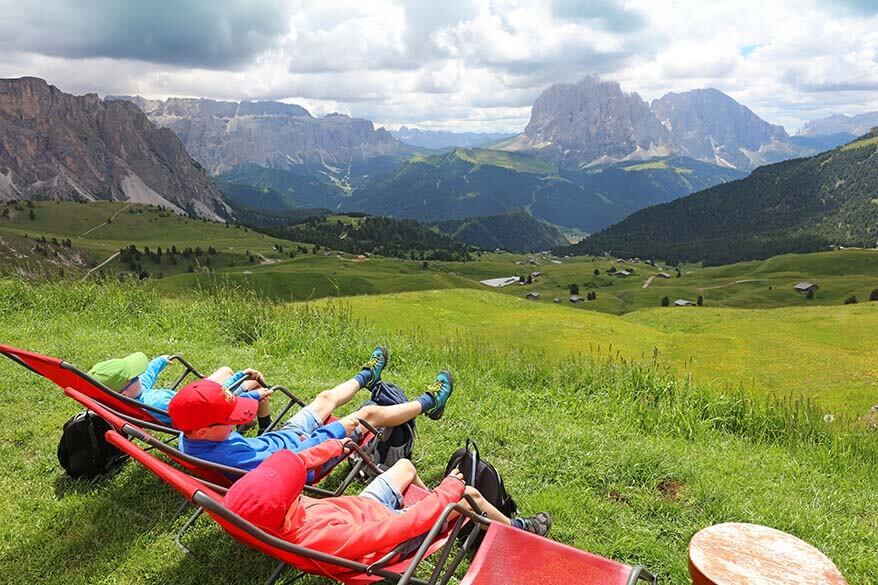
It took us about 45 minutes to reach the Pieralongia Hut, but we made lots of photo stops along the way. This is in principle just a 20-30min hike, so it’s really something for everyone. We met families with smaller children, but also older people. You can have such a relaxing day hiking here!
Malga Pieralongia Alm is one of the most authentic mountain huts we saw in the Dolomites. The surroundings are so pretty and you could easily spend an hour or even longer here. There is a restaurant, bathroom facilities, and a small playground for the children. They also have some farm animals – always fun for the kids.
If you hike a bit further past the hut, you come very close to the peculiar-shaped rocks that you saw in the distance. You might run into some donkeys here. The views are amazing and this is a really nice place to make a stop if you brought your own picnic.

At this point, we turned around and hiked back in the direction of Seceda, taking a slightly different route than the one we came on.
We hiked slightly down to Rifugio Troier – this is a bigger hut with a nice restaurant and a beautiful outdoor seating area with incredible views. Here you will find a playground and a small animal farm as well. Plenty of opportunities for the children to play and a good excuse for the adults to get a drink or try some local apple strudel.
With incredible scenery and so many mountain huts and playgrounds Seceda – Pieralongia hike is just perfect for a relaxing day in the Dolomite mountains.
- Duration: 1-3hrs (depending on playground and restaurant stops).
- Distance: 4 km.
- Difficulty: Easy.
- Facilities: There are several mountain huts/ restaurants along this trail.
- Accessible by public transport: Yes. Take a bus to Ortisei.
- Parking fee: Yes. Parking in Ortisei is limited, so public transport is often the easiest option.
- TIP: If you plan to take the Seceda cable car in summer, it’s a good idea to book your lift tickets online in advance!
Alternative trails:
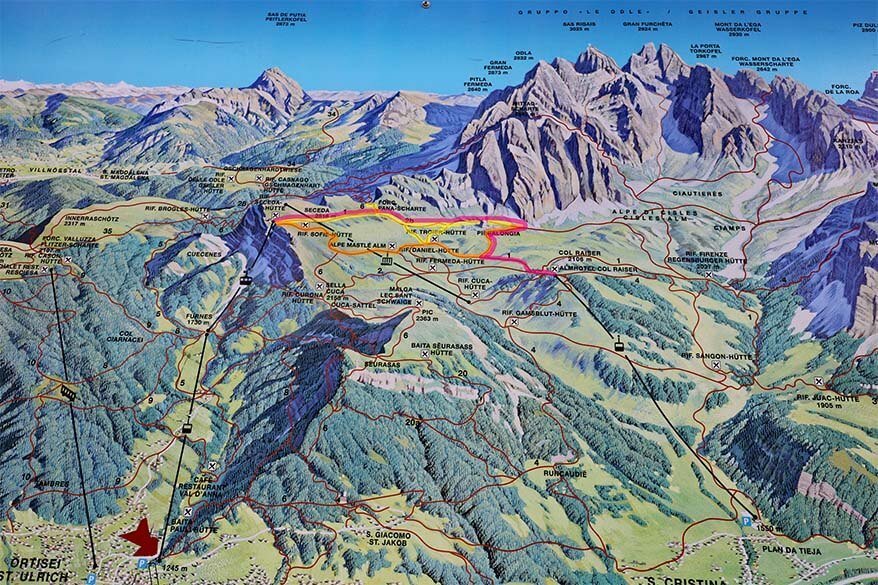
- Alternative circular trail option is to continue hiking past Pieralongia rocks till you get to the first crossing. Then turn right in the direction of Fermeda Hut, then right again, and follow the lower trail back to Seceda. This is the longest and the more strenuous option, since you’ll have to walk back up to Seceda. This is the orange line on the map below.
- Seceda to Col Raiser. Continue past Pieralongia rocks, turn right in the direction of Fermeda Hut, then go left at the next turn, as you join part of Torri di Fermeda hike. Col Raiser is well indicated. At Col Raiser you can take a cable car down to St. Cristina. About 2km, count at least 2hrs hiking time + stops. This is the pink line on the map.
- As you can see on the map, there are many other options to explore the area around Seceda. If you have strong knees, you could even hike back down all the way to either Ortisei or St. Cristina.
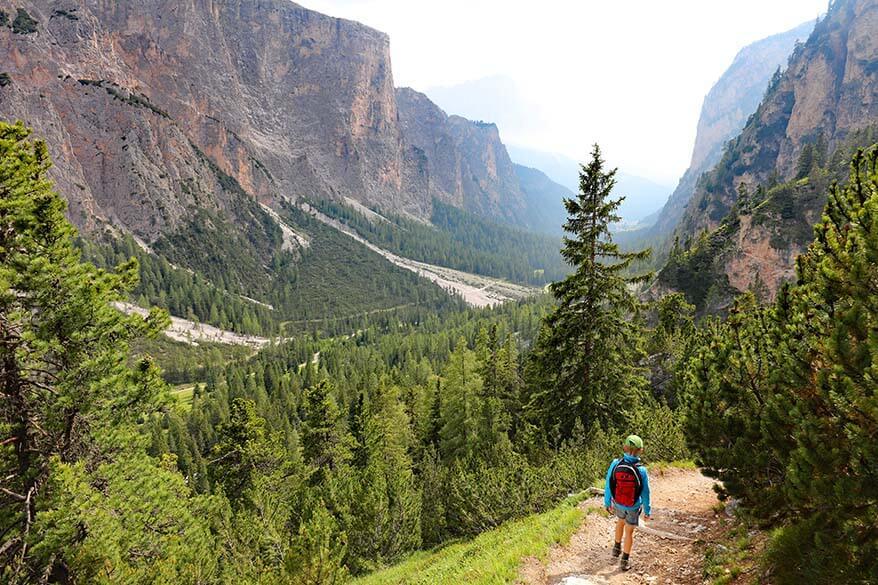
3. Tre Cime di Lavaredo (Drei Zinnen)
Tre Cime di Lavaredo hike (Drei Zinnen in German or Three Peaks in English) is the one you’ll find in pretty much all Dolomites hiking guides. It’s often mentioned in all kinds of publications as one of the absolute best hikes in the Dolomites.
I have mixed feelings about this hike, however, and mainly due to its popularity and the crowds in summer. The scenery is AMAZING, but very barren compared to the other places in the Dolomites. The first time we hiked here, we couldn’t complete the hike because of the weather and we preferred the greener hikes in the Puez-Odle Nature Park, the Val Gardena side of the Dolomites. However, we gave this hike a second chance a few years later and we loved it.
It’s also quite a long way to get here, especially if you are coming from Val Gardena, as we were. I don’t recommend driving here for a day – you better stay in Cortina or Misurina for exploring this area. That’s what we did the second time we visited – we stayed in Cortina, about 22km/ 40 minutes drive from here.
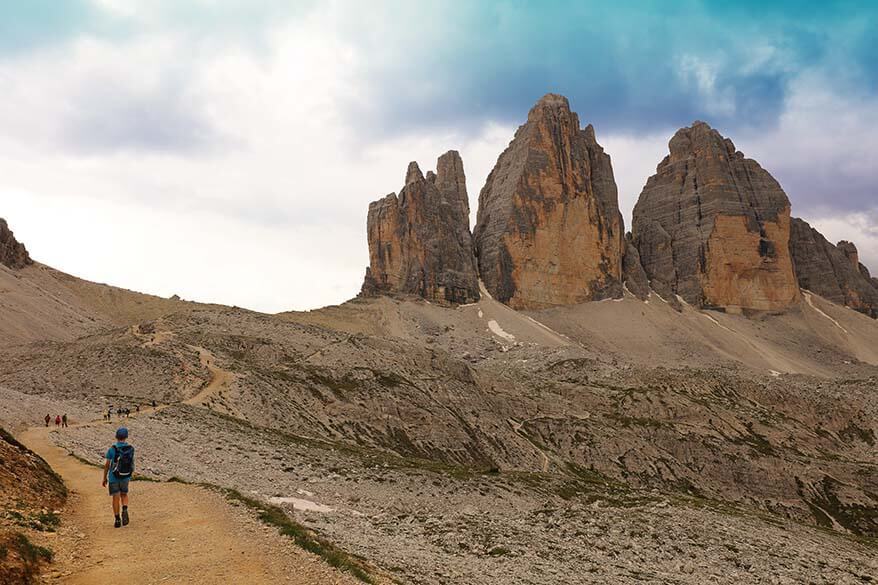
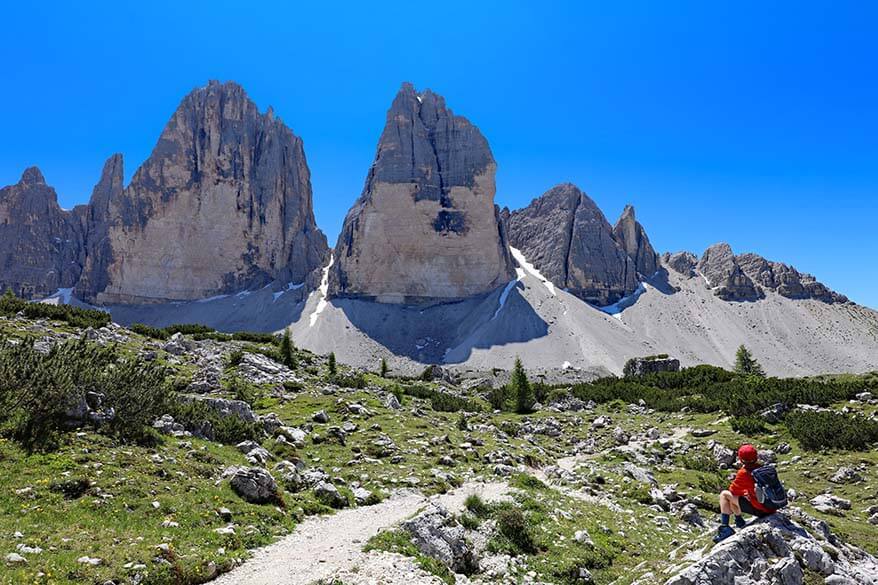
Tre Cime di Lavaredo, the symbol of the Dolomite UNESCO World Heritage site, is popular for a reason. Not only are the three peaks truly impressive, but you can also enjoy some of the best far views in the Dolomites (see the featured image as well). It’s truly beautiful and well worth a visit.
The good news is that you don’t have to hike the entire 9.5-10 km loop in order to enjoy the views. The negative side is the crowds, as Tre Cime is a popular place for bus tours. We visited the area in the first week of July, on a rainy day that ended with thunderstorms and lightning… Still, it was by far the busiest hike we did in the Dolomites. If you can, come off-season (September is said to be great), or as a minimum, avoid summer weekends.
The second time we came here, a few years after the first trip, it was a sunny day in July. The crowds were insane in the beginning, but it got much quieter the further we hiked. We also did a few amazing detours that we didn’t know about the first time and they made this trail so much more special.
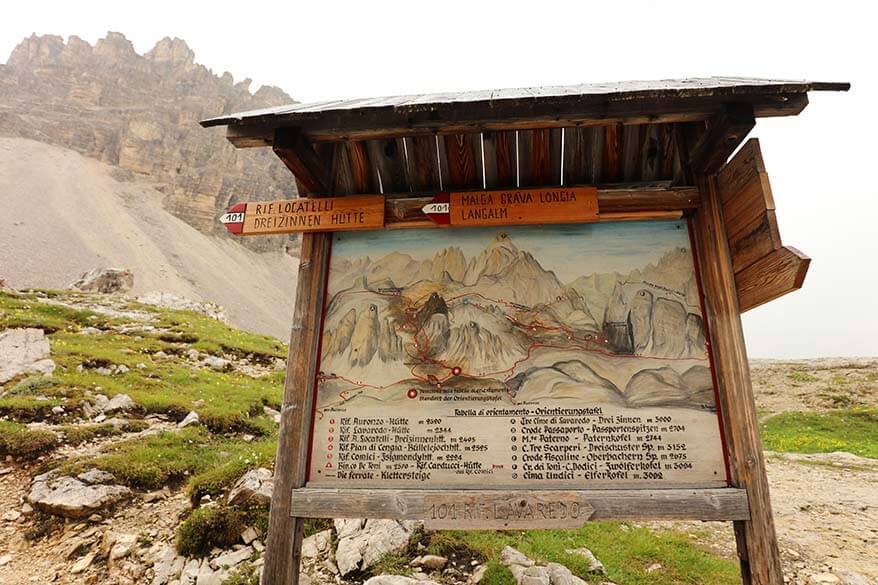
Tre Cime di Lavaredo loop trail starts at Rifugio Auronzo. Just walk past the restaurant and to the left, and you’ll see the wide gravel road leading in the direction of Rifugio Lavaredo. About halfway there is a small chapel, Cappella degli Alpini.
This first part of the hike is flat and very easy and is therefore really busy. Families with young children even walk here with the strollers. Rifugio Auronzo – Rifugio Lavaredo walk is 1.7 km one way and takes about 30 minutes.
At Rifugio Lavaredo the trail gets a bit tougher and steeper as you walk in the direction of Forcella Lavaredo, one of the best viewpoints of this area. Count about 20 minutes to get here from Rifugio Lavaredo (+-1 km). Most people and especially groups don’t go further than this point.
At this point, the trail gets easier as it remains relatively flat, as you walk in the direction of Rifugio Locatelli (Dreizinnenhütte). This is actually a wide gravel road used for supplies to the hut. This part of the hike is about 2 km and will take approximately 40 min.
If you already walked this far, you’re almost halfway and can just as well continue and do the whole loop. The next stop is Malga Langalm (almost 3km, 1h20), from there it’s just a short hike back to Rifugio Auronzo (2.5km, 40min). But it’s here that most people turn off and miss some of the best scenery of this hike.
The first time we hiked here, somewhere in between Forcella Lavaredo and Rifugio Locatelli it got dark, started to rain, and we had to turn back. In a matter of minutes, the gravel road turned into a river, lightning got stronger and thunder – really loud, and we had to literally run for shelter.
With over 2,400m (7,800 ft) height and well above the tree line, this is a very dangerous area to be when there is lightning. We decided to wait out the storm at Rifugio Lavaredo and had a very long lunch here till the lightning stopped.
The second time we chose the best weather day to hike at Tre Cime and our experience was totally different. Now that we did this entire loop (and took the time for those few short but very rewarding detours), I feel that I can give you a much better idea of what this hike is about. For that, please check our detailed article below for more information and insider tips that we didn’t know the first time.
- Duration: 3.5-5 hrs.
- Distance: 9.5-10 km.
- Difficulty: Moderate (the first part is easy).
- Facilities: There are several mountain huts/ restaurants along this trail.
- Accessible by public transport: Yes, in high season.
- Access by car: In summer, you must reserve your parking spot online in advance and pay the toll fee to drive up to Rifugio Auronzo. See our detailed guide for more information.
LEARN MORE: Tre Cime di Lavaredo Hike – Complete Guide
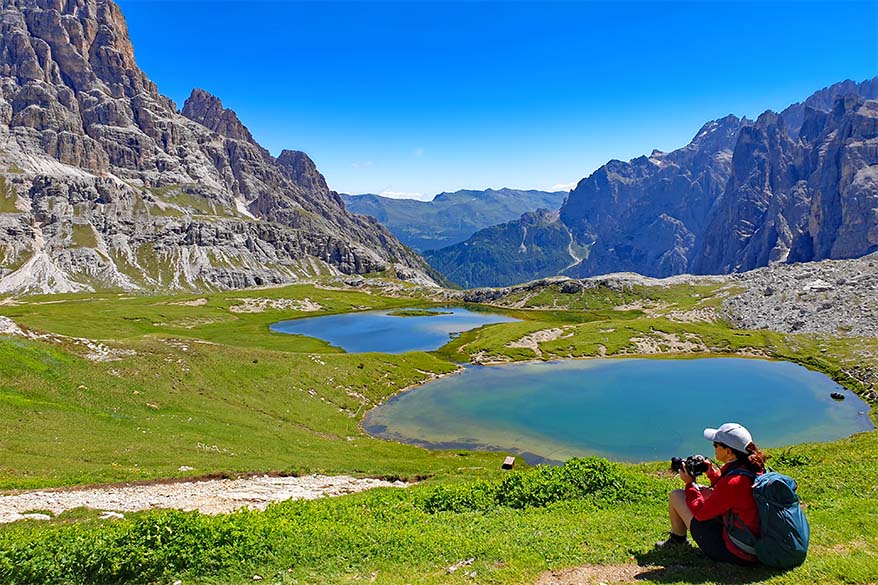
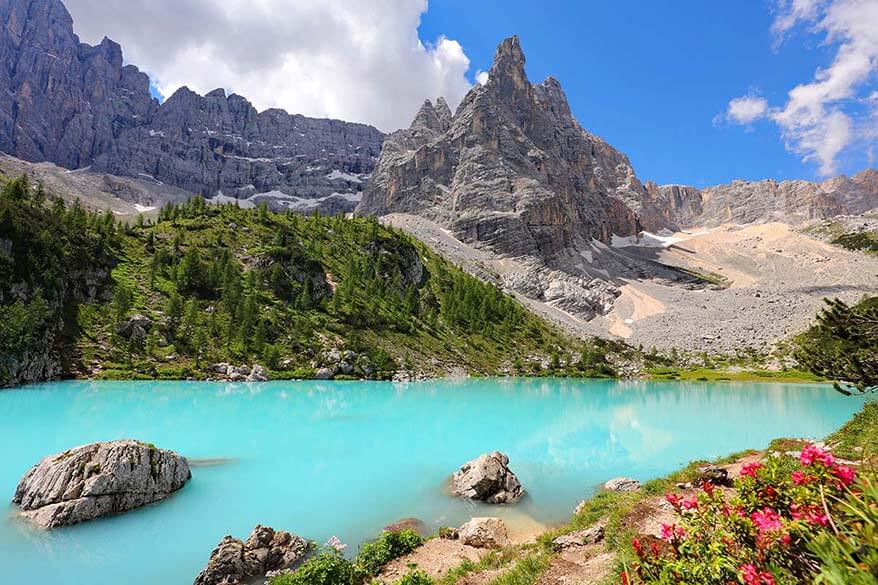
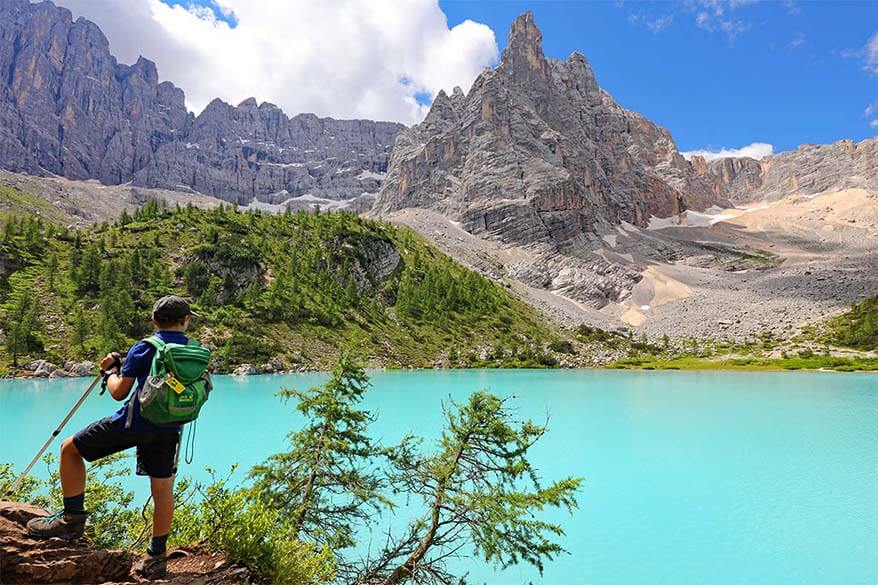
4. Lago di Sorapis
Lago di Sorapis hike is one of the two new additions to this Dolomites hiking list. We didn’t get here on our first trip, but we did this hike on our second visit to the region and this is one of the best Dolomites hikes that I would highly recommend to everyone!
Lake Sorapis is a stunning milky-blue lake that looks even more spectacular in reality than in the pictures. Yes, it’s truly that beautiful! And if you visit on a sunny day, the water is really that blue!
However, this is also one of the more challenging hikes on this list of the – mostly easy – hikes in the Dolomites. The hike is not that long – about 2 hours one way – but there are some steep sections, metal staircases, ladders, and narrow passages where you have to use metal cables for support.
Having said all this, if you are fit, have good hiking shoes, and come here on a dry day, it’s really nothing too challenging. We did this hike with our kids, age 9-11 and we saw some younger kids on the trail too. Some people also took dogs on this hike.
Lake Sorapis has become extremely popular in recent years and it gets very busy here. Furthermore, since almost everyone opts for the same ‘easiest’ track, you have to do the same hike in two directions, meaning that you’ll always meet many people along this hike.
The best tip I can give you if you are planning to do this hike is to start as early as you can. If – and only if – the weather is exceptionally good and there’s no risk of thunderstorms, you could also come here later in the afternoon, when most hikers start to leave. Either way, you won’t be alone here.
- Duration: 4-5 hrs (2 hours each way, plus time at the lake).
- Distance: 10.5 km (but our GPS tracking app showed 12.5 km).
- Difficulty: Moderate.
- Facilities: There is a mountain hut 3 minutes walk from the lake.
- Accessible by public transport: Yes. Take a bus to Passo Tre Croci.
For more practical information, alternative trails, and useful tips, please see our detailed guide to this hike via the link below.
LEARN MORE: Lake Sorapis Hike
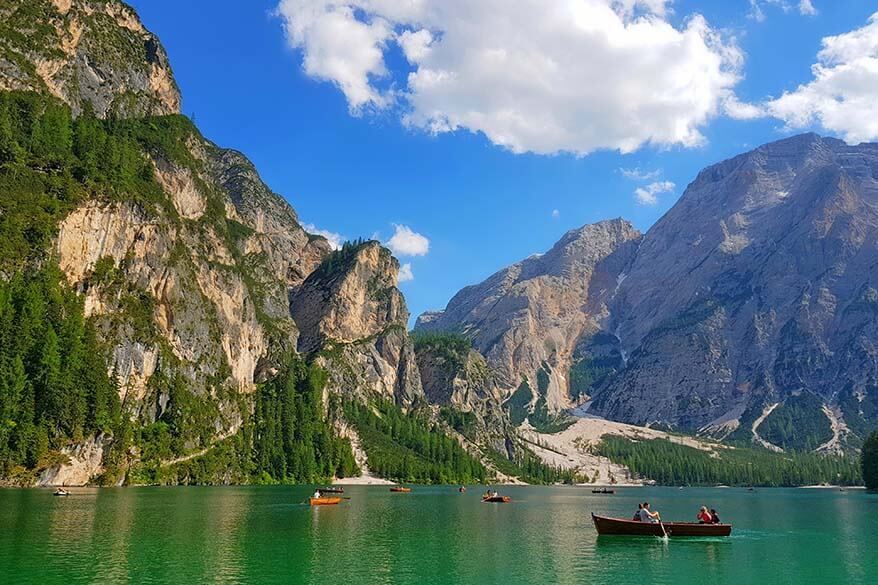
5. Lago di Braies (Pragser Wildsee)
Lago di Braies, also known as Pragser Wildsee, is without a doubt one of the most beautiful mountain lakes in Europe, maybe even in the world. It reminded us of Lake Louise in Canada. I have to say that the Dolomites are just as beautiful as the Canadian Rockies, maybe even more impressive in a way, as there is more variety in the landscape.
Lago di Braies is another extremely popular tourist destination, but its beauty will make you forget the crowds. Try not to look at the huge parking lot and a big hotel blocking the view, and head straight to the lake. As you arrive at the picturesque wooden boathouse, you’ll be struck by the pristine beauty of this place.
You don’t have to hike much in order to appreciate the scenery of Lago di Braies, but hiking to the end of the lake is the best way to escape the biggest crowds. The circular hike is quite easy and can easily be done with children. Note that the hike on the left side of the lake is a bit steeper and rocky, the right one – completely flat. If you are visiting with young kids and have a stroller, just stay on the right side of the lake.
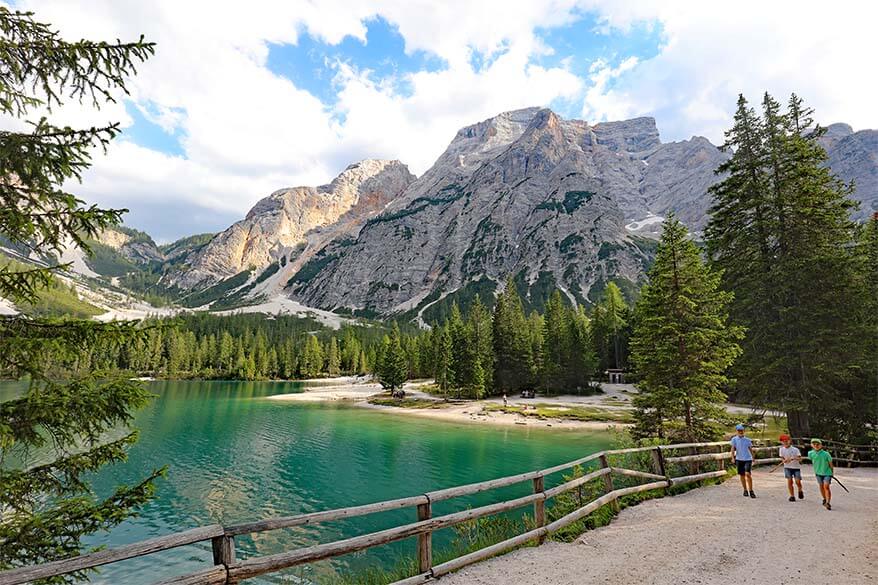
At the back end of the lake, you’ll find several beaches. It’s a good place for a dip in the water, but keep in mind that the water is freezing cold. Our crazy kids went swimming here, so it’s definitely possible if you feel like cooling down a bit after the walk.
Lago di Braies hike is by far the easiest of all the Dolomites hikes described here, and the views are not to be missed. A must-see place if you are visiting Dolomites for the first time!
- Duration: 1.5 hrs.
- Distance: 3.5 km.
- Difficulty: Easy.
- Facilities: There is a hotel and a restaurant by the lake.
- Accessible by public transport: Yes. Many organized day tours also visit here.
- Parking fee: Yes. During the busiest weeks in summer, access by car is restricted during part of the day, and you need to reserve parking or arrive outside the restricted hours. See our detailed guide for more information.
TIP: Plan to spend half a day at Lago di Braies. You can also rent a boat, which is such a great way to enjoy this beautiful lake.
LEARN MORE: Lago di Braies – complete guide
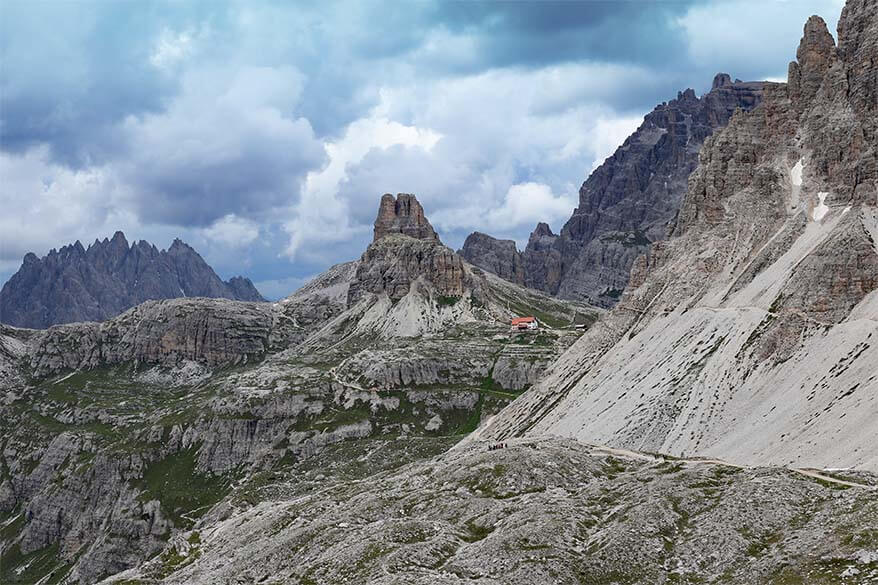
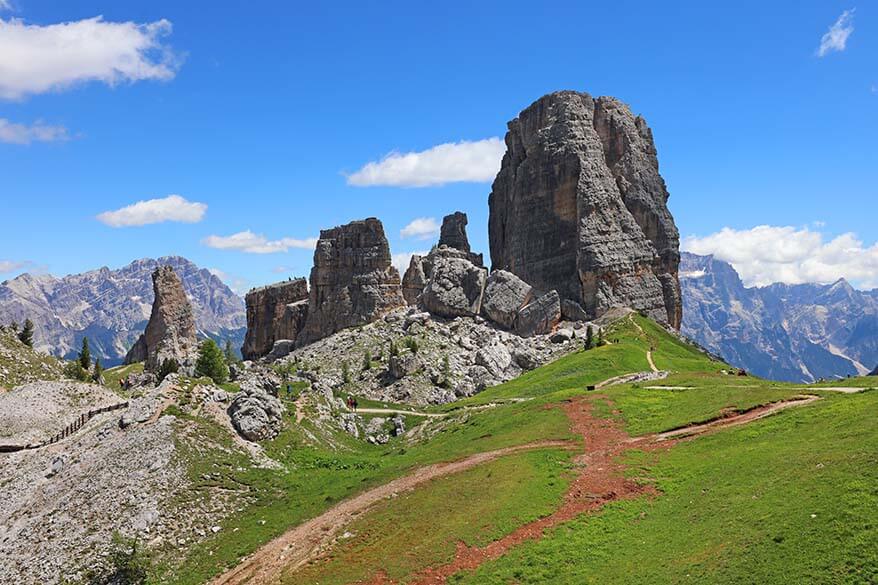
6. Cinque Torri
Cinque Torri hike is the second hike I added to this list after our repeat visit to the Dolomites. This is an easy, short hike, and the scenery is just WOW! Furthermore, you can enjoy some jaw-dropping views if you don’t hike far. Don’t miss it if you find yourself close to the Cortina d’Ampezzo or Passo Falzarego area!
This is probably one of the most rewarding of all the easy hikes in the Dolomites and I find that the pictures don’t do it justice. The views are amazing everywhere you look and the WWI sites and a (free) open-air war museum make a visit and the hike so much more special. Cinque Torri is also a great place to learn more about the Great War history in the Dolomites.
There are several hiking possibilities at Cinque Torri and many trails pass this area. But if you are looking for the very best easy option, simply opt for the Cinque Torri loop trail (Giro delle Torri). This trail takes you around the five towers, offering the most incredible views in all directions.
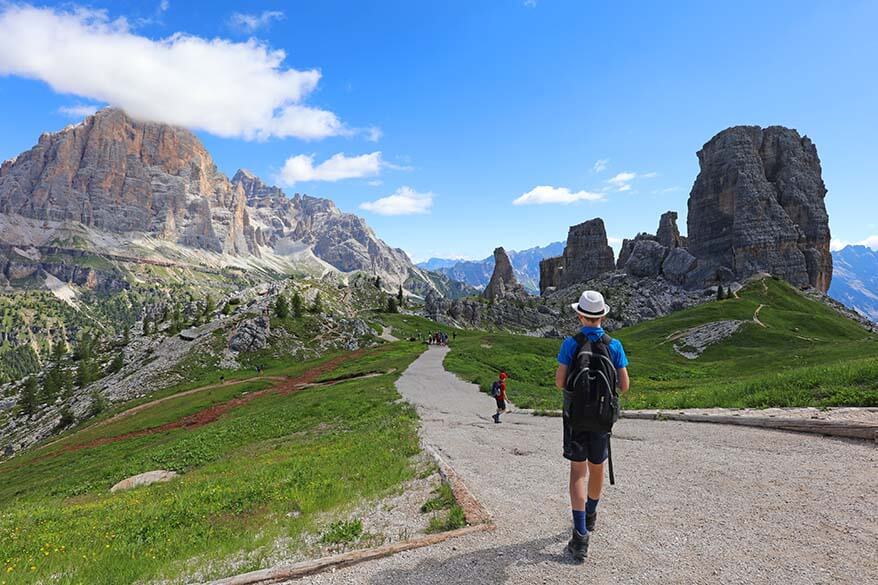
The first section of the Cinque Torri hike is wide and is something that everyone should be able to do. Most of the WWI exhibits can also be found here. If you do the entire loop, there will be some real Alpine hiking with steeper sections. However, the hike is so short that it’s really nothing to worry about.
And yes, it’s well worth going all the way around the five towers, because the views are very different on the other side.
- Duration: 1 hr.
- Distance: 2 km.
- Difficulty: Easy.
- Facilities: There are restaurants and bathrooms at Rifugio Scoiattoli and Rifugio 5 Torri.
- Accessible by public transport: Yes. Take a bus between Cortina and Falzarego Pass.
- Access: Hiking here is free. If you prefer, you can also take the 5 Torri chairlift (operating in summer) to shorten the walk. In our detailed guide, we also share another easy way to visit without using the chairlift.
If you have more time in the Cinque Torri area, you can do a few additional hikes. See all the information and additional suggestions in our guide via the link below.
LEARN MORE: Hiking at Cinque Torri
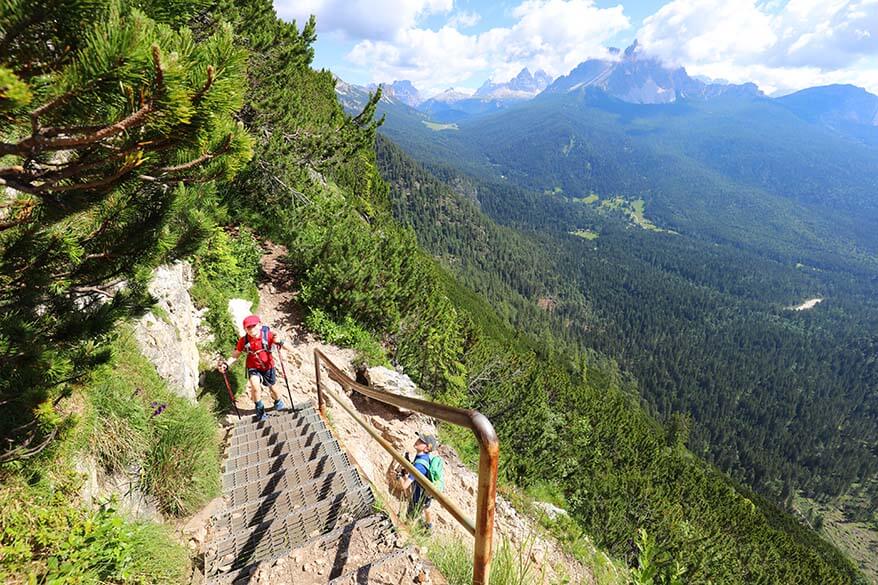
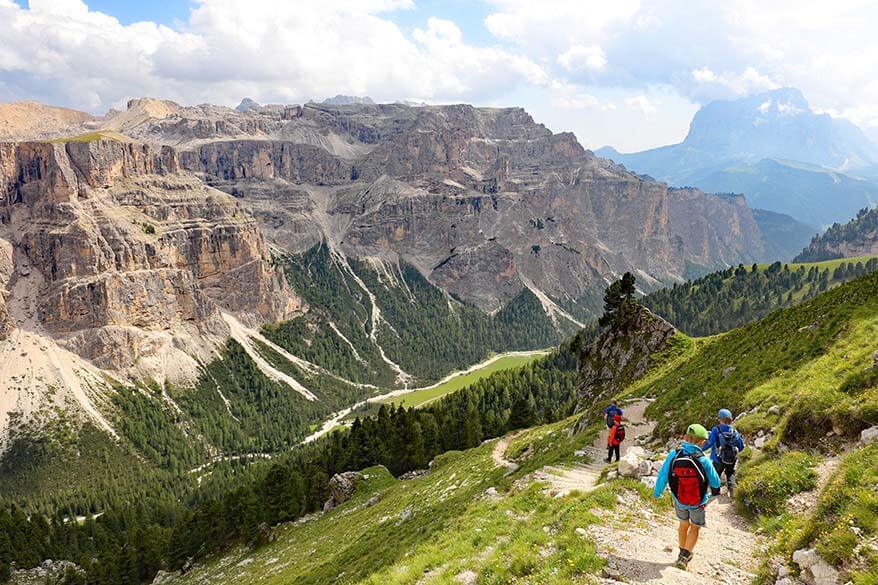
7. Selva to Rifugio Puez (Puez-Odle Altopiano Hike)
We had really high expectations from this hike as we heard several people describe it as the ultimate hiking experience in the Dolomites. I have to say that this hike from Selva to Rifugio Puez starting at Dantercepies cable car station and via Rifugio Jimmy is by far the most diverse day hike you can probably do in the Dolomites, but it’s also the most challenging hike we have ever done.
By no means is this an easy hike and don’t believe those websites that tell you it can be done in 5-6 hours. Not if you are a recreational hiker who actually wants to enjoy the scenery, take some pictures, and stop for a picnic along the way.
Taking into account that you first need to take a cable car to the starting point of this hike, stop to rest and eat, and get back to your starting point in Selva, you should count 7-9 hours for this hike. It took us about 8 hours hiking, more if we add the walk back to our hotel in Selva. Every time we talk back about this hike, we all refer to it as ‘the hike that would never end’.
The hike starts out very promisingly with truly amazing views at Dantercepies cable car station. The first part of the trail to Rifugio Jimmy is easy and enjoyable and takes just 15-20 min. Here you are facing the first real challenge – a steep climb to Forcella Cier along the hiking trail no.2. The views are great, but so is the effort. The climb will probably take at least half an hour and it’s really tough. Don’t forget to enjoy the views along the way – after all that’s what you’re here for, and not for the race.
When you reach the top and head into the mountains, the scenery changes completely. It’s a rocky terrain with no vegetation and even in summer, you’ll still find quite some snow here.
There are two viewpoints along Jeuf de Cir area, both also offering a chance to turn off left and head back down to Selva along the trail no.12. By this point, you probably hiked for 2 hours and you think, based on what you read, that you’re halfway. You’re not! If you feel really tired by this point, I’d really consider going back to the village from here, as this is the last safe option to go down. The next safe trail downwards is at the Puez Hut, another 1,5-2 hours hiking from here.
It’s really difficult to get excited about this part of the trail. The scenery isn’t all that special, there is no shade, and you feel like there will never be an end to this hike. The only nicer place along the way is Lago di Crespeina, but by now you realize that you can’t afford to linger much longer if you want to make it back to the village before dark. No worries, you think, there is another trail indicated on the map that will get you down to the valley quick…
However, what you find at Forcella de Ciampac is a sheer wall of rocks and loose stones, by no means a hiking trail. If you are not tired of your life, do not attempt to hike down here. We tried just a small part and it was the most frightening hiking experience ever. We had no choice but to scramble back up and continue our hike all the way to Puez mountain hut, as initially planned.
After 4.5 hours of serious hiking, we finally reached Rifugio Puez (Puez Hütte) at 2,475 m. Note that this is not the end of the hike, as you still have to get back down to the valley, some 1.000 m below.
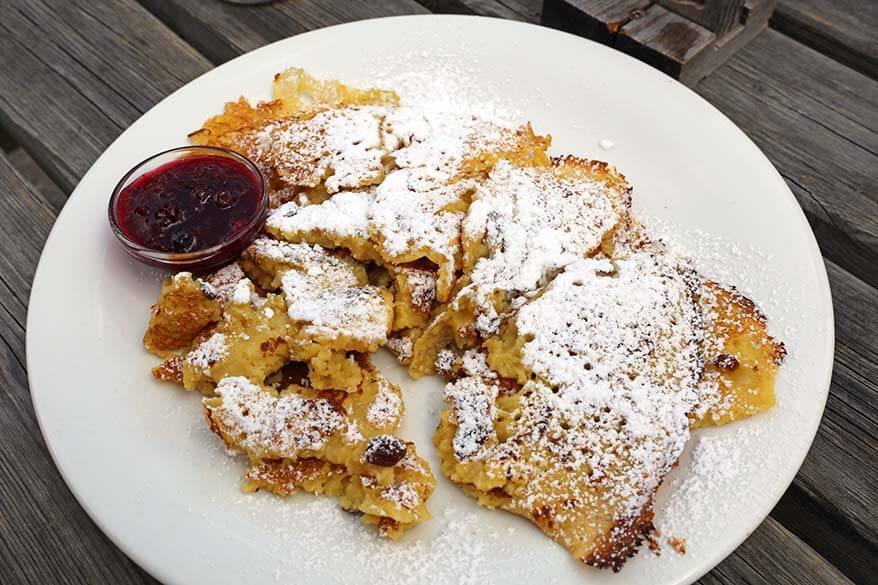
Since this last stretch takes at least another 2 hours (it took us 2.5 hours and we were walking fast), we decided to take a well-deserved break. Luckily, there is a restaurant at Puez hut and I can really recommend their Kaiserschmarrn – traditional shredded pancakes that are very popular in Northern Italy and also in Austria.
Once again, we looked at the map and were thinking of taking the most logical route back. Trail no. 14 looked like the best way to get to the valley.
Luckily, we asked the waitress at the restaurant and from her reaction we understood that this trail is really steep and not that impressive.
Instead, she recommended we take the slightly longer, but supposedly more beautiful trail no. 16 down from Puez to Selva. I feel so grateful for her advice, as this part of the hike was so spectacular that it saved the whole day for us.
Alternative trails:
Since the nicest part of this Selva – Rifugio Puez hike is at the beginning – the area around Jimmy Hut, and then again at the end between Puez Hut and Selva, it would be possible to split this hike into two separate hikes and still see the best scenery.
On the other hand, the 1km vertical climb from Selva to Puez would be really exhausting, so it’s not for everyone either.
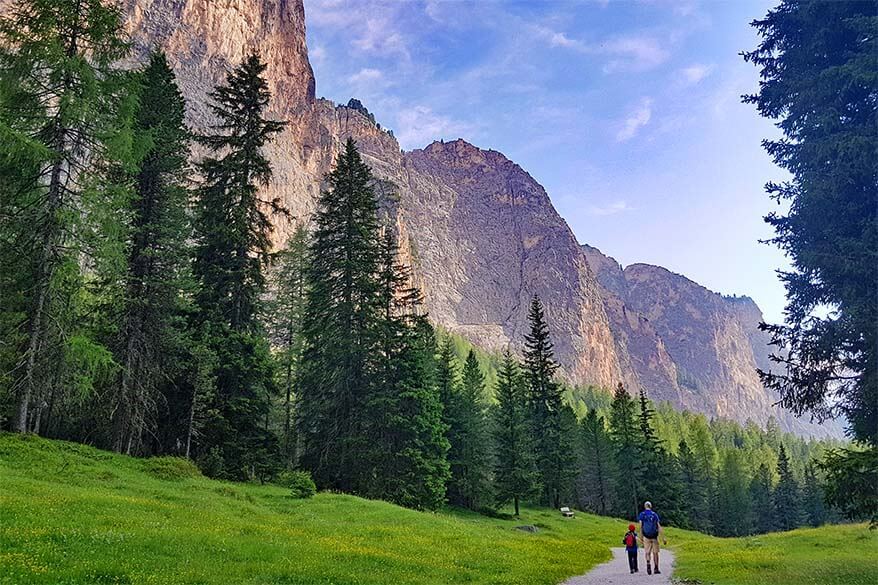
However, even if you just hike a small part of this trail into the mountain valley at the Vallunga hiking area in Selva, it is also really worth it as the views are amazing. This part of the hike is flat and can even be done by bike or with a stroller.
Would I recommend this hike from Selva to Puez Hut? If you travel well prepared, know what to expect, and count the whole day for this hike, then yes, it’s worth it.
If, on the other hand, you are looking for nice views and little effort, then you better consider doing just one part of this hike.
- Duration: 6-7 hrs (+stops, count at least 8 hours if you want to enjoy it).
- Distance: Some sources say it’s 14 km, some – 16 km, the others – 22 km. We didn’t track the distance, but I can tell you it felt closer to 20 than to 14.
- Difficulty: Moderate, with some easy and some hard parts.
- Facilities: There are facilities at Rifugio Jimmy and Rifugio Puez. Nothing in between.
- Cable car: This hike starts at the Dantercepies cable car. Check the operating schedule in advance, especially if traveling in early or late summer.
- Accessible by public transport: Yes.
- Parking fee: Yes. If starting in Selva, paid parking is available in the village.

Map of the Best Hikes in the Dolomites
As promised, here is the map indicating the starting point of each hike mentioned in this post. I also indicated parking areas where you can leave your car for each hike.
You can click on the map or zoom it in and out. For the index, click on the little arrow on the top left corner.
How to use this map: Use your computer mouse (or fingers) to zoom in or out. Click on the icons to get more information about each place. Click the arrow on the top left corner for the index. Click the star next to the map’s title to add it to your Google Maps account. To view the saved map on your smartphone or PC, open Google Maps, click the menu and go to ‘Your Places’/’Maps’. If you want to print the map or see it in a bigger window, click on ‘View larger map’ in the top right corner.
Practical Tips for Hiking in the Dolomites
- Best time to hike in the Dolomites is June through September. If you can, avoid the peak season, July and August.
- Plan to spend at least a week in this beautiful area – there is so much to see!
- Parking fees and cable car rides are quite expensive. You can save money by making use of guest cards offered by most hotels in the region. They usually include free public transport and give discounts on cable car rides. If you are staying in one area for at least 3 days, it might be worthwhile to buy a pass issued by a local tourism board (e.g. Val Gardena Pass or Cortina Card). If you are planning on taking at least 2 cable cars a day, it can save you quite a lot of money.
- Travel well prepared: always carry plenty of water, snacks, sun protection, as well as rain gear. We always pack a good sunscreen spray and a backpack rain cover – and sometimes we use both on the same day.
- Sturdy hiking boots are a must for most hikes (we love our Lowa Renegade GTX boots). Light hiking shoes (like these) can be sufficient for easier hikes. I also recommend good trekking poles, and not only for those with weak knees. We use our hiking poles on most hikes in the Dolomites.
- Afternoon storms are very common in the Dolomites, so start your hikes early. The weather can be very different in different places, so it’s best to consult websites that offer a very local forecast. We use this website (they also have an app) most of the time, and the forecast is usually pretty accurate.
- Always carry a mobile phone (and a power bank!) with you.
- Buy a good hiking map of the area or, as a minimum, take a smartphone picture of the hiking map of the area before you start. I recommend this Tabacco map for the Cortina area (Lago Sorapis, Tre Cime) or this Tabacco map for the Val Gardena area (Seceda, Adolf Munkel Trail, Rifugio Puez).
- If you are looking for more suggestions for the best shorter hikes in the Dolomites, you may want to check this great guidebook that features 50 different walks.
- Don’t overdo it. Better do one hike and truly enjoy it rather than try to see it all in too little time. Take your time to explore the little villages, mountain passes, and enjoy your time in the Dolomites!
Where to Stay for Dolomites Hiking Vacation
The roads are really steep and narrow in the Dolomites, and there are many mountain passes you have to negotiate, pretty much everywhere you go. On top of that, you have to share the roads with hundreds of bicycles and busses, and there are lots of road works in summer as well. Therefore, staying in just one place and driving up and down to different areas in the Dolomites will eat up too much of your time.
After thorough research and based on our experience, I recommend two areas that can be best used as a base for hiking in the Dolomites: Val Gardena (the towns of Selva di Val Gardena, St. Cristina, or Ortisei) and Cortina d’Ampezzo.
The first time we visited the Dolomites, we stayed in Selva di Val Gardena and it was a great home base for exploring the Val Gardena area, but really much too far for the hiking trails around Cortina. See our Val Gardena accommodation guide for this area.
On our second trip in the Dolomites, we spent a week in Cortina d’Ampezzo. It’s such a beautiful area as well and a perfect base location for many of the best hikes in the Dolomites.
LEARN MORE: Best Places to Stay in the Dolomites
Val Gardena is a good place to stay for most of the Dolomites hiking trails described in this post, including Lago di Braies, but not ideal for the Tre Cime di Lavaredo hike, Lago di Sorapis, or Cinque Torri. There are so many mountain passes between Val Gardena and Cortina, and you really can’t enjoy them if you are just passing by.
The better option for exploring would be to stay at Val Gardena for a couple of days, then make your way to Cortina, stopping at the mountain passes along the way. Then spend at least 2-3 nights in Cortina, from where you can easily visit Tre Cime, Lake Sorapis, and Cinque Torri.
If you rather have a quiet vacation and just stay in one place, then make it Val Gardena. It is really well located not just for the most beautiful hikes of the Dolomites, but also if you want to drive some amazing mountain passes.
It’s also close enough to the highway, so if the weather is really bad in the Dolomites, you can easily visit Bolzano or Merano for a day. But if you absolutely want to hike at Tre Cime or Lake Sorapis, then stay in Cortina. If it rains, you can take a day trip to Venice from there, as we did.
READ ALSO: Best Things to Do in Venice
So, this is my small selection of some of the best hikes in the Dolomites. I hope that you’ll find inspiration in this post and enjoy your trip to this incredibly beautiful region.
There are, of course, many more stunning trails and amazing hikes that you can do here, as well as countless other activities and places to see. But if you are looking for truly spectacular shorter/ day hikes in the Dolomites, then I think you won’t be disappointed by any of these trails described in this article. If, however, you are looking for even more suggestions, please take a look below!
More nice hikes in the Dolomites:
- Lago Federa hike from Giau Pass – amazing hike, but quite a bit longer than others, and start/end points are not the same, which makes it more difficult to do. Thus not on our ‘best of’ list, but absolutely worth it if you have more time.
- Lago di Limides hike – such a short hike that you can easily combine it with any other place nearby.
- Lago di Dobbiaco – the nicest views don’t require any hiking, but there’s a very easy (accessible) loop around the lake that’s great for everyone, even those who normally don’t hike.
Must-see in the Dolomites:
- Best places to visit in the Italian Dolomites
- Most beautiful Dolomites lakes
- Marmolada, the Queen of the Dolomites
READ ALSO: How to Plan a Trip to the Dolomites: Itinerary Suggestions
Visiting Italy and looking for more travel recommendations? We have tons of articles for a big variety of popular destinations all over Italy. Please check our Italy travel guide and also our Italy food guide.
TIP: Save this guide for later, share it with your friends, or pin it to Pinterest so you can easily come back to it when planning your trip.
More travel guides for some of our favorite places in Italy:
- Best Places to Visit in Italy
- Best Things to Do in Rome
- Rome 2 Days Itinerary
- Best Things to Do in Florence
- Florence 1-Day Itinerary
- Best Things to Do in Venice
- Venice 3 Days Itinerary
- Best Things to Do in Milan
- Milan 1-Day Itinerary
- Best Things to Do in Naples
- Naples 1-Day Itinerary
- Best Things to Do in Ravenna
- Best Things to Do in Verona
- Best Things to Do in Siena
- Best Things to Do in Rimini
- Lake Garda
- Best Places to See in Lake Como
- Bellagio, Lake Como
- Lake Como Travel Tips
- Capri Island
- Emilia Romagna Region
- Cinque Terre
- Italian Riviera
- Amalfi Coast
- Cinque Terre vs. Amalfi Coast
- Tuscany Towns
- Trentino


Hello Jurga, thank you so much for sharing your experience with us on the beautiful Italian dolomites! I’m from Singapore and my friends and I will be heading to the dolomites in mid-August and we would like your take on the car rental situation in dolomites.
As there are a total of 4 of us with 3-4 medium luggage, we are considering to rent a bigger car to fit all our luggage in the car boot. However, we also read and noted that the roads in dolomites may be narrow and driving through these roads may be difficult. I am an experience driver but it is my first time to Italy/Dolomites so I’m not too sure what to expect. Hope to hear back from you soon!
Thank you so much!
Hi Lun, I’d say rent the car that fits your group and luggage comfortably and you’ll be fine. Yes, the roads are narrow, but there are plenty of buses, campers, and big cars safely navigating them. We have visited in our 7-seater van (Chrysler Grand Voyager/ Dodge Grand Caravan size) multiple times and had no issues. Comfort and safety above anything else.
Enjoy your trip!
Hello. Which hike in Cortina area is better for family with kids (6 and 12, well trained for hikes) in mid September-Tre Cime or Soraphis? It will be our second time in Dolomites. First time we were not lucky with weather in Cortina area for all 3 days we stay here (and lucky in Selva area where we stay after, for a week ). We did Croda hike in rain, and my husband did Tre Cime hike in heavy clouds, with older kids. This time we will stay in Ortisei for a week, and want to come to Cortina area in one of the days in good weather.
Thank you
p.s. all our hikes I planned according to your guide, thanks a lot 🙂
Hi Anna, both hikes are amazing and totally different. If the weather is great, I’d go for Tre Cime. Simply because it’s so iconic. It’s also a more relaxing hike without steep drops as at Lake Sorapis. But you really can’t go wrong with any of them.
First thank you for the great articles. I am wondering if you can recommend a couple lower altitude hikes we can do the first day. I usually take a day or two to adjust to altitudes above 7000 to 8000 feet. We are going in September for 5 days.
Hi Todd, we never had any issues with altitude in the Dolomites – it’s nothing like the mountains in Colorado or Peru. That said, if you want to start easy, head to Lago di Braies and Lago Dobbiaco first – visiting these lakes doesn’t require any hiking, and the altitude is just about 1200-1500 meters (4000-5000 ft).
Val di Funes and the Adolph Munkel Trail (#1 on our list) is also under 2000 meters (+-6500 ft) and is an easy one to start with.
Hope this helps. Have a great trip!
This is exactly what I’m looking for! We just completed the TMB in Sept and realized that we would prefer day trekking instead of hut-to-huts which was a bit tough (yes, princess here) doing 14 days on the trail.
Ha ha, I can totally relate, Karen. I rather do day hikes as well.
Glad to hear that you found this guide useful. We have tons of more information to help you plan your trip to the Dolomites on our blog – see here.
Hello. As with many other people, I want to thank you for this detailed review of hiking paths in the Dolomites area. Now we can make our plan to see many beautiful places during a reasonably short trip. Question: Are the ski lifts in this area working during the summer period?
Hi Alexander, most of the main gondolas/chairlifts work in the summer, but definitely not all. So you would have to check in advance. The gondolas that we described as part of these hikes all work in the summer season.
Have a great trip!
Just wanted to say thank you for the information! Leaving for our Dolomites trip in a few days and this has been so helpful planning.
Hi Jordyn, thank you for taking the time to leave your kind feedback. Appreciate it.
Have a great time in the Dolomites!
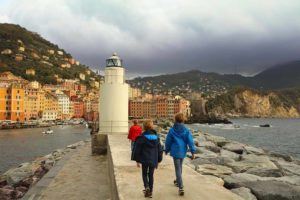
Hello. I came across ypur Dolomite article. The first picture in the article shows two people walking on a trail, but I did not find which trail this was in your article.
Which trail is the first picture in the article about the Dolomites. The picture before the article starts. Thanks.
Hi Johanna, the featured image is from the Tre Cime di Lavaredo hike. We mentioned it in the article, but I guess you missed it. You can find more information about this hike in our detailed guide to hiking Tre Cime di Lavaredo.
Hi Jurga,
I use OS maps app in the UK. I just wondered which map app you use that would be comparable.
Fantastic info by the way. 👌👌👌
Regards
Chris
Hi Chris, call me old-fashioned but I don’t use any map apps for hiking. We sometimes buy a paper map for longer hikes, but most often we simply take a picture of the trail map before we start and then follow the signs along the way.
In most places in the Dolomites, you’ll find maps at the trailhead with all the details of each hike in that area, so unless you go on some mukti-day treks, you don’t really need a map.
Enjoy your trip!
@Jurga, thanks for info. I’ll be taking paper maps also. I didn’t realise there would be sign posts as well😀😀. Thanks again 😎👍👍
Hi Jurga,
How long does trail number 36 in Adolf Munkel trail take?
Hi Rabih, we haven’t done that last bit, so I’m not 100% sure. But it shouldn’t be more than 15-20 minutes one way, so maybe 30-40 minutes in addition to the hike that is described in this article.
Your post on 7 best hiking trails in the dolomites is making my travel planning much easier. I wanted to thank you!!!! I was so intimidated by all the trail options before reading your post. I dud have one question, we are planning on going end of September – will the weather be still OK in your opinion? Or is that too late? .
Thank you!!!
Maui
Hi Maui, thanks for the kind feedback – glad to help.
As for the weather, it’s really impossible to say. In general, end of September should be ok for most of these hikes. You can never exclude the possibility that it could rain, but that is also the case in the summer. Sometimes, there is some snow at that time of the year already, but this doesn’t happen often.
All in all, you can never predict the weather in the mountains, so keep your plans somewhat flexible and adjust if needed. Very often, even if it rains in one place, it can be nice and sunny a few kilometers further.
Have a great trip!
Hi Jurga, I just wanted to say thank you for this guide. So useful. We are going in August and I now have a good plan using your suggestions. Hoping that the weather cooperates!
Hi! Thank you so much for providing all of this information – it is so helpful for a first timer. I am planning a trip to go to the Dolomites the first week of June, but I’m not sure if it will be worth it for the hiking at that time. Do you have any tips on where to stay at that time for doable hikes/if it is worth going? Thank you!
Hi Carter, it’s hard to say and a lot depends on the weather this spring, but June is usually already quite summerly. Some hikes at the highest elevations (like Tre Cime) might still have some snow or more mud, but most trails should be fine. I would think that it’s definitely worth going and you should be able to do most hikes from this list. Even at Tre Cime, maybe you could just hike a part of the trail if the weather is really nice. Just see how it all looks when you get there.
As for where to stay, take a look at this guide.
Have a great trip!
many thanks for these articles we used them on our trip to the Dolomites beginning of September, we were in a motorhome so had to do more research on parking and stopping places but we put together a series of hikes with the aid of your blogs and the weather and hikes were great and really had a wonderful time keep up the good work
Sounds like you had a great time in the Dolomites. Glad to help.
What is the best town to station ourselves at while touring Lake Como in italy.
Hi John, it really depends on your overall itinerary, how you travel (car/ public transport), in which season, and how long you are staying. We have an extensive guide on where to stay in Lake Como – take a look for more information.
In general, the towns around the middle of the lake are the best if you want to see all the ‘musts’. Take a look also at our guide to the best towns to visit in Lake Como.
If you are traveling by car or by train, you can stay in Varenna. If you rather be right in the middle of it all, Bellagio is a great option (both these towns are very busy, especially during the day). In the low season, you may want to stay in Como instead. Just last month, we visited Lake Como by car and stayed at Grand Hotel Cadenabbia and the location was excellent too (we took the boat to all the other places though – driving and especially parking is a nightmare in summer).
Hope this helps.
Hi,
I loved your post, since you’ve traveled the Dolomites so often I wondered if I could ask your opinion on our planned trip…We are supposed to be in the Dolomites in the middle of May. Is it really that bad to go at that time of year? The best I could do is bump our trip back about two weeks. That puts us there the very beginning of June. Does that two weeks make a big enough difference in the weather to change my entire trip? I truly appreciate any help you can give in making this decision!
Thank you,
Brandy
Hi Brandy, yes, there is generally quite a big difference between visiting the mountains in Europe in May or in June. I know it’s just a few weeks and a lot will depend on the weather this winter and how much snow there is. But in May, often, there is still quite a lot of snow on the trails and most cable cars are also closed. Whereas towards the end of the month – beginning of June, the cable cars are usually running again and the trails are better.
Once again, nobody can tell you how it will be next year. But if you are planning to do lots of hiking (and definitely if your hikes involve any gondolas), then I’d try to plan the trip a bit later if you can. What you can do, is try to research the cable car opening times for the places that you think you’d want to visit (most hikes don’t involve gondolas, but some do). If they already have this info, it might help you decide.
And otherwise, just make the best of what you get. There are always plenty of hikes at the lower elevations that should be perfectly fine in May.
Good luck with the planning.
Hello,
wonderful writings, thank you!
would you be able to share GPX file of these tracks?
or you did and i missed it?
Kind of you,
Thanks, Tamas
Hi Tamas, I don’t have gps data. We never really use that. It’s all rather simple day hikes, you don’t really need that much detail. Just find the trailhead and follow the signs of the trail you want to do.
Which of your 7 favorite hikes is closer to Selva Di Val Gardena, and which are closer to Cortina d’Ampezzo ?
Hi John, the article includes a map indicating all the trailheads so you can see exactly where each hike is. Basically, about half of these hikes are close to Cortina (Tre Cime di Lavaredo, Lake Sorapis, Lgo di Braies, Cinque Torri), and the rest – are closer to Val Gardena (Adolf Munkel Trail, Seceda, Rifugio Puez).
My wife and I are planning a 10 day hiking trip in the Dolomites from September 19 to September 29.
We were thinking of staying in Selva Di Val Gardena area for five days, and then going to the Cortina d’Ampezzo area for the other five days. Is this a good idea ? Or should we stay in just one of these areas for the entire 10 days ? We chose these areas because you wrote that they were your favorites.
Hi John, I recommend these areas because we found that they have excellent possibilities for various hikes nearby while at the same time saving you a lot of driving on mountain roads.
Of course, you can also just stay in one place and find plenty of hikes to fill 10 days (or even the entire summer), but it all depends on what you want to see and do. For the best hikes mentioned in this article and also for most of the most beautiful places in the Dolomites, splitting your stay between Val Gardena and Cortina is really one of the best ways to see it all without spending hours and hours in a car each day.
And if you have 5 days in each place, it also gives you quite some flexibility to decide where exactly to go each day depending on the weather.
Enjoy your trip!
I planning to visit Italy May/Jun 23 and hiking the Dolomites is on the list. However i am only bringing a carryon backpack and wondering how important it is to wear proper hiking boots as they will take up sp much room and I won’t be using them for the remainder of my trip. What trails would you recommend if any that would be suitable with plain white sneakers???
Hi Kathy, good shoes are extremely important – most hikes are quite steep and can be muddy, etc. That being said, you don’t absolutely need heavy hiking boots. Lighter hiking shoes (something like this) or sneakers with a good sole and some protection for the toes (something like this) should be ok for most hikes. A lot also depends on the weather and trail conditions, of course. May might be too early for higher altitudes.
From the hikes listed here, the easiest is the loop around Lago di Braies. Also at Cinque Torri, you can see a lot without doing much strenuous hiking (if you take a cable car up). Seceda trails are also not too rocky or steep and Adolf Munkel Trail is also not too demanding.
At Tre Cime di Lavaredo, you could hike just a part of the trail – it’s a wide gravel road mostly.
I definitely wouldn’t attempt Lago Sorapis or Rifugio Puez in plain sneakers.
Hi,
This is a great blog
I am travelling to Ortisei late June.
I wanted to ask what the weather temperature is like during your travel period.
Do I need to pack any cold weather gears during hiking or when wondering the towns at night ?
Regards
Evan
Hi Evan, as you can imagine, nobody knows how the weather will be in advance. It can be 10-15° and rainy or 20-25° and sunny, or anything in between. The best thing to do is to check the weather forecast a week before your trip, to get somewhat of an idea of the temperatures. But even then, it’s mountains – so things can change all the time and it’s often difficult to rely on the forecast. The best thing to do is pack layers so that you can adapt to any weather.
You won’t need a winter jacket in summer, but long pants, a sweater, and a rain jacket is always a must, definitely in the evenings. During the day, you’ll usually be ok with shorts and t-shirts, but again – a sweater and a rain jacket should always be in your backpack when traveling in the mountains. And good hiking shoes too.
Have a great trip!
I really appreciate the time and effort you’ve put into this post! It’s so overwhelming to know where to start and your site is incredibly helpful. Thankyou!
Glad to help, Hayley. I know how overwhelming it is to plan a trip to a new destination from scratch.
Enjoy the Dolomites!
Hi,
Did your kids use trekking poles for these hikes?
For the Selva to Puez hike, can i still do it without cable car? I plan to do this hike in early june and the cable car is not open yet.
Thanks
gladys
Hi Gladys, we did use hiking poles for some hikes if I recall well. And yes, our kids also used them for some hikes. We each have a pair of light foldable hiking poles and so we always carry them with us.
They aren’t really a must for the hikes featured here, but it depends on the hike, trail conditions, and your knees – it can be helpful for sure.
For Selva, if the cable car is not open, that usually means that it’s too early for the hiking season. There’s likely snow/ mud on the trails and the mountain huts will not be open. Also, the hike you’re talking about is already very long even if you take a cable car, so no, I wouldn’t try if you can’t take the cable car to shorten the journey. There are plenty of nice alternatives.
PS It’s strange that the cable car wouldn’t be open in June – in most areas, they start the summer season end of May (but I don’t know about this one specifically). So maybe it will be open by the time you go there. Just check it a few days in advance.
Have a great trip!
I will go from Chamonix to Dolomites, If I take the bus or train , it’s easy to get public transportation from Val Gadena to Cortina, or I have to rent a car to drive to there? Thanks
Hi Victoria, since we ourselves always visit by car, I really don’t know how good the bus connections are between different areas in the Dolomites, and I have no time to research. You should be able to find all this info online yourself. Good luck!
Great post. Very helpful!
Glad to help. Have a great time in the Dolomites!
Hello! Thank you so much for such a well-written informative blog. We are planning a trip to the Dolomites the first week of May. Do you have an opinion about the trails that early in the hiking season? We are taking our 3 boys during their school break so we don’t have a lot of options as to the timing of the trip.
Hi Holly, a lot will depend on the weather, but in general, I’d assume that any hiking trails really high up (like Tre Cime) will not be accessible yet. There’s sometimes snow there end of June still. That being said, the first part of the trail might be doable with good waterproof hiking shoes – it really depends.
I also don’t think that Lago di Sorapis will be doable, or any of the Seceda hikes…
Adolf Munkel Trail might be doable since it’s lower, but you’d have to check locally…
You can definitely visit places like Lago di Braies or Lago Dobbiaco, but for any of the hikes, you’ll have to check the situation when you get there. Otherwise – in addition to some of the best and easier-to-reach places in the Dolomites, visit Lake Garda or Lake Como or places like Venice, Verona, etc. Those are all great at that time of the year. We have lots of travel guides for most of these destinations. Be sure to also check this guide to some of the best places in the Dolomites – you can see a lot even without hiking.
@Jurga,
Thank you so much for getting back to me so quickly!
Thank you so much for your detailed blog, you have been a lifesaver! I didn’t know where to start and here I found all those awesome hikes I see in pictures, right here!! Cannot thank you enough:)
Glad to help, Carol. Have a great time hiking in the Dolomites!
Where can I pourchase your book?
A book? Unfortunately, we don’t have any books, just the info on our blog.
If you are looking for a book featuring some of the best shorter hikes in the Dolomites, take a look at this one. But – as always – you’ll still have to make your own selection since most books simply include too many options and make it overwhelming. But the combination of doing online research + having a book with you could potentially be useful.
Hope this helps.
@Jurga,
THANKS…..you are SO correct, this can be so overwhleming! I’m going to use your site here as my main guide to planning my trip. I’m taking my daughters (grown) this next summer to the Dolomites and it’s so confusing, never being to the area before.
Even though, I think I’m going to follow all your advice, just wondering is there a tour that you might suggest that would do all the planning for me for a 5 day trip?
THANKS again!
Hi again, I’m not aware of any tours that would visit all the best places in about 5 days. And – despite the fact that it looks overwhelming – it’s really easy to plan a trip to the Dolomites. Ideally, you rent a car, then pick one or two centrally located places to stay, and then just do day trips/ hikes depending on how the weather is.
Take a look at our article with some Dolomites itinerary suggestions and see if you can find an itinerary that somewhat fits your interests. In that article, you’ll also find some more info on where you could base yourselves. Hope this helps.
What a wealth of great information, Jurga! Thank you, thank you for taking the time to post the info, plus the maps, and photos, and links. Hoping to go in June 2022, if COVID allows us to travel from British Columbia, Canada.
Thanks for your kind feedback, Bryan. Hope you can make that trip happen. Things are looking better and better for travel in spring/summer, so fingers crossed for you!
Dolomites are just as beautiful as many of the places we visited in BC, minus the wildlife, but you do get other things in return – amazing food is one of them. You’ll love Italy!
Hello Jurga, thank you so much for sharing all this information. It is incredibly useful and very well done. I was hoping to hike the Seceda – Pieralongia area in the winter. Is this possible to do? I have the necessary gear, crampons etc. but wasn’t sure if the cable cars and trails would be open to the public. I’m up to hike a sizable distance to make this happen, just would like a little more information about navigating the area in the winter. Thank you so much, Jesse
Hi Jesse, I really don’t know how easy that would be. The area is definitely open and people are skiing there in winter, but where exactly the ski slopes are and whether you can walk next to them – I don’t know. You can find a bit more info on the official website, including some pictures of how it looks in winter. Maybe it will give you a better idea of what to expect. If I were you, I’d rent skis and explore the area that way – so much easier than trying to walk. 😉
I also found this website with the winter hikes in Val Gardena. Maybe you can find something nice in their selection.
Hope this helps. Enjoy your trip!
This’s a mazing travel blog with so much details, and I wish I could have read it much earlier, I just planed 24 day trip to Italy and will visit Dolomites in NOV 24, do you think the trails you mentioned still open and hikable? Thanks! Leon
Hi Leon, thanks for your feedback and I’m sure you’ll have an amazing time in Italy. But as for the Dolomites, it will be too late to go hiking at the end of November. Normally, places that are higher will be covered in snow and it’s quite likely that it will be wintery everywhere already. The ski season starts at some places at around the end of November already.
You really never know how the weather will be, however, and if you just visit for one day, you could visit places like Lago di Braies or Marmolada for example. Basically – either places located lower or places where you can get to by a cable car (and that are open at that time of the year). Be sure to check if the lifts to Marmolada are open, however. It’s possible that they only start the season at the end of November and you might be just a few days too early…
What you can also do is look up webcams for the areas you want to visit and check how it looks a day or two in advance – it will give you a good idea of how the situation is at that time. Here are the webcams of the Val Gardena area and I’m sure you can find others, depending on where you were planning to go.
But – in all honesty – the end of November is about the worst time to travel to the region. Summer activities aren’t possible and it’s also just too early for skiing, so the majority of lifts will still be closed.
If it’s all too wintery for the mountains, you can always just go to Venice for a day, or visit Bolzano (and visit Ötzi) and maybe Merano – both towns are very nice and you can see them both in a day.
For more destination guides for Italy, check out our Italy travel guide – it has an overview of all our articles and might give you some other ideas for places to visit. If you haven’t seen it yet, check out this article too – Italy in November, but keep in mind that end of November will be very different than the beginning of the month.
Enjoy your trip!
Hi Jurga, I can’t thank you enough for the effort you input for my question. I can’t thank you enough for link you provided, tons of valuable information. Thought you were good blogger, find out you offer solutions. Gonna read all of your blogs this week.
And I am going to skip Dolomites this time, but I SHALL return just for Dolomites another day, for the 7 best hikes! :))
Cheers my friend !
Glad to help and hope you can make it to the Dolomites some other time. Ideally, in summer. 🙂
Have a great time in Italy!
Hi Jurga, thank you for the great info.
You mentioned in two hikes there are bathroom facilities.
How about other hikes? Are there bathrooms, at trailhead or somewhere?
Thank you!
-Chen
Hi Chen, oh, I thought it was clear – let me clarify. When we say that there are mountain huts/restaurants, this per definition means that there are bathrooms as well. All the mountain huts and restaurants always have restroom facilities.
So yes, it’s not a problem for most of these hikes. But there are, of course, sections (sometimes maybe even 2-3 hours), when there will be nothing but nature. It really depends on the hike.
There are mountain huts at the start or at the end of all of the hikes mentioned in this article, sometimes both, and often also in between.
Have a great trip!
Hi, thank you so much for your blog! We just took the Adolf Munkel trail with out 3 teenagers today and it was amazing! We are looking for a shorter hike for tomorrow and Seceda-Pieralongia looks very tempting. But on Google Maps and Wikiloc it seems that the distance between those two points is more like 10 km one way… Did I get something wrong? Thanks!
Hi Laurent, if you take a cable car all the way to the top from Ortisei, it’s really an easy hike with quite a few options on how far you hike and you can turn back to the cable car and make the hike as easy and as short as you want.
Or you can walk to the cable car station above Santa Cristina instead of going back the same way, in which case it’s probably an even easier hike.
I’m not sure about distances as it really depends which trail you take exactly and when you turn back, but it’s really quite an easy hike.
It’s all explained in the article above.
Have a great day!
Just did the last one considered as hard. We did it in 5 hrs. We are not super trained and it was a pleasant hike, not difficult at all.
Well, you must be better trained than you think if you did that entire hike in 5 hours and still enjoyed it :).
Have a great time in the Dolomites!
Wow!! This is one of the best hiking blogs I have ever read. SO much solid information and very easy to understand. Incredibly grateful that I found this! Heading to spend a month in Italy and one week will be hiking in the Dolomites. With this post, I feel like my research is almost complete!
Glad to help, Michelle. You’ll love the Dolomites and a week is just about right for the first visit. You’ll probably want to return though ;).
One tip of advice- don’t get discouraged if the weather forecast would show rain every day. It’s often very local and usually only in the afternoon. Try to keep your plans somewhat flexible, check local (hourly) forecasts for each place you want to visit, and you can often avoid the rain altogether.
If you’re looking for more info about the Dolomites or Italy in general, here you can find an overview of all our articles about various destinations in Italy.
@Jurga, thanks Jurga!
This is beyond helpful and is exactly what I was looking for! Thank you so much!!
Glad you found this useful, Heathe. Enjoy the stunning scenery of the Italian mountains!
Hello, I would like to subscribe to this website to get the latest updates. Where can i do it? Please assist.
Hi Pearl, thanks for reading and your interest in our blog. You can subscribe to our newsletter here.
This is so so helpful! I’m doing a solo trip soon and I will be following your guide! Thanks a lot x
Glad to help. We’re just back from an amazing trip in the Italian Dolomites and Austrian Tyrol and will have even more info on the blog soon. So many great hikes and incredible scenery.
Enjoy your trip!
I am traveling Italy the first week in November. Will the trails be open at that time.
Hi Lola, I think that November will be too late for these trails. It really depends on the weather, but there is usually quite some snow in the mountains in November already.
Instead, you can do many other niece things and visit towns and villages in Italy. We have some suggestions in this article – Italy in November. Check it out!
Thank you I’ll look into that
Dear Jurga, thank you for this charming and well-written guide! I especially appreciate the list of hiking tips at the end. (I was a bit saddened by the disabled right-click but upon reading the reason why, I now understand.) Maybe I missed it but I’d like to know if the last hiking trail you described (the long, hard one) is accessible from Val Gardena, your recommended base camp. Thank you in advance for your reply.
Hi Juno, the last hike starts in Selva di Val Gardena – one of the main towns of Val Gardena. You have to take Dantercepies cable car first (see map). Alternatively, you can take one of the cable cars straight to Jimmi Hut (map) – that will save you some hiking, but that first part is very beautiful and really easy. It’s after Jimmi Hut that it starts to climb up.
If you do this entire hike to Puez Hütte, you’ll then end it in Selva, at Vallunga valley (see map).
If you stay in Selva, as we did, you can just walk to the start of this hike from your hotel. Alternatively, if you stay in one of the other towns, you can take a car or a bus. If you take a car, you may want to park it at Vallunga (end of your hike). I think (not sure though) that this parking was a bit cheaper (and bigger) than the one at Dantercepies cable car.
Hope this helps. Enjoy your trip!
What time of year did you travel to the Dolomites? We are thinking about planning a trip for late September/early October of next year.
Hi Jackie, we were there in the beginning of July. In general, May to September are the best months for hiking. October – really depends on the weather, but could be beautiful too.
Enjoy your trip!
Tho travel is impossible for now and the immediate future, there is great joy in panning. Your website looks fantastic but I find its usefulness limited by my inability to copy and paste. Am I supposed to read it and take notes? That seems a bit tedious. It would be great if I could copy and paste it in order to use it in a document Why is this function not enabled or have I not simply not figured out how to do it?
Sorry, I just perused the other comments and found the reason for this. I understand; still, it does greatly limit the site’s utility.
Hi Marlene, I understand your concern and I can imagine that it might be helpful to copy/paste some info. Unfortunately, there are also others that copy/paste our kids’ pictures and our text and use it as their own. Since we disabled the right click on our site, we are seeing a huge improvement in this and so, for now, we’re sticking with this decision. I know it’s not ideal, but I trust that our readers can appreciate and understand this. You can always bookmark the articles and come back for more details as needed – that also supports our blog and helps us to keep creating new useful content for our readers. Or you can also just print the parts that you want to take with you.
All the best and I hope that you can make your dream trip happen when the current worldwide situation is just a bad memory…
Printing it out is a good idea but it’s difficult to print just “the parts” I want to take with me given how interspersed these parts are with photos, links, and ads. Could you offer a “print” view of the text? Now, that would be useful.
I understand, Marlene. But since there are only so many hours in a day and I run this blog on my own and for free, I just don’t have the capacity to offer this service.
4 of us will be flying from Dresden to somewhere close to where we can access the Dolomites. (Also need to fly back to Berlin instead of Dresden) I can not find any flights to Bolzano that will get us back to Berlin. So, can you suggest a town that would work? One thought is Innsbruck and the other is Milan. Just don’t know what the drives would be like; passes, etc. Thanks! Love your photos of a place that has been on my bucket list for years and at 74 I need to get there NOW! Wende
Hi Wende, there are so many airports in that area so there shouldn’t be a problem to find a flight from Dresden. I don’t have the time to do the research for you, but you can try a website like Kiwi that is usually great in showing all the nearby airports for your destination.
I think that Innsbruck or Salzburg is a good choice and maybe Verona or Venice – depending on which part of the Dolomites you want to visit. Milan is a bit further away, but also doable.
Coming from Austria and staying in Val Gardena area, the roads are very good and there are no scary mountain passes. If you drive from Venice to Cortina area, it’s also ok. The passes are mainly between Val Gardena and Cortina areas.
If you are not sure how the roads are, just take a look at the Google Maps – it’s usually pretty accurate with the driving times and distances and you’ll quickly get an idea of how the road is based on the time that it takes, according to Google.
PS We are from Belgium and we drove to the Dolomites by car. From Dresden, it’s even closer and definitely doable.
Hope this helps. Enjoy your trip!
PS2 There is no need to leave multiple questions about the same – I answer them as soon as I can. I, therefore, deleted your previous question as it was pretty much the same. 🙂
Thanks for advice! I didn’t mean to leave two messages but didn’t think the first one had gone through! lol I like the idea of flying into Innsbruck and was just worried about Brenner Pass being impassable with snowy weather but now see that it is fairly low so that shouldn’t be a problem. Getting really excited!
I don’t remember how that pass looked like exactly, but that just probably means that it was nothing to be worried about. It’s all highways there anyway and – if you are going in the season when you can do these hikes, there shouldn’t be any snow anywhere on the roads anymore. Enjoy your trip!
One more question, I hope! I know that you suggest staying close to Val Gardena for easy access to hikes but I am looking at a farm stay in Enneberg which is 12 miles south of Bruneck. Would that location make it difficult to get over to Val Gardena area for hikes and then back for the evenings? (The farm stays around Val Gardena were more expensive than near Bruneck which is why looked in that area
Thank you for any help you can give.
Wende
Hi Wende, you’d have to check google maps for exact driving times. I can’t find where that place is exactly, but if it’s next to Bruneck, it means that you’ll have to drive the Gardena Pass every time in order to reach Val Gardena towns. It’s a really beautiful mountain pass and not too hard to drive, we found, but it’s still a pass with a narrow road and lots of curves.
Despite what I have written about the right click and text selection. I want to thank you for writing beautifully and providing valuable information. It helped our planning to the Dolomites greatly!
Thank you, Charlene. Glad to hear that and hope you have the most amazing trip to the Dolomites!
Dear Jurga,
I found your travel blog while I was searching for the Cinque Terre hiking route. Ever since then your blog has become one of the favorite travel blogs. I am very disappointed to notice the website has disabled right click and text selection. I have trouble understanding what the goals for doing that. I used to be able just to copy the foreign location names and paste in Google maps for a quick reference. Now I have to write it down or simply just skip reading further. I am sure this is not the intent of a travel blog.
Thank you for your attention.
Hi Charleen, thank you for your feedback. It’s very important to us as we have just introduced this feature that prevents people from copying materials from our website and will be evaluating it soon.
While I understand that this brings certain discomfort to our readers planning their trips, we had to take this decision because of multiple websites and other blogs copying our content illegally and publishing as their own. It’s never fun to see someone else profiting from your hard work, sometimes slightly rewriting our text, and presenting it as their own. It is our hope that by removing this feature we will discourage the copycats, but it’s also not our intention to annoy our readers. The whole purpose of our blog is to help our readers to easier plan their own dream trips and so it’s a really tough call. I’m sure you can appreciate the fact that it wasn’t an easy decision.
We’ll give this some time and see how things go before deciding if we’ll keep it or not.
Thank you, Jurga for the explanation. It just didn’t occur to me that there are those shameless people stealing people’s travel blog content and making a profit. Of course, you need to protect your hard work and intellectual property. Please keep on writing.
Thanks.
Thanks for understanding, Charleen. It’s never easy to make a decision that is not ideal for our readers, but we really hope that it helps to prevent copycats at least to some extent…
Thank you for your support! Appreciate it.
Hi, thank you for such a comprehensive post! I am thinking of visiting during mid April next year, but quite bummed to see that most of the hikes will be closed. Do you have any suggestions on alternative hikes i can take in april?
Hi Sam, unfortunately, I really don’t know what and if is open in April. Up to Easter, most places are still open for skiing, so maybe you can try that or snowshoeing instead… Otherwise, try to contact a local tourism board and see what they suggest.
I went for the Adolf Munkel Trail yesterday. The weather was very cloudy which hid the peaks of the Odle group of mountains, but when they cleared for a short time, it was magnificient!
The route was pretty easy and the views are absolutely spectacular, if you only have time for one hike, i would go for this one.
Thanks for this blog, can’t wait to try the rest of the hiking routes!
Thanks for sharing your feedback, Nissim. Adolf Munkel Trail is a beautiful and quite easy hike, indeed. Glad you enjoyed it and hope you enjoyed the rest of your trip as well.
Happy travels!
Hi there,
Thank you for such a detailed post. I will be backpacking the area at the end of September and I do not plan on renting a car. I haven’t decided where I am staying just yet, probably in Val Gardena (not sure which town). Is it tough getting to the start of the hikes without a car? Is there public transit or can you walk to most of these hiking points? Thank you in advance
Hi Bonnie, please check the other comments under this article. The question about public transport has been asked so many times before. In short, yes, you can get to some hikes with a bus, but not all of these will be as easy. Some of these hikes aren’t even in Val Gardena…
That being said, there is so much to see and there are so many amazing hikes in Val Gardena area, that you can easily stay there and see a lot of the most beautiful scenery. If you stay at one of the Val Gardena hotels, the local bus is normally free of charge with a guest card that you get at the hotel.
Enjoy your trip.
Thank you very much for this article! It’s gonna be very usefull!
Thanks for your feedback, Kint, and enjoy your trip!
Thanks so much for this extremely detailed and fantastic blog! It helped me plan our Dolomites getaway. I must tell you that we kinda followed your blog quite religiously for this trip. Thanks again 🙂
Glad to hear that, Preethi, and I’m glad you found our travel tips helpful. Maybe you’ll find more inspiration on our blog for other trips as well 😉
Hello Jurga, thanks for sharing your experience and such an informative blog. I will be traveling to Italy in May next year and I would love to stop by Dolomites before flying out from Venice. I would like to make a trip to Val Gardena, Lago Braies and Tre Cime Di Lavaredo. How many days would you advise and is May a good time to visit Dolomites? I’m so excited reading your blog and can’t wait to plan a trip over next year.
Hi Joanne, I’d advise at least 3 days for this – one for Val Gardena, one for driving to Cortina area passing Lago di Braies, and one for Tre Cime. But you could easily spend a couple of weeks as well 🙂
However, I don’t know how hiking conditions will be in May and there will probably be some snow still. Even so, you can do a lot even if you don’t hike and I think that at least part of the trail of Tre Cime (the flat one, till Rifugio Lavaredo) should probably be doable. I guess it will all depend on how much snow they’ll get in the winter and how warm the spring will be.
Thanks for your advise, Jurga. If I’m coming from Venice, where should I stop by first? Val Gardena or Lago di Braies? 3 days is perfect for our trip since we only have 10 days in Italy. Are the hotels and restaurants open in May as it’s a shoulder season and less crowded. Would love to stop by Seceda too but I had a feeling that the cable car service is still closed during May.
Hi Joanne, coming from Venice, you should probably visit Cortina area first, then Lago di Braies on your way to Val Gardena (there are several roads, but that one is much better and has fewer mountain passes than the one that looks shorter on the map). Use Google Maps to check driving distance and to plan an itinerary that makes the most sense for you.
Hello we are wanting to do a day trip to the Dolomites from Venice or Verona can you recommend maybe a tour company..
Hi Claudia, I don’t have personal experience with the tours, but here you can find some great options. I think that from Venice to Cortina area is better as that means less driving and more sightseeing. Hope this helps!
Great thank you. Loving your travel tips ????
What a brilliant post!! I’ll be having a look at the rest of your blog later. This has settled my wife and mines minds about our holiday next year so just need to start planning it now. Do you know if the bases you suggest (Cortina, Val Gardena and then somewhere in the passes while travelling between the two) possible on public transport as neither of us drive?
Hi Rich, I think it should be possible to visit the area using public transport, but I have no experience with it. Why don’t you just Google or check local tourism boards websites. Have a great trip!
Helpful as ever Jurga (I found your Cinque Terre piece really helpful in April).
Researching for the dolomites is like a minefield – so many opinions, will take much of this on board, and will be looking or longer hikes that take me to the top of the peaks. If you’ve got any idea, give us a shout, but will be doing my own research anyhow.
Hope you and the family are well, and enjoy your travels.
Jack
Thank you, Jack. We love hearing from loyal readers!
I don’t have any suggestions for longer hikes in the Dolomites, but there is one shorter one that we were hoping to do and didn’t get to on this trip. That’s Lake Sorapis hike. You may want to check it out if you have more time in Cortina area.
Enjoy your trip!
Very usefull info. Great article, Jurga !
Thanks for sharing this. Exactly what i need for day hike around dolomites.
Never been to dolite, but dont want to drive, so will follow what Melody sheahan did using public transport to val gardena
Have a great trip!
Thank you so much for putting this together! Honestly its difficult to find information on good hikes so this has saved alot of time. We are off to the Dolomites in mid july for a week. It will be our first time and I have been dreaming about going for a long time. Thanks once again 😉
Enjoy your trip, Ani. The Dolomites are incredibly beautiful – you’ll love it!
I’m going to add to the compliments of other readers who said this is a fantastic article. I’m a journalist, and so I know how difficult it is to convey information in a precise and interesting way. Your work is as good as I’ve ever seen. My wife and I will be staying near Bolzano in late September 2019, and your info is perfect. We are in our mid-50s and good physical shape (she is a personal trainer!), but we’re not back-country hikers. The hikes you describe are exactly what we will be doing. And I know what you mean by “the hike that would never end,” as we had one of those at Acadia National Park in Maine in the US a few years ago!
Thank you for your feedback, Kevin. Enjoy your time in the Dolomites and if you do decide on that long trek that never ends, start early and make sure to follow the road down as described in our article – it’s a beautiful part of the hike that really saved the day for us.
Thanks so much for this very helpful and timely guide to hiking in the Dolomites. We are planning to do this next year and didn’t know where to start as there are so many trails. I have some ideas now, thanks for sharing!
Good to hear you found this useful, Lucy. Enjoy the trip!
Thanks so much for this very helpful and timely guide to hiking in the Dolomites. We are planning to do this next year and didn’t know where to start as there are so many trails. May I ask if it’s possible to hike in October assuming that it is a cooler month? If we want to use a guide, which agencies would you recommend? Thanks
Hi Corina, I think October is a bit tricky as you’ll never know how the weather will be. I did some research and most guided tours seem to stop in September. However, I found this private guide who is running hiking tours till mid October. The hikes start from Cortina d’Ampezzo area and you have a choice of several day hikes, some that are mentioned in this post (Tre Cime di Lavaredo and Lago di Braies). Since it’s a private guide, you can ask for any hike that you like, but since it starts in Cortina, it would be indeed wiser to stay in that area. I see that they also mention Lago di Sorapiss, which is a stunning hike as well. Also Lagazuoi is something we considered and it would definitely be worth it. So yes, there are some possibilities.
Loved reading your post. Thanks for sharing..
We are looking at visiting this area in June.. Would be there around the 12th June.. Would the refugios / mountain huts be open at that time?
Also is it possible to convert some of your treks into a 2 day itinerary and stay at the mountain huts for a night? Which one would you recommend?
Hi Vineeta, I’m afraid I can’t help you much with the multi-day hikes as we have no experience. I’d assume that most mountain huts would be open mid-June, but if you want to be sure about a specific one, it would be best to try and contact them (or a local tourism board) directly.
There are just so many hikes in the area and you could indeed combine several of them into a multi-day hike, but you’d have to do your own research and get a really good hiking map for the area.
EDIT to add: I just stumbled upon this guided tour that lets you choose how many days you want to hike in the Dolomites and they say they’ll take care of all the arrangements. Maybe worth checking…
Very useful information! Will definitely consider all of them.
PS. What trail did you guys take at the first picture of the blog with your two sons and the rocky peaks to the left side?
Hi Jill, someone just asked it the other day as well (you could see it in the comments below). The first picture is from Tre Cime di Lavaredo.
Such a helpful article! THANK YOU!!!
Good to hear that, Angela.
Happy travels!
Hello Jurga-Great article about the Dolomites. We are going in August. Where is the trail(name/location) in the 1st picture? We want to go! Thanks!
Hi Karen, the first picture is from Tre Cime di Lavaredo (Three Peaks) hike. It’s described in the article.
Enjoy your trip!
For sure your post is the most useful and informative that I’ve
encountered. Thanks for helping everyone !
Thanks for your feedback, Emilio. Enjoy hiking in the Dolomites!
As others have said, your post is the most useful and informative that I’ve
encountered after much searching. the guide book Shorter Walks in the Dolomites
is very useful but your lived account is very helpful in terms of organizing our trip.
I wonder if you might have any thoughts about staying in one Rifugio or another?
Steven
Hi Steven, glad you find this useful. I know how it is to research a trip and how first-hand reports are incomparable to any book indeed.
Unfortunately, I can’t help you further – we never do multi-day hikes and thus never stayed in any mountain huts. There are so many of them and it’s a great way to hike through a big area, but you’d need a very good hiking map with all the huts indicated to figure out the best itinerary for a region where you want to hike. I also don’t know if you need to book any of them in advance, but I guess it would depend on the season and the group size.
Good luck with the search!
Thank you, Jurga, for your response. I should have mentioned we will not have a car. It seems best for us to stay in Ortisei and conveniently walk trails you recommended from there. Hopefully for one day we will rent a car and drive to do hikes from Santa Maddalena. Your photos are so enticing and your suggestions very helpful – much appreciated.
Elaine
If you don’t have a car, I strongly advise to stay in one of the Val Gardena towns and book your accommodation asap. Ortisei, Selva, or Santa Cristina are all good options. We stayed in Selva.
If you stay there, you will normally get a guest card at your accommodation that allows you to use the public buses free of charge. If you are planning to do more hiking in the area, it might be interesting to check Gardena card – it can save you some money if you take lots of cable cars (we didn’t do that as it made little sense for us it really depends on how many cable cars you plan to take – they are quite expensive).
PS to get to Adolf Munkel trail, you can also take a bus. First to Chiusa and from there to Zanserhütte. But I don’t know the schedule, but I’m sure you can ask for that info at the local tourist office once you get there.
Hi, Jurga – Your very helpful info about best walks/hikes in the Dolomites is much appreciated. The closest we’ve been to this area was in Castelrotto, Siusi and Bolzano. In September we look forward to going on the trails you described. Do you think Chiusa would be okay for a base? Thanking you for considering my requested advice – Elaine
Hi Elaine, if you have a car and don’t mind a bit more driving on most days, then yes, Chiusa seems ok to me. Only to get to Cortina area it’s really far. On the other hand, if you take the bigger roads (like on this map, so not via the mountain passes), it should also be doable.
Hey Jurga, I read travel articles a lot. And I mean A LOT!
And I think this is possibly the best article I’ve read. It’s entertaining, informative and has just the right amount of detail. Thank you very much. My hikes will be based around this write-up.
May I ask one question? My partner and I plan on staying in Val Gardena for the 5 nights we’ll be in the Dolomites. We will be there in July and plan on using buses to get around. With that in mind, will we be able to explore the Sella group (specifically Pordoi and Sella) from Ortesei via bus? I’ve heard these passes are great, so I would hate to miss them because I decided to save money and not rent a car.
Thank you so much for your kind feedback, Ed. Always glad to hear that our readers find the articles entertaining and useful.
We didn’t take the bus, so I don’t have experience with that. But indeed there is a local bus in Val Gardena and it’s free with a guest card that you get at the hotels in the area. I’m not sure if there is any bus that goes to these two passes though, but you can just ask at your accommodation or at the visitor center. I’m sure they’ll know the best way to get there. We constantly had to deal with buses on those narrow roads, so I think you can get there by public transport.
PS I’m not sure if you’ll save much by not renting a car – renting a small car in Italy is really not expensive. So it really depends on what else you’re planning to do I suppose.
Hey Jurga,
Wow, the cars really are quite cheap. I may be able to justify renting one, even if I only use it for two of my four days…
I have one more question for you regarding your trail ‘Seceda – Pieralongia – (optional) Col Raiser’. Is there any particular reason you are starting at Seceda, rather than at Col Raiser? Most of the articles I’ve read have this trail or similar starting in reverse to yours. Just wondering if you have a preference.
Hi Ed, hiking from Seceda to Col Raiser you’ll be going down pretty much all the time (unless you make a loop as we did, then you’ll go back up a bit). Whereas going the other way you’ll be climbing up all the time. Pretty much all the people we met were hiking in the same direction we did and I really don’t know why those guides tell you to start at Col Raiser, except maybe that the cable car to go up is a bit cheaper there… Or they think that a beautiful hike in itself isn’t enough if it’s not challenging… No idea, but we kind of prefer not to make things more difficult if it’s not necessary… So if you come to Ortisei and start your hike in Seceda, you can end your hike at Col Raiser and go down to Santa Cristina from where you can take the bus back to wherever you are staying (or wherever you left your car).
And yes, renting a car is indeed not that expensive in southern Europe and it gives you so much freedom.
Enjoy your trip!
Hi Jurga, awesome posts lots of great information. I have been thinking of getting a map for the area. Would you recommend one map company over another? I know they speak Italian and German in the area. Being from the states I unfortunately only speak English. Will they speak enough English we can get by? Hopefully they will not be offended because we don’t speak their native language? Also we are going to be there for a while. We have 15 days should we spend them all there. Can you recommend the best quaint mountain towns to visit to break up the days of hiking so we can take a day off and rest? Thanks so much, Jerry
Hi Jerry, yes, indeed that area is a bit tricky in terms of language – everything is more German than Italian actually and the food is a mix of both – it’s great! I don’t really speak much Italian or German and could get around well with just English, so you’ll be fine. I think my husband spoke German a couple of times, but not because they didn’t understand us in English.
As for the maps, we just used Google Maps to get around and didn’t buy any hiking maps either as all the hikes we did were quite short and well indicated.
15 days is long so you can do a lot. I think that if you like seeing more places you could split your stay between Val Gardena and Cortina d’Ampezzo area.
If you want to visit some really nice towns, then why not just stay in the mountains for a week and then spend the rest of your time visiting other amazing places nearby (there are so many!).
Close to Val Gardena are towns of Bolzano and Merano – both make a great day trip (we visited both in a day and it was really nice). Also Trento is doable as a day trip from this area and is certainly worth a visit.
A bit further to the South you have Lake Garda with amazing scenery and stunning little towns – you can’t go there as a day trip from the Dolomites, but coupld easily spend 2-4 days in that area. More information here: Best of Lake Garda and here: Lake Garda itinerary ideas. From there you can also easily visit Verona and even Venice. If you go more to the west, you come to Milan and Lake Como – all amazing places. More info here: One Day in Milan and also here: Bellagio, Lake Como.
As you can see, possibilities are really endless, so it’s really up to you. In 15 days you could see a lot – mountains, lakes, towns…
Hope this helps and doesn’t confuse you more…
Enjoy the trip – it’s an amazing part of Italy. You’ll love it.
Great post Jurga. I’ve spent a bunch of time sorting through all the info on the net on the Dolomites, looking for the perfect hiking trails and home-base town in prep for our family trip this summer. Your post is exactly what I needed! Keith
Glad to hear that, Keith. Enjoy your trip. You’ll love the Dolomites!
Hello Jurga, loved the post! I’m definitely doing the Adolf Munkel Trail. I want to do the Seceda – Pieralongia hike too, but have a question; would be great if you could reply:
Is it possible to hike from Ortisei to Seceda and on to Malga Pieralongia Alm, and back? In other words, is it possible to avoid taking the cable car during this hike? I’ll be back-packing for 2 months straight, so want to save money where I can. I am reasonable fit, and a couple extra hours of hiking shouldn’t be a big deal. Also, I could take public buses wherever I can. I read somewhere that I could take a public bus back from Col Raiser to Ortisei.
A response would be much appreciated.
Thanks,
Prateek.
Hi Prateek, it is possible to hike from Ortisei to Seceda, but it’s a very steep and long climb- you’d go from 1236m to 2518m – it’s A LOT! I have no idea how long that would take, but I wouldn’t advise this to anyone.
It’s a bit easier to do from St. Christina, but still over 1000 m ascent.
If I remember well, cable car from St. Christina to Col Raiser was cheaper than the one from Ortisei to Seceda, so you could make the hike from there (it would require a bit more hiking uphill, but nothing compared to coming all the way from the bottom).
If you stay at any of Val Gardena hotels, you should be able to get a guest card that allows free use of public transport and also gives you a discount on cable cars.
TIP: if you are staying in the area for several days and are planning to do lots of hiking, you could save a lot by getting Val Gardena card. It’s not cheap, but quickly pays off if you take just a couple of cable cars.
Hope this helps.
Hi thanks for the really informative post. Could you tell me where the trail numbers come from? Do the maps of the area have the trails illustrated and numbered on them?
Hi Liz, I’m sure there are maps you could get at the info centers, but we just used simple trail maps that you get at the cable car. Those maps don’t usually have trail numbers, but they do have hiking paths clearly indicated. You can also find the trail numbers on the informative boards before each hike and all the signs along the way have trail numbers on them.
So, basically, if you know which trail you want to follow, you could do it without a map as well, just following the signs. But I always took a picture on my phone of the informative boards at the start of the hike, so we had an overview with us just in case.
If you are planning to do any serious hiking, more than just a few hours, I think it would be wise to get a good hiking map of the area.
Hi Jurga,
Thanks for this amazing post. Such useful information. I am
planning a trip to the Dolomites with my husband this summer. Just like you we will be looking for easy to medium hikes. We plan to spend 18 nights in the Dolomites. Could you advise me on how we should divide the days between Val Gardena and Cortina (we will make these 2 as our base). Initially I was thinking of spending more days at cortina and fewer at Val Gardena, but after reading your article I am re thinking my decision. Please do advise.
Hi Nupur, 18 days is really a lot, so why don’t you split them in two and spend 9 in each place? I’d almost go for a bit more time in Val Gardena and less in Cortina, but in any case you have so much time that you can thoroughly explore both regions.
In addition to all these amazing hikes, another reason why we liked staying in Val Gardena is that it is close enough to the highway. So in case of bad weather in the mountains we could visit some beautiful towns nearby. Bolzano is recommended, but also Merano was extremely nice. Both just an hour’s drive away from Val Gardena; we visited both on the same day.
As far as hiking goes, there are so many options near both places, you’ll find plenty to keep you busy.
Have a great trip!
Thank you so much for your amazing advice, hints, and suggestions. I am planning a trip with my mother in law and this was VERY helpful. One question, if we were to stay in Val Gardena and or Cortina, Do we need to rent a car? Or, can we use all public transportation?
Hi Kathryn, once you get to Val Gardena, you don’t really need a car. There is a local bus that connects all the main villages.
I’m not sure about how easy it is to get from Val Gardena to Cortina by public transport though. It might look like it’s close by on the map, but it really isn’t and the roads there are crazy steep and narrow.
I also don’t have experience with transportation in Cortina, but I assume that there are busses there as well that bring you to the starting point of some hiking trails.
Hope this helps. If not, try researching the websites of Val Gardena tourism and Cortina.
Thank you for your quick response – I really appreciate i! I will check out those websites and start planning. Have a wonderful day..
I just love seeing you your family enjoying such stunning scenery. Our girl is almost two and loves being carried along our hikes but I think it won’t be long before she will start walking more herself (she can walk a long way she just stops to look at everything so we don’t get very far haha). These hikes in the Dolomites look so stunning and I’m glad to see they are manageable for little legs too 🙂
Hi Suzy, our kids also started hiking at 2. She’ll be hiking before you know it. 🙂
Most of the hikes described here are a bit too difficult for the little legs, but if you can carry her, you could do the easier ones for sure.
How do you get to Val Gardena or Cortina from a major city/airport? We are trying to avoid renting a car, so we’d like to fly into the closest airport and take public transit if possible.
Hi Gina, I honestly don’t know. I think that even if there are any public transport options, they would require so many connections that it would take you a day. I remember, however, that all the hotels in the area had promotion for airport shuttles you could book with them – not cheap (think several hundreds of euros), but definitely the easiest way to get there from any major airport nearby. The closest big airports are Milan, Munich, and Venice. But there are also some smaller ones, e.g. Innsbruck in Austria. You could just ask your accommodation and they’ll arrange it for you.
Just note that it can be so much easier and cheaper to rent a car than take a shuttle in two directions. In addition, it also gives you complete flexibility to drive to the starting points of the hikes once you are there.
Hope this helps.
Thanks for the reply! My husband is just worried about driving there. We are from the states, and earlier this year he had to drive in Ireland. Opposite side of the road on VERY narrow roads, he was so nervous and anxious. Maybe if we just drive to a hotel in the area and take public transit to the hiking areas the driving wouldn’t be so bad.
Hi Gina,
The roads between Val Gardena and Cortina are really narrow, so maybe stay away from that area. If you just drive to Val Gardena from e.g. Milan (like on this map), it’s highway pretty much the whole time, except for the last half hour or so. But that road is really ok, just a regular road in the mountains, no mountain passes. It gets steep and narrow after Selva.
Also, in Italy they drive on the same side of the road as in the States.
Indeed, once you get to your hotel, you can just leave the car there (make sure hotel has free parking and is not far from the main road where busses drive). We stayed in Selva and really liked the town – many restaurants, shops, busy enough to be enjoyable but not too busy. Lots of beautiful hikes in that entire area – can easily fill a few weeks.
We are planning a trip to Ortisei for a week in September. We’ve been to the Dolomites three times now.
For Val Gardena we are taking the train from Verona (our last stay before the Dolomites) to Bolzano, and there are frequent buses from there to Val Gardena, I think around an hour. There is also bus service from Bressanone, a bit further north of Bolzano. Public transportation is very good in the area, and we have done just fine without a car. Milan was convenient for us, but we have also done this from Venice. I think Milan was more straightforward. Check out Trenitalia.com.
We have been to Cortina also, but we prefer the Alpe Siusi and Val Gardena areas.
Thanks for sharing this practical info, Melody. I’m sure it will be very useful to other readers looking to reach Val Gardena by public transport.
Thanks for sharing such a fantastic blog. Awesome Pictures it’s looking pretty cool and lovely in this post. I haven’t visited Italy yet, but after reading your blog, would surely love to visit ASAP.
Keep updating with beautiful places with your blogs, Keep it up.
Thank you so much for your kind feedback, Kathleen. Italy is AMAZING, no matter where you go, you’ll love it for sure. Hope you can find a way to see it soon.
Happy travels! Jurga