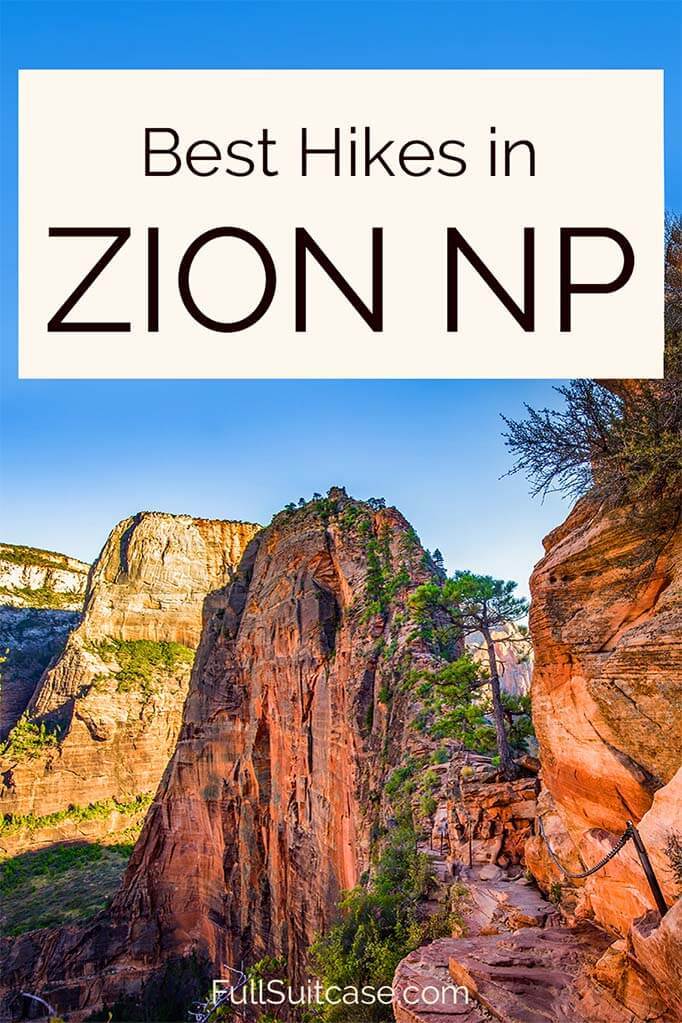
Hiking in Zion National Park: 15 Best Hikes & Tips (+Map)
This site contains affiliate links, which means that we may earn a small commission, at no cost to you, for qualifying purchases. It supports the work that goes into keeping this content free. Thanks for reading! More info: Privacy Policy.
Zion National Park in Utah is a real paradise for hikers and outdoor enthusiasts. But planning a trip to one of America’s most popular National Parks might be overwhelming…
What are the best hikes in Zion National Park? How to get to trailheads? What to know about hiking in Zion? This article should answer all your questions.
Since our own trip to Zion dates from a long time ago, this post is written with the help of our guest writer Dani James from Misfit Wanders travel blog. She’s an American who’s passionate about hiking and outdoors and hiked a lot of trails in Zion. In this article, she shares her favorite hikes and top tips for hiking in Zion.
First, you can find a list of the best hikes in Zion that are featured in this article and a map indicating all the trailheads. We also included some essential tips and practical information for hiking in Zion. Further below, you can find a more detailed overview of each hike. Take a look!
READ ALSO: Where to Stay in Zion National Park
Introduction
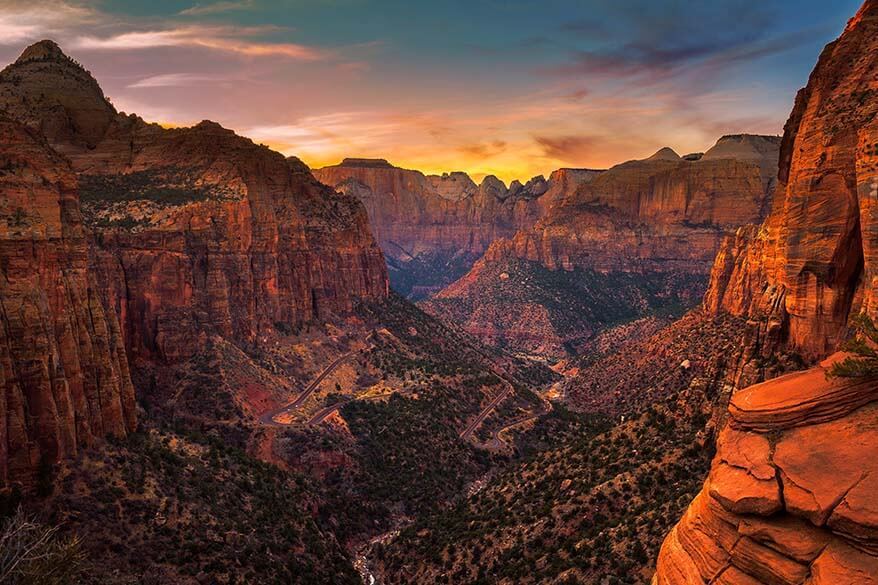
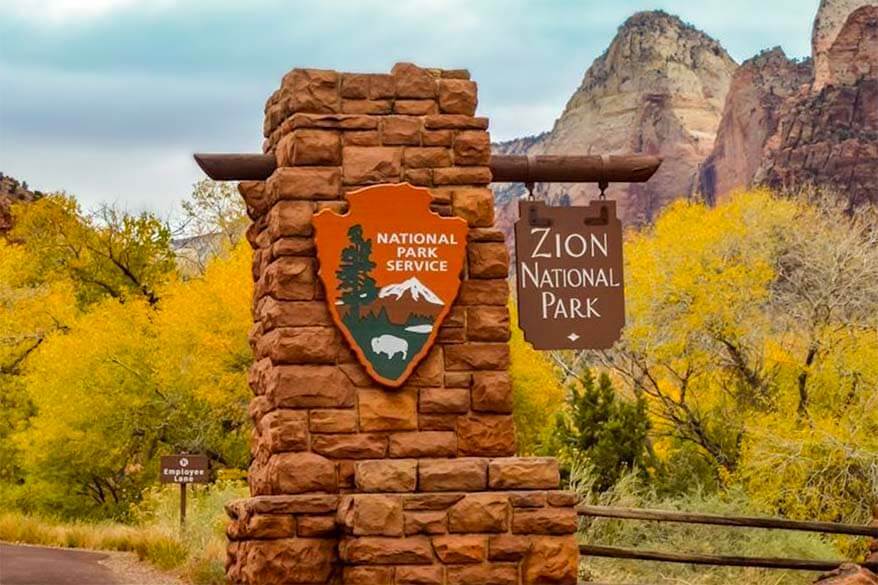
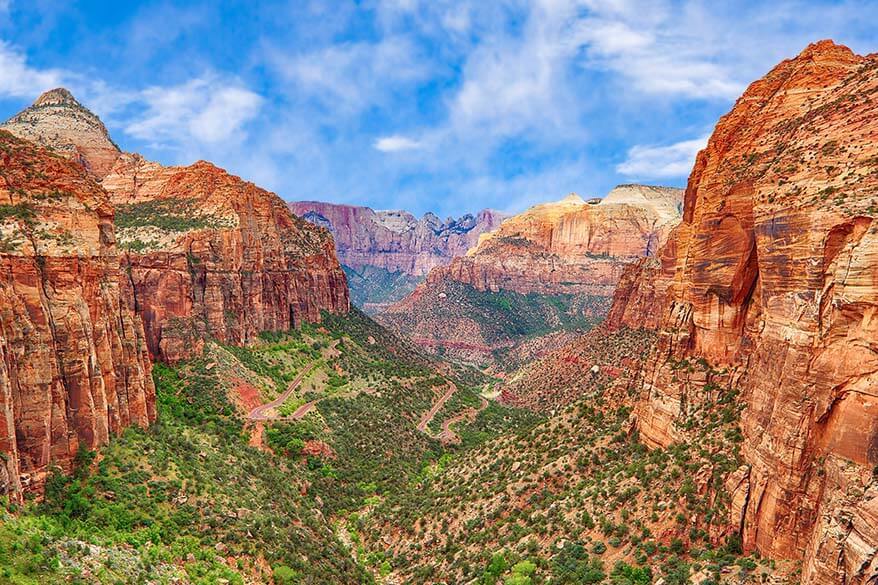
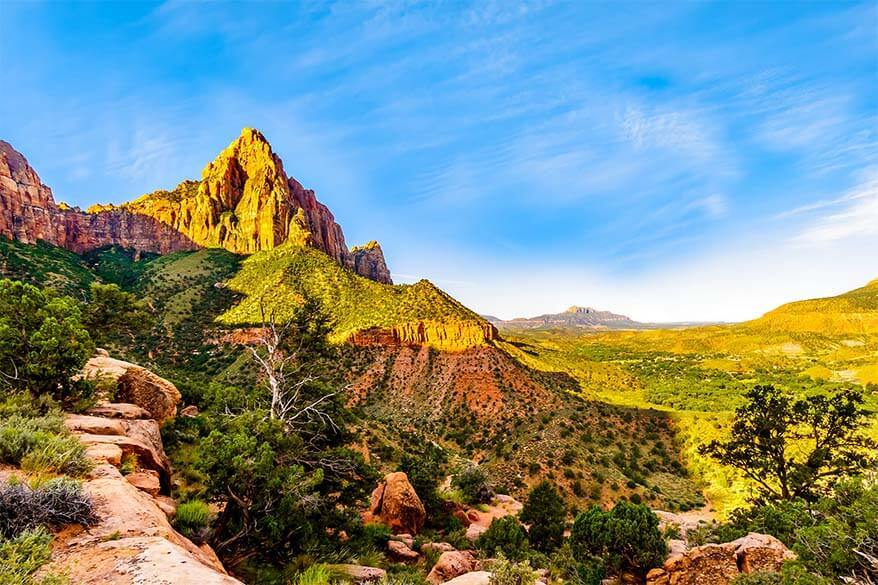
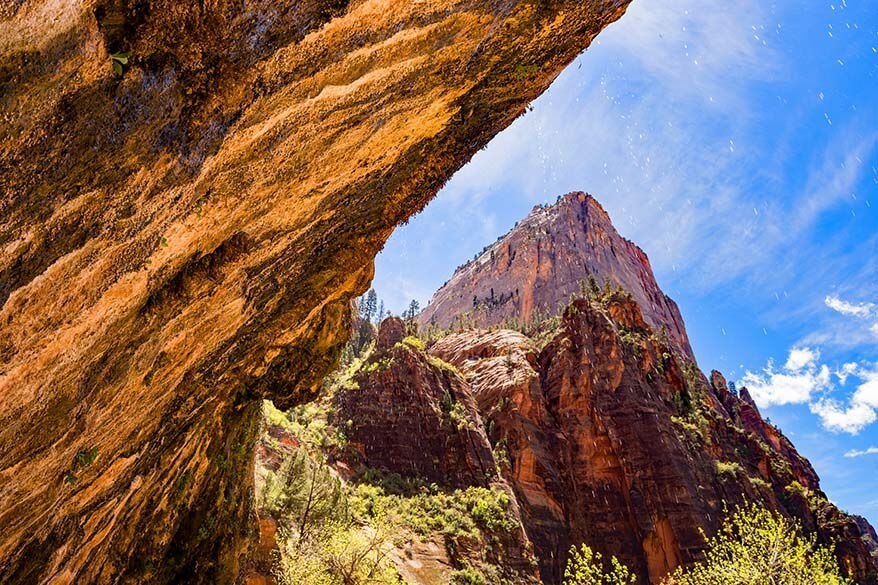
Zion is Utah’s first National Park, characterized by the massive stones and the vibrant colors of the canyons. It’s a place where you can follow the paths that pioneers and native people used to travel on.
Zion National Park has over 124,000 acres of protected wilderness (about 84% of the park). So, stay on the marked paths! There are plenty of areas that you are allowed to explore, with over 90 miles of hiking trails and several camping sites.
Hiking trails in Zion vary from very easy to strenuous and multi-day hikes. You can see waterfalls cascading down from cliff sides, venture in narrow canyons, or hike through Juniper forests and Aspen forests. There are also more than 1,000 species of plants throughout Zion. This National Park quickly turned into one of my favorites since there is so much variety in one park!
Good to know: Zion National Park is open the whole year round and many hikes can be done in any season (weather permitting, of course).
PRO TIP: If you are planning to visit several National Parks, get an annual pass. It’s called America the Beautiful Pass and costs 80 USD for the whole family traveling in the same vehicle. It is valid in all National Parks and 2,000 federal recreation sites across the United States for one year from the month of purchase. If you are planning to drive from Zion to Bryce Canyon and visit one more park within a year, this pass will quickly pay off.
Best Hikes in Zion:
- Canyon Overlook Trail (Easy/Moderate)
- Angels Landing (Strenuous)
- Lower Emerald Pool Trail (Easy)
- Upper Emerald Pool Trail (Moderate)
- Riverside Walk (Easy)
- Pa’rus Trail (Easy)
- Observation Point (Strenuous)
- The Narrows (Moderate – Strenuous)
- Hidden Canyon (Moderate – Strenuous)
- Watchman Trail (Easy/Moderate)
- Weeping Rock (Easy)
- West Rim Trail (Strenuous)
- East Rim Trail (Strenuous)
- Grotto Trail (Easy)
- Lady Mountain Trail (Strenuous/Climbing)
Further below, you can find more details about each hike. But first, some practical information and a map – that way, you have a better idea of what to expect.
TIP: If you are looking to get a bit off the beaten path in Zion and do a really nice hike, check out this highly-rated UTV & hiking tour to a slot canyon. It’s just a short tour, but it’s amazing and it will make your visit so much more special!
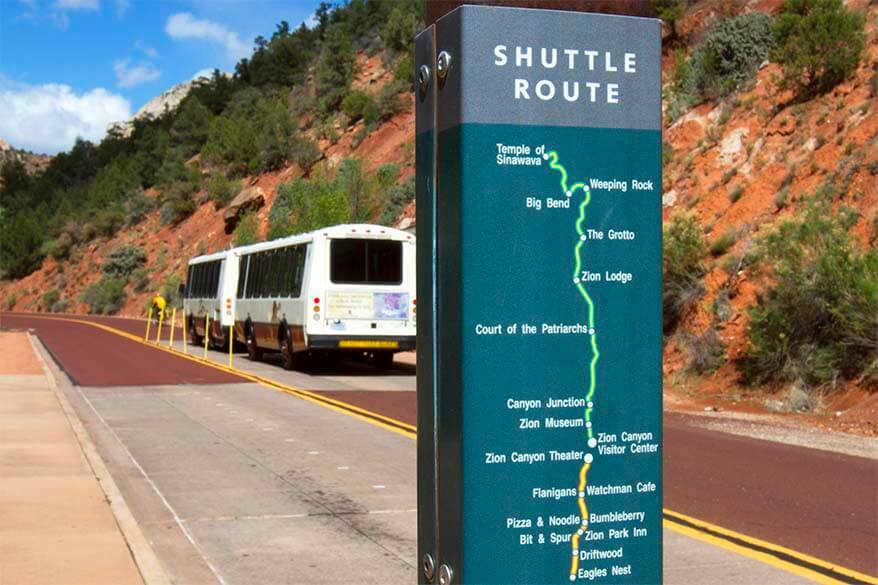
Zion Shuttle & Transportation
When planning to visit Zion, keep in mind that Zion Canyon Scenic Drive is not open to private vehicles in high season (March to November). Instead, you can use a very efficient FREE shuttle bus system with two routes – Springdale Shuttle and Zion Canyon Shuttle.
Springdale Shuttle transports you from nearby Springdale town to the entrance of Zion National Park.
Zion Canyon Shuttle has 9 stops along the Zion Canyon Scenic Drive, giving you easy access to hiking trails. Here you can find more information about the shuttles.
TIP: Stay in Springdale. This town has the best price/quality accommodations for exploring Zion.
Map of Hike Trailheads
To give you a better idea of where all these hikes are, I created this map indicating the trailheads of each of the Zion hikes mentioned in this article. Easy hikes are marked in green, moderate in yellow, and strenuous in red.
Please keep in mind that not all the hikes are circular. Some easier hikes follow the Zion shuttle route, allowing you to easily start and end wherever you want. Some other hikes are much easier if done in one direction and not in the other (downhill vs. uphill); in those cases, we indicated the trailhead for the easier route.
Parking: For all these hikes, it’s best to leave your car in Springdale or at Zion NP Visitor Center and use free park shuttles for transfers.
Good to know: There are also a couple of longer/ strenuous hikes where you have to arrange transportation to the starting point of the hike. There are plenty of local companies that offer this service, but you have to book in advance. It’s always easier/better to book a transfer to the starting point of the hike as you are completely flexible as to when you return. All the hikes mentioned in this article end along the Zion shuttle route, so you can easily get back to your car after the hike.
How to use this map: Use your computer mouse (or fingers) to zoom in or out. Click on the icons to get more information about each place. Click the arrow on the top left corner for the index. Click the star next to the map’s title to add it to your Google Maps account. To view the saved map on your smartphone or PC, open Google Maps, click the menu and go to ‘Your Places’/’Maps’. If you want to print the map or see it in a bigger window, click on ‘View larger map’ in the top right corner.
Important Information for Hiking in Zion
Make sure to check current trail conditions when planning to hike in Zion. There have been many landslides and rockfalls in Zion and, at the moment of writing, some popular trails are closed or partially closed. For example, Weeping Rock, Hidden Canyon, and Observation Point trails are all experiencing long-term closures due to a large rockfall.
It’s also essential to check the weather forecast, especially when planning longer hikes. Furthermore, flash floods can happen in narrow canyons, so make sure that you keep an eye on the most up-to-date information.
Important! The weather and trail conditions might change at any time, so keep an eye on the official website for up-to-date information and current conditions. Overnight hiking trips in Zion require a permit. Here you can find more information about Zion Wilderness Permits.

Best Zion National Park Hikes
1. Canyon Overlook
- Difficulty: Easy / Moderate
- Distance: 1 mile/ 1.6km roundtrip
- Duration: 1 hour
- Trailhead: East of Mount Carmel Tunnel, Highway 9
Canyon Overlook Trail is a nice short hike that leads to a jaw-dropping view at the end. This hike is doable for all ages and experience levels. Most of the trail is relatively flat except for the random tree roots and the stairs. We were surprised at how quick it was to get to this view. Once we made it, it felt like we just conquered one of the nicest viewpoints in Zion National Park!
A combination of a relatively easy hike and stunning views, make it one of the most popular hikes in the park, and rightly so. The only disadvantage about this trail is that it’s not accessible with the shuttle and you need a car to get to the trailhead.
Furthermore, car parking is very small, so you best come here early in the morning. Drive through the Zion-Mt Carmel Tunnel and right after the tunnel, you’ll see a small car parking on your right. The trail starts on the left side of the road (see the map above for the exact location).
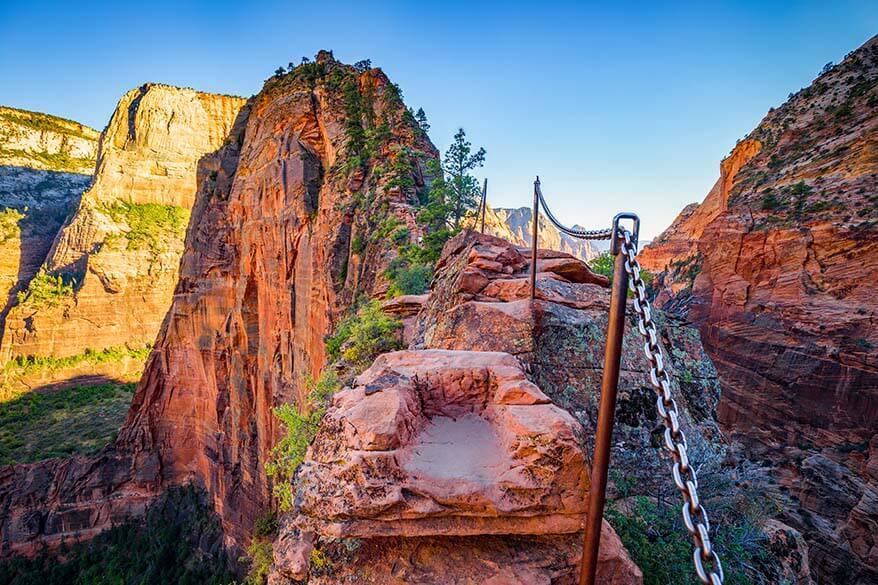
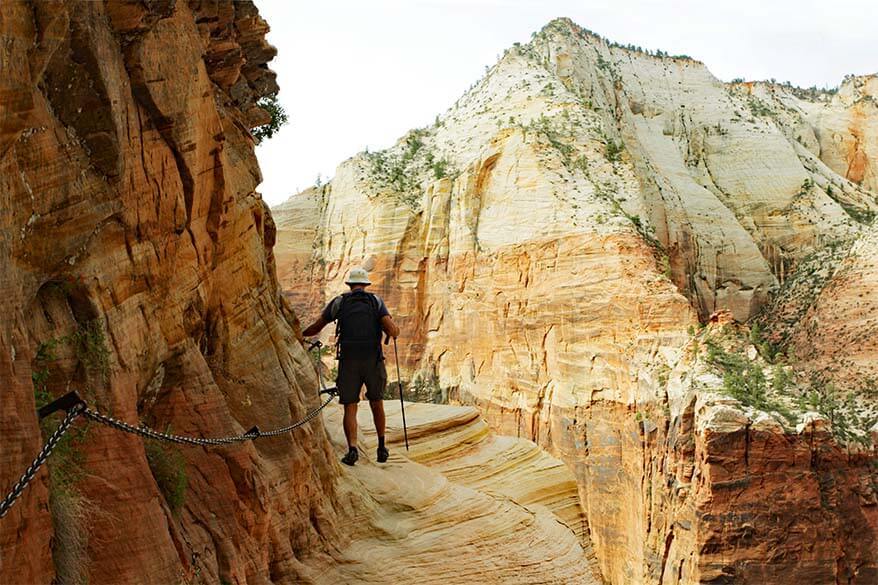
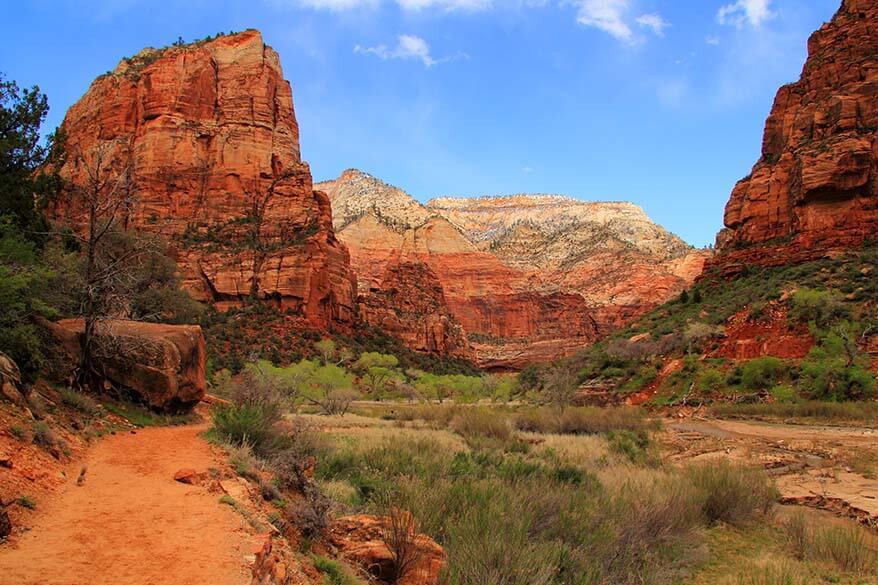
2. Angels Landing
- Difficulty: Strenuous
- Distance: 5.4 miles/8.7 km roundtrip
- Duration: 3-5 hours
- Trailhead: The Grotto. Shuttle stop #6
- PERMIT! Angels Landing hike requires a permit now. They have several options including a day-before lottery. For up-to-date info, check the official website.
Angels Landing is the most popular hike in Zion, attracting a huge number of people in high season. If you enjoy the more exhilarating hikes, then this trail should definitely be on your Utah bucket list. On the other hand, if you’re scared of heights then this is not the best trail for you. In that case, hike until you reach Scout Lookout and turn back.
You have to be in good physical shape to be able to hike this trail. But it’s not that much about your physical condition and more about the narrowness of the trail and scary drop-offs. Weather plays a huge part in this trail since at times you’re holding onto a chain bolted into the side of a cliff! If it’s too windy, the trail will get closed.
TIP: The best times for this excruciatingly hard but short hike is early mornings in the spring or summer. The crowds here can be crazy, so make sure to check the permit situation well in advance. If you can, opt for the early start and take the first shuttle in the morning. Alternatively, you can rent a bike in Springdale and bike to Angels Landing trailhead. If you’re staying at Zion Lodge, you could also walk to the trailhead.
PRO TIP: If you cannot get a permit for the entire Angels Landing hike, you are allowed to hike up to Scout Lookout without a permit. The views here are amazing and can be a nice alternative for those who are not able to hike the entire trail.
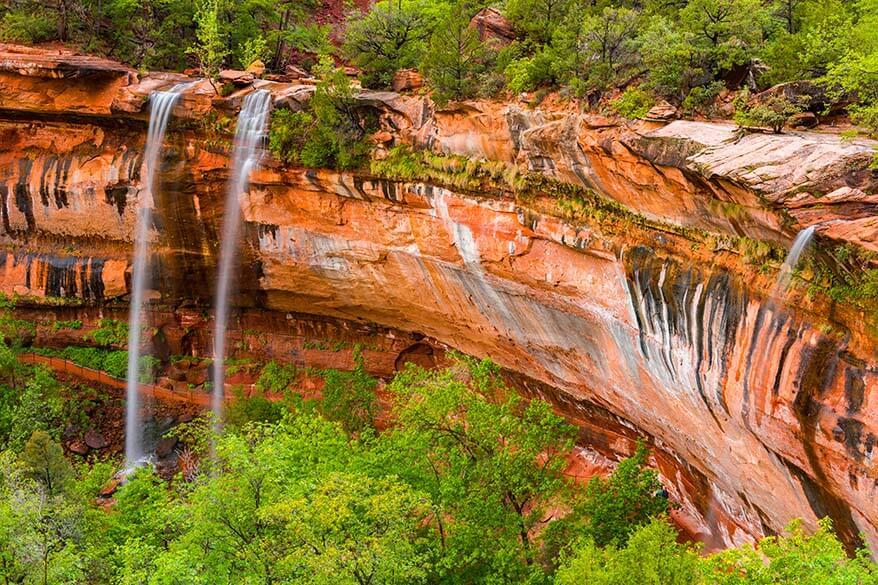
3. Lower Emerald Pool
- Difficulty: Easy
- Distance: 1.2 miles/ 2 km roundtrip
- Duration: 1 hour
- Trailhead: Zion Lodge. Shuttle stop #5
Lower Emerald Pools Trail is the easiest of the two Emerald Pool trails. With a little help, it’s wheelchair accessible and also a great Zion hike for kids. You can even take a baby stroller on this path.
As you journey on this trail, you’ll get to enjoy the wonderful nature and beautiful waterfalls. The glistening pools of water at the end of the hike and the scenery along the way, make this one of the nicest places to visit in Zion.
We took this trail with excitement. It was raining when we visited, but the rain just made the waterfalls so much more impressive. Once we made it to the Emerald Pool, the rain let up and the fog began to clear up. It was magical. So if you are in Zion and the weather isn’t cooperating, this is a good hike to do.
4. Upper Emerald Pool
- Difficulty: Moderate
- Distance: 3 miles/4.8 km roundtrip
- Duration: 2-3 hours
- Trailhead: Zion Lodge. Shuttle stop #5
You can get to this trail by first hiking the lower and middle Emerald pools. Once you make it to the start of the Upper Emerald Pool, that’s when it gets a bit harder. At times, the trail is quite steep with rocks that you have to climb over. But it’s worth enduring the path for the view at the end!
We were here on a rainy day and were blown away by the beauty and the power of the cascading waterfalls. The water coursed down quickly and had an unbelievable force as it gushed off the side of the cliff. It’s a sight that’s definitely worth a hike!
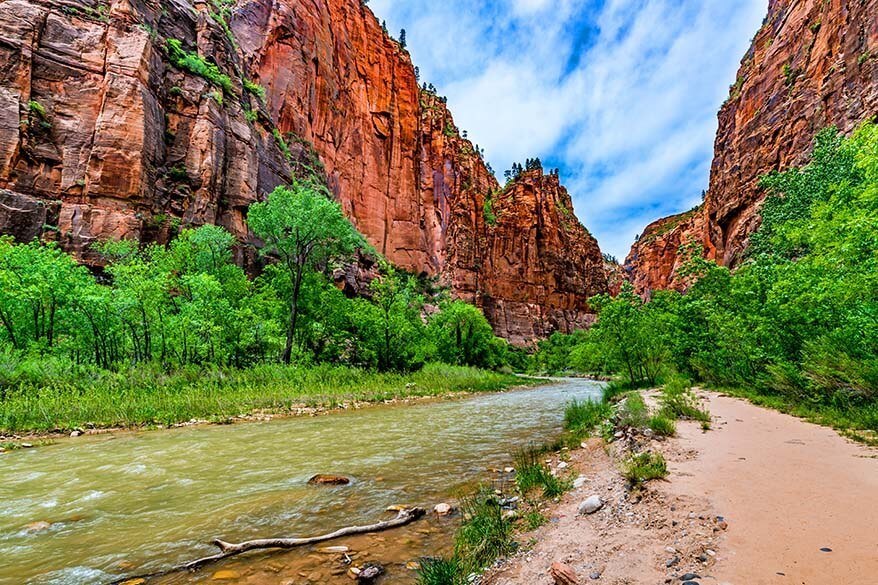
5. Riverside Walk
- Difficulty: Easy
- Distance: 2.2 miles/3.5 km roundtrip
- Duration: 1.5 hours
- Trailhead: Temple of Sinawava. Shuttle stop #9
This path is relatively easy, so Riverside Walk is a wonderful hike for the whole family. There are lush hanging gardens on the side of the mountain and wonderful views of the Virgin River. We were captivated by its beauty and this became one of our favorite hiking trails in Zion!
Check out the Weeping walls here and, if you go early in the morning, you may get the chance to spot some wildlife.
The first part of the trail is paved, so 0.4miles is wheelchair accessible. The rest of the path is mostly sand trail. This easy walk has amazing views and is extremely popular. If you can, try to check it out early or late in the day, when there are fewer people.
6. Pa’rus Trail
- Difficulty: Easy
- Distance: 1.7/ 2.7km miles one way
- Duration: 1-2 hours
- Trailhead: Zion Visitor Center, shuttle stop #1. This trail follows the road passing Zion Museum (shuttle stop #2) and ending at Canyon Junction (shuttle stop #3). So you can do it in any direction and also just a part of the trail.
- Pets/ bikes: This is the only Zion hike where dogs and bicycles are allowed.
Pa’rus Trail is one of the newer trails in Zion National Park that truly has something for everyone. Its name means ‘bubbling water’ and it follows the Virgin River giving you many opportunities to get close to the water.
It is paved and mostly flat and is, therefore, one of the easiest, wheelchair-accessible trails in Zion. This is a very nice family-friendly hike that can easily be done in any season.
Enjoy the wonderful nature as you are surrounded by it! Pa’rus Trail is a great spot to see the sun go down behind the mountains. Wildlife sightings are quite common here, but for that, you have to come early in the morning or in the lower season when there are not that many people around.
TIP: Don’t miss the view from the Canyon Junction bridge at the end of this hike. It’s one of the most iconic viewpoints in Zion. If you don’t want to hike the whole trail, you can also get to this viewpoint with a shuttle.
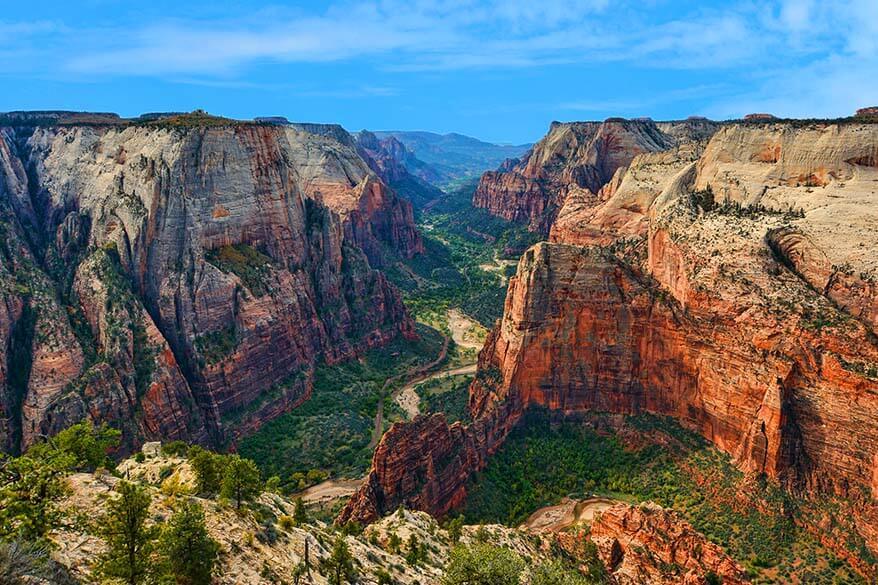
7. Observation Point
- Difficulty: Strenuous
- Distance: 8 miles/12.8 km roundtrip
- Duration: 4-6 hours
- Trailhead: Weeping Rock. Shuttle stop #7
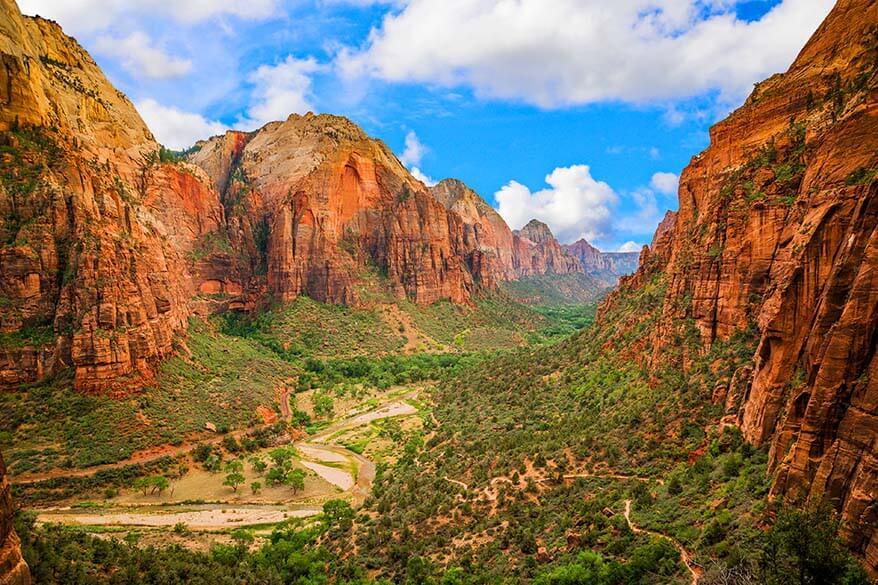
Observation Point is the most iconic trail at Zion National Park. There’s simply no other view like this! Observation Point offers an amazing view of Angels Landing and the zig-zagging Virgin River below.
It is a tough hike, one of the most strenuous among the best hikes in Zion. Most of the trail is a ruthless uphill climb and parts of it are created out of the canyon walls. This hike is not like Angels Landing which induces fear of how high you are; Observation Point trail is strenuous because of its elevation gain of over 2,100 feet (640 m). If you can endure it, however, you will be rewarded with the most phenomenal view.
As you hike up the path, you’ll get to see Echo Canyon with its white cliffs and curvy canyon formations. Some people use walking sticks on this trail, but it’s not absolutely necessary.
Good to know: Observation Point can be reached from two sides – starting at Weeping Rock or at East Mesa Trailhead. Weeping Rock is more convenient to get to as you can use the shuttle, whereas the East Mesa Trailhead requires a long drive and is not well indicated. Therefore most people do this hike starting at Weeping Rock. On the other hand, the trail is much easier if you start at East Mesa. If you can arrange for a transfer to East Mesa and hike to Observation Point and then on to Weeping Rock, you’ll have the best views and a much easier downhill hike.
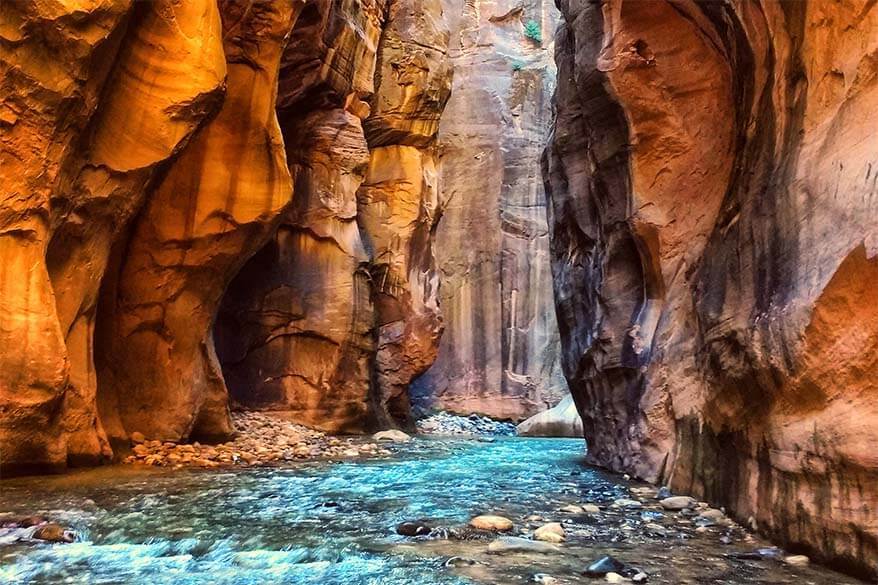
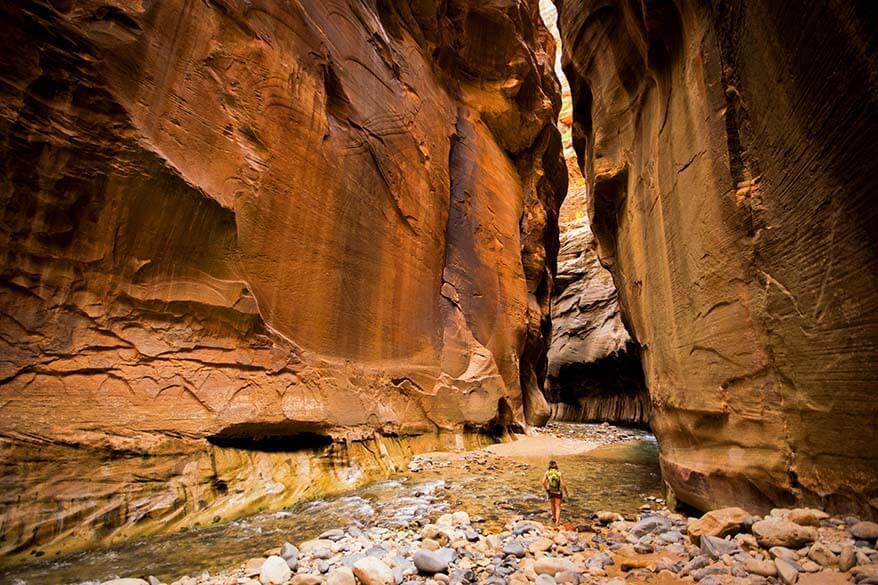
8. The Narrows
There are two ways to hike The Narrows – from the Top Down or From the Bottom Up.
The Narrows from the Top Down
- Difficulty: Strenuous
- Distance: 16 miles/25.7km one way
- Duration: 12 hours; more relaxing if done in 2 days
- Trailhead: Chamberlain’s Ranch (you’ll need to arrange a private shuttle)
- End of the hike: Temple of Sinawava. Shuttle stop #9
- Important: Wilderness permit is required for this hike.
- Recommended: Walking Sticks, waterproof boots, waterproof gear
The Narrows hike from the Top Down is an adventurous long hike that requires a full day. Many people opt to do it over two days, staying at a campground halfway. This hike is not that difficult, but it is challenging because you have to walk in the water. Also, its length, especially if done in a day, makes this a strenuous hike.
The trailhead is at Chamberlain’s Ranch, about 1.5-hour drive from Zion Visitors Center. So you need to arrange transportation to get you to the starting point. There are several companies running private shuttles in Zion, just search on the internet for ‘zion narrows shuttle’ and make sure to reserve it in advance. Alternatively, you can now do this hike with a guided tour and let them take care of everything.
Follow the gushing Virgin River to the narrowest place in Zion Canyon. The strenuous hike involves walking through water for much of the trail. So be prepared to get wet! The best season to hike The Narrows is late spring or summer. That’s when the water is warmer and the water level isn’t as high.
The Narrows can have flash floods, so plan ahead for this hike by checking the weather. It’s also important to dress appropriately and bring walking sticks on this path. Waterproof boots are a must since you’ll be treading through the river. On both sides of the path, you’ll see stone walls 1,000 feet (300 m) tall. At its widest, the river is about 30 feet (10 m) wide.
The Narrows from the Bottom Up
- Difficulty: Moderate
- Distance: 10 miles/16km roundtrip
- Duration: 6-8 hours
- Trailhead: Temple of Sinawava. Shuttle stop #9
- Recommended: Walking Sticks, waterproof boots/ water shoes, waterproof gear
If ‘Top Down’ of the Narrows is too much, then you can opt for the Narrows from Bottom Up hike. This trail starts at the Riverside Walk and is more popular than the harder one, also because you don’t need a permit for it.
This hike allows you to see some of the narrowest parts of the canyon and stunning scenery, but in a much easier way than the Top Down trail.
TIP: You don’t have to hike all the way to Big Spring and back for great scenery. You can also just hike this trail for an hour or two and experience some amazing surroundings as well.
On the official National Park Service website, you can find a complete guide to hiking the Narrows.
9. Hidden Canyon
- Difficulty: Moderate
- Distance: 3 miles/ 4.8 km roundtrip
- Duration: 2-3 hours
- Trailhead: Weeping Rock. Shuttle stop #7
Hidden Canyon is one of the more adventurous Zion hikes, with an elevation gain of over 1,000 feet (300 m). So prepare for an uphill hike!
The Hidden Canyon is a ‘hanging canyon’ and it has narrow depths that feel like it could go on forever. Once you venture on this hike, you will cross several ravines. At some parts of the trail, you will need to scramble up the stony path.
There are some parts with chains along the side, but for most parts, you don’t really need them. Be careful when you cross over the stream bed that’s in the Hidden Canyon.
The trail starts at the Weeping Rock and follows East Mesa Trail in the direction of Observation Point. After a while, it splits off and goes to the right. You’ll do lots of zig-zagging on this adventurous trail. But that’s also what makes it fun!
Here you can find more information about the Hidden Canyon trail.
10. Watchman Trail
- Difficulty: Easy
- Distance: 3 miles/4.8km roundtrip
- Duration: 2-3 hours
- Trailhead: Canyon Visitor Center
Watchman Trail is usually overlooked since most people are caught up on the famous trails of Zion. But this easy hike is a real hidden gem that gives you a great view of the Springdale valley below. Along the trail, you’re surrounded by green shrubs, evergreens, and pear cactus.
The trail goes a bit uphill, but it’s not too strenuous and the path is well marked. It’s a good hike for beginners and also for families. If you’re looking for a really nice easy hike in Zion, then this might be a very good option.
TIP: Watchman Trail is a popular hike for amazing sunrise views. If going for sunrise, make sure to pack a headlamp as you’ll be hiking up in the dark. It’s also a great hike at sunset and you can get back down before it gets dark.
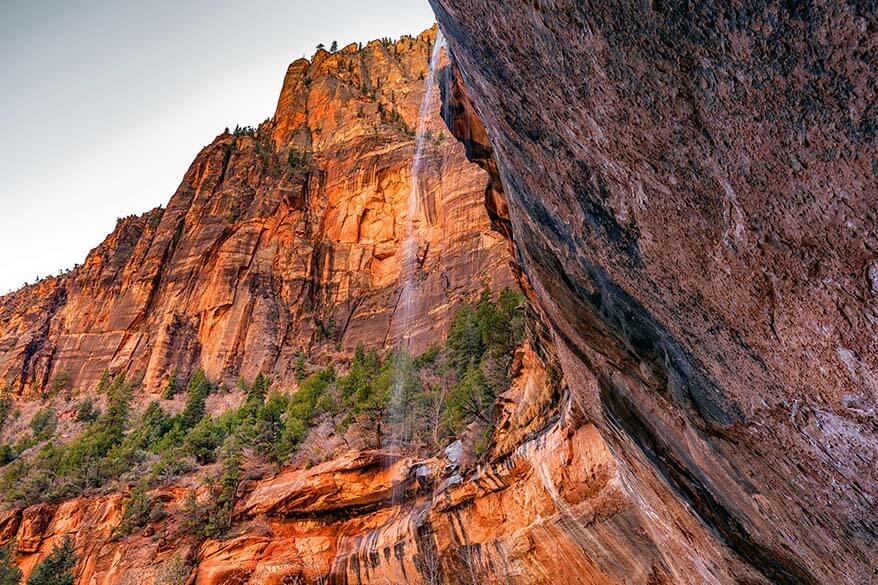
11. Weeping Rock
- Difficulty: Easy
- Distance: 0.4 miles/0.6km roundtrip
- Duration: 0.5 hours
- Trailhead: Weeping Rock. Shuttle stop #7
Weeping Rock is one of the shortest nice trails in Zion National Park and can get really crowded. But it’s a sight to see! The name gives away what you will see – a large rock that looks as though it’s weeping, thus Weeping Rock.
Once you make it to the viewpoint, you’ll also see the Great White Throne to the left.
It’s a steep uphill walk but really short and rewarding. Furthermore, the trail is mostly paved, so it’s a good hike for a family.
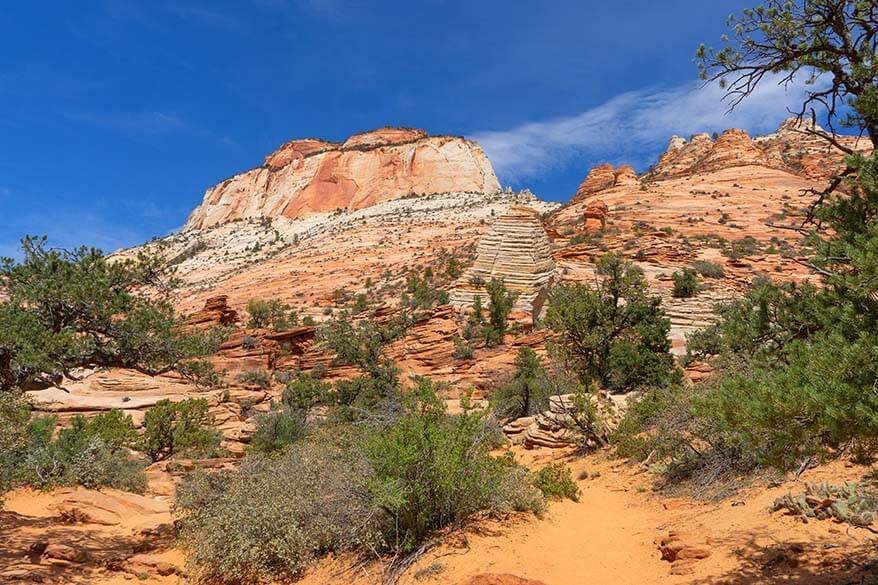
12. West Rim Trail
- Difficulty: Strenuous
- Distance: 15 miles/24km one way
- Duration: 9-12 hours
- Trailhead: West Rim Trailhead or Lava Point Overlook (add 1.5 miles to the hike). You’ll need to arrange a private shuttle to the trailhead.
- End of the hike: The Grotto. Shuttle stop #6
- Important! If you plan on doing this hike over two days, you need a wilderness permit.
West Rim Trail is one of the most beautiful long hikes in Zion. It can be done as a day hike or a 2-day adventure with your backpack. Since it’s a long hike, it’s considered strenuous, but most of the trail is downhill or nice and level.
The West Rim Trail is known as the ‘top down’ hike since it goes into Zion Canyon. There are several views on this hike, each better than the previous one. It will feel like you just walked into a fantasy world filled with hidden treasures waiting to be seen.
TIP: Along this hike, you’ll pass the popular Angels Landing Trail. If you’re fit and have enough time, definitely consider this detour.
Here you can find more information about the West Rim Trail.
13. East Rim Trail
- Difficulty: Strenuous
- Distance: 11 miles/17.7km one way
- Duration: 5-9 hours
- Trailhead: East Entrance Ranger Station (you’ll have to arrange a private shuttle)
- End of the hike: Weeping Rock. Shuttle stop #7
East Rim Trail is the ‘little brother’ to the West Rim Trail. At the beginning of the trail, you have amazing views over the colorful Navajo Sandstone mountains. It’s worth visiting the eastern side of Zion just for that, even if you are not planning to hike far from the road.
The views along this hike aren’t as impressive as on the West Rim Trail. However, it offers more variety in scenery making it a great choice for those who want to explore deeper and to experience more diversity in Zion.
The start of the trail is fairly easy, although it goes uphill (1,000 ft – 300 m elevation). If you want to, you can also just walk the first few miles till Jolley Gulch and turn back. It’s a good alternative for those who don’t want to do the entire hike or rather not have to worry about arranging additional transportation.
The trail continues down into the Echo Canyon and caution is required here. There can be slick rocks depending on the weather.
Further along the route, you’ll reach a junction that goes towards the Observation Point (mentioned higher above). Keep in mind that this detour will add quite a few miles to your hike, but if you start early, you should be able to do this detour before continuing to the end of this trail at the Weeping Rock.
Here you can find more information about the East Rim Trail.
14. Grotto Trail
- Difficulty: Easy
- Distance: 0.5 mile/.8km one way
- Duration: 1-2 hours
- Trailhead: Zion Lodge. Shuttle stop #5
- End of the hike: The Grotto. Shuttle stop #6
The Grotto Trail can’t compare to the most beautiful hiking trails of Zion but it’s a good easy walk for those who can’t do the more strenuous hikes. It can also be a quick leisure walk in the morning before you take on the other hiking trails, or at the end of the day, if you still have some energy left.
This hike follows Fall of the Valley Road between the Zion Lodge and the Grotto Picnic Area. It stays mostly flat and you get to venture into a wooded area, listen to the birds chirping, and gaze at the tall stone formations ahead. If you’re lucky, you might run into some wildlife here as well.
At the end of the trail, across the river from the Grotto Picnic Area, you’ll find Angels Landing trailhead. Even if you are not planning to hike all the way to the top, it’s worth crossing the river for a beautiful scenery overlooking this iconic rock formation in Zion.
15. Lady Mountain
- Difficulty: Strenuous climb, rock climbing gear required
- Distance: 2 miles/3.2km one way (4 miles total)
- Duration: 6-10 hours
- Trailhead: Zion Lodge. Shuttle stop #5
- Required equipment: 100-foot rope, harnesses, essential rock climbing gear
Lady Mountain is one of the more remote and quieter places in Zion with spectacular views. It’s not widely known or extremely popular simply because you need rock climbing gear for it. Trailhead isn’t very well indicated and it’s best to do this hike with a local guide who knows the area and can also provide you with the necessary equipment.
If you go on your own, make sure that you do some research for the exact directions. Follow the painted arrows and use the carved steps when available. Try to stay on the trail and don’t wander off of it.
Most of the trail, you’re going to be climbing and following the ridges of the boulders. There’s a part of the trail that can be tricky – that’s where you’ll have to use a rope. TIP – pull up your pack along with a friend’s pack first before climbing up yourself.
Fall is the best time to climb Lady Mountain. It’s best to do this hike when there’s no snow and summer can be too hot to be climbing the demanding trail.

My Favorite Hikes in Zion
With so many hiking trails in Zion, it might be very tough to choose which ones to hike. My own personal favorite hikes are Emerald Pools, The Narrows, and Riverside Walk.
About the Author. Dani James aka Misfit Wanders is a nature-loving gal from South Dakota, USA. She loves wilderness and hiking and has done many road trips exploring America’s National Parks. Nowadays, she lives in Sweden, the land of pristine nature, and blogs mainly about hiking in Sweden.
Getting to Zion & Tours
The best way to get to Zion is by car. However, once you reach Springdale, you don’t absolutely need a car as you can use the park shuttle (in season). In that case, you may want to look for a transfer from Las Vegas. If you are staying in Zion for a few days, this will likely be cheaper than renting a car that you won’t use.
An alternative is to visit Zion with an organized tour. There are day tours from Las Vegas that visit Zion for a day, together with Bryce Canyon. You won’t be doing much hiking on these trips, though, but it’s a nice way to visit if you are short on time.
If you want to explore the area deeper, consider a longer, multi-day tour. This amazing 3-day tour is a great way to see all the best places in the area.
TIP: If you are looking for some fun outdoor activities in Zion, take a look at the selection of some of the best tours in the Springdale area and also some amazing tours in East Zion. You can tackle some of the more challenging hikes with a guide, go horseback riding, biking in Zion Canyon, rock climbing, or canyoneering. This slot canyon tour is one of the most unique options. Check it out!
Where to Stay
One of the nicest places to stay in Zion is Zion Lodge located inside the National Park. However, this lodge is quite expensive and it’s not easy to get a room here in the high season. Furthermore, it doesn’t have a pool and the Wi-Fi connection is very spotty at best.
As already mentioned, the best alternative is to stay in Springdale. This small town is located just outside the National Park entrance. Depending on which hotel you choose, you can either walk or take a free shuttle to the park.
TIP: One of the nicest hotels in Springdale is Cable Mountain Lodge, located just 5 minutes walk from Zion Visitor Center. For more recommendations, please see our detailed guide via the link below.
LEARN MORE: Best Springdale Hotels
Zion Hikes FAQ
With so many amazing hikes in Zion, it’s hard to say which one is best. Canyon Overlook, Angels Landing, and Emerald Pools are probably the top 3. However, if you can only do one hike in Zion, then consider the Canyon Overlook Trail. It’s relatively easy and short, plus the views over the Zion valley are incredible. Furthermore, it only takes about 1 hour – perfect for those who are short on time.
If you are looking for the best hikes that give you access to the most spectacular panoramic views in Zion National Park, then consider the following hikes: Angels Landing, Canyon Overlook, Observation Point, Watchman Trail, and West Rim Trail. These trails have the best views!
The best easy hikes in Zion National Park are: Riverside Walk, Pa’rus Trail, Canyon Overlook, Weeping Rock, Lower Emerald Pool, and Watchman Trail. They are all relatively easy and offer nice views.
Angels Landing is probably the most dangerous hike in Zion National Park. There is a steep climb at the end of this hike, with sheer drops and chains for support. Many people hike here every day and it’s perfectly possible to do it safely, but it’s not the best idea to hike here when it’s very wet.
More travel inspiration for Utah, Arizona & Nevada:
- Best Things to Do in Las Vegas
- 1 Day Las Vegas Itinerary
- Must-See Places in Arizona
- Phoenix Scottsdale Itinerary
- Best Day Trips from Las Vegas
- Grand Canyon – Horseshoe Bend – Antelope Canyon Itinerary
- Things to Do in Moab
- Things to Do in Sedona
- One Day in Grand Canyon
- Grand Canyon in Winter
- Sedona Day Trip
- Monument Valley
- Best Things to Do in Arches National Park
- Best Things to Do in Canyonlands National Park
- Arches and Canyonlands in One Day
- Moab Itinerary Suggestions
- Tips & Tricks for Visiting Las Vegas
- Gold Butte National Monument
TIP: Save this guide for later, share it with your friends, or pin it to Pinterest so you can easily come back to it when planning your trip.
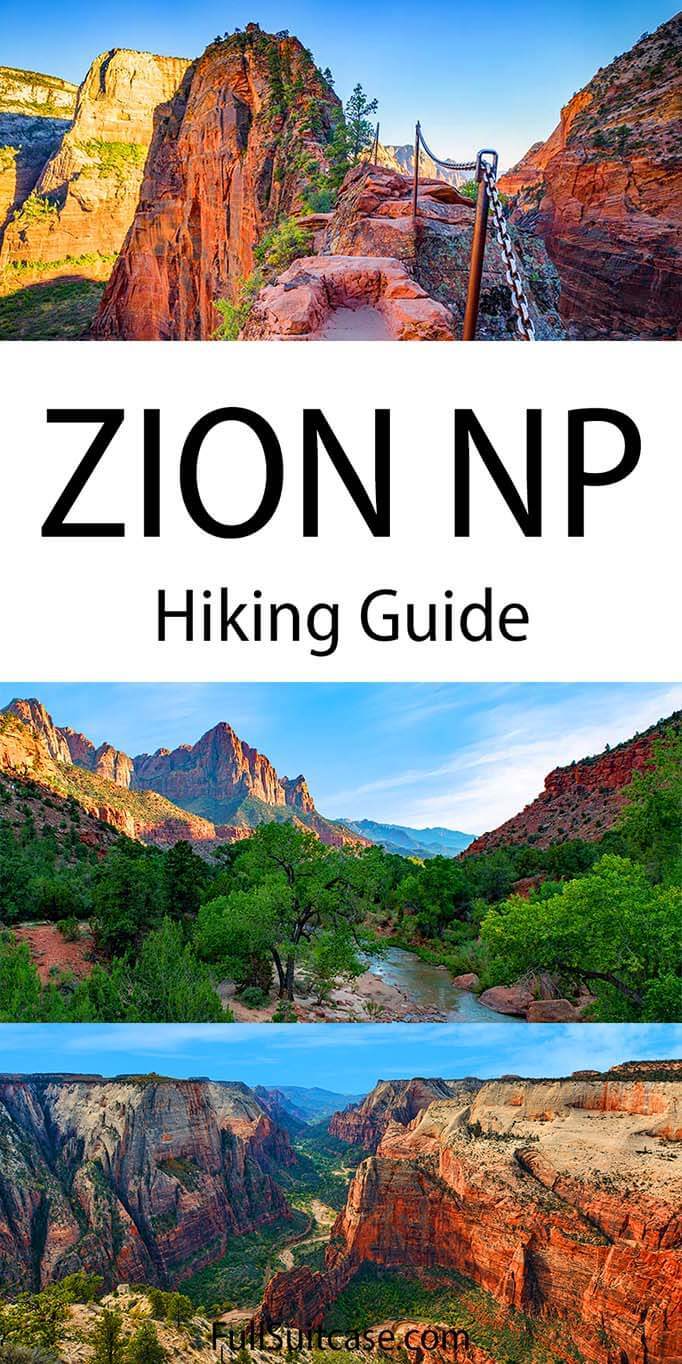
Image credits: MisfitWanders.com/ Depositphotos.com/ Unsplash.com/ Zion shuttle image: karenfoleyphotography/Depositphotos.com
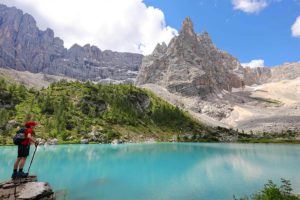
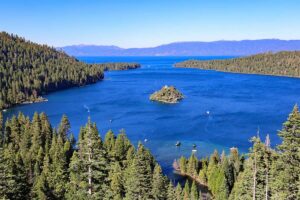
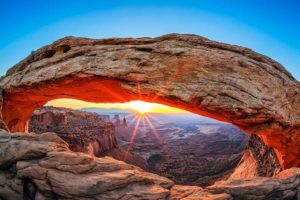
More travel inspiration – stunning nature destinations in the USA:


Love this guide! We went to Zion for the first time last year and hired a local guide to do canyoneering for the first time. It was so fun!
Sounds like you had a great time in Zion!
Happy travels!
Hi,
This is a great guide. How can I print this information.
Hi Dee, if you want to print anything online, you can just use Ctrl+p. Please consider only printing the pages that you really need.
Have a great time in Zion!
This is a great guide indeed. Thank you for this and the other laying down details for 2 days in Zion and Bryce. I’m planning to stay one day in Zion. Looking at the easy trails and looking at the time as my wife and I are not experienced hikers, which of these three trails do you recommend that would have best views – Pa’rus, Watchman or Riverside – they seem all to be along the Virgin River and have similar time to walk them. Then I’m planning to go to Lower Emerald Pools and Canyon Overlook on the way to Kanab. I think those would be enough for a whole day right? 1 longer and 2 shorter hikes. I would really appreciate any recommendations you may have for us.
Hi Marcelo, how much you can do in a day depends not just on how fast you hike, but also if you take the shuttle, how long you have to wait, etc. In any case, start early if you can.
From the three trails you mentioned, I think I’d opt for Riverside. Also because it takes you deep into Zion Canyon. But if you want to stay closer to the entrance, others are nice too. Just keep in mind that Watchman actually goes uphill while the other two are rather flat and follow the river.
Hiking at Emerald Pools is really nice, and you could do Lower and Upper hikes there, plus the viewpoint at the end of Pa’Rus trail and then potentially walk back towards the visitor center following the river and/or take a shuttle for a part.
There are so many possibilities. You could also go to Riverside first, then Emerald Pools, and then decide how you feel and if you want to add another easy hike before driving out and hiking to Canyon Overlook.
Enjoy your trip!
@Jurga, thank you very much!! I’ll take the last suggestion, riverside first, then emerald pools and then see. Thanks!!
Thanks for sharing this. Such a great guide. If you have to choose just one longer hike for about half a day in July, which one would you suggest?
Hi Harry, if you do just one hike and have half a day, then I’d probably go with Angels Landing. Just make sure to start early so that you can beat the crowds. Otherwise maybe do the hikes at the Emerald Pools.
For an even shorter visit, we would recommend Canyon Overlook hike.
Have a great time in Zion!