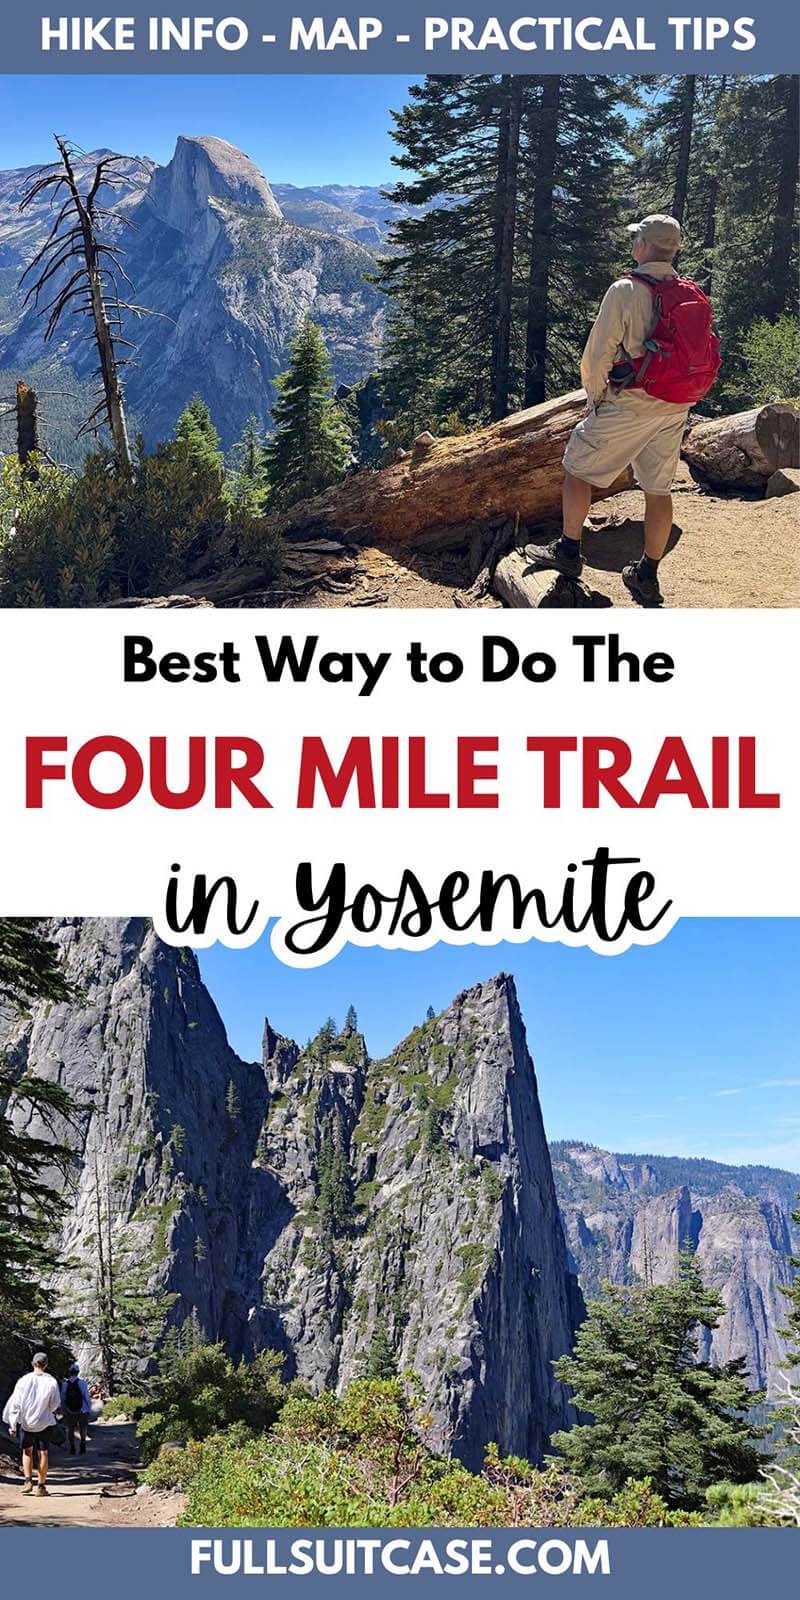
Best Way to Hike The Four Mile Trail in Yosemite (+Map & Practical Tips)
This site contains affiliate links, which means that we may earn a small commission, at no cost to you, for qualifying purchases. It supports the work that goes into keeping this content free. Thanks for reading! More info: Privacy Policy.
The Four Mile Trail is a classic Yosemite hike that connects Yosemite Valley with Glacier Point at the top, offering some of the best views in the park.
Despite its name, the trail is actually longer than four miles, and it’s one of the park’s steepest and most strenuous hikes. But if you’re up for the challenge, you’ll be rewarded with the most spectacular views in Yosemite National Park. And if tackling the full climb isn’t for you, there’s also the option to hike it downhill only, which makes things a lot easier.
We hiked the Four Mile Trail on our recent trip to Yosemite as part of our Northern California road trip. In this guide, you’ll find everything you need to know about this trail: hike details, a map, what to expect along the way, the best way to do it, and practical tips for planning your visit. Find out!
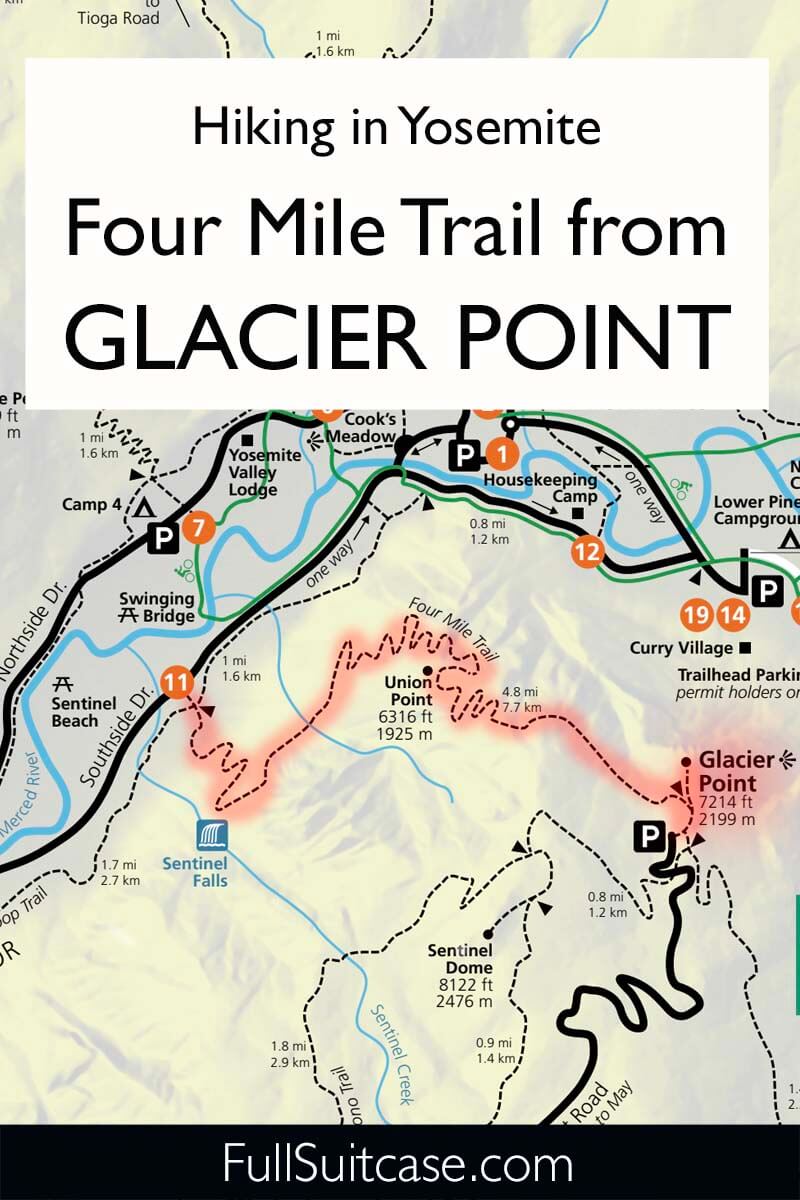
Four Mile Trail Overview + Map
- Trail length: 4.8 miles one way (9.6 miles (15.5 km) round trip)
- Hiking time: 6-8 hours round trip; 2–3 hours one way (downhill).
- Elevation gain: About 3,200 ft (975 m).
- Difficulty: Strenuous.
- Trailhead: Yosemite Valley, shuttle bus stop #11 (location on the map).
- Alternative starting point: Glacier Point – more info below.
- Trail type: Out-and-back, or one-way from Glacier Point.
- Family-friendly: Only for experienced, fit kids/teens, ideally downhill.
PRO TIP: The easiest way to do the Four Mile Trail is one-way, starting from Glacier Point. For this, you have to arrange transportation to Glacier Point – either by having someone drop you off or by taking the park’s Glacier Point Tour Bus (booking link here and more details below).
Keep in mind that Glacier Point Road is only open during the summer season, usually from late May through October or early November, depending on snow. Always check the official park website for current road and trail conditions before your hike.
What to Expect
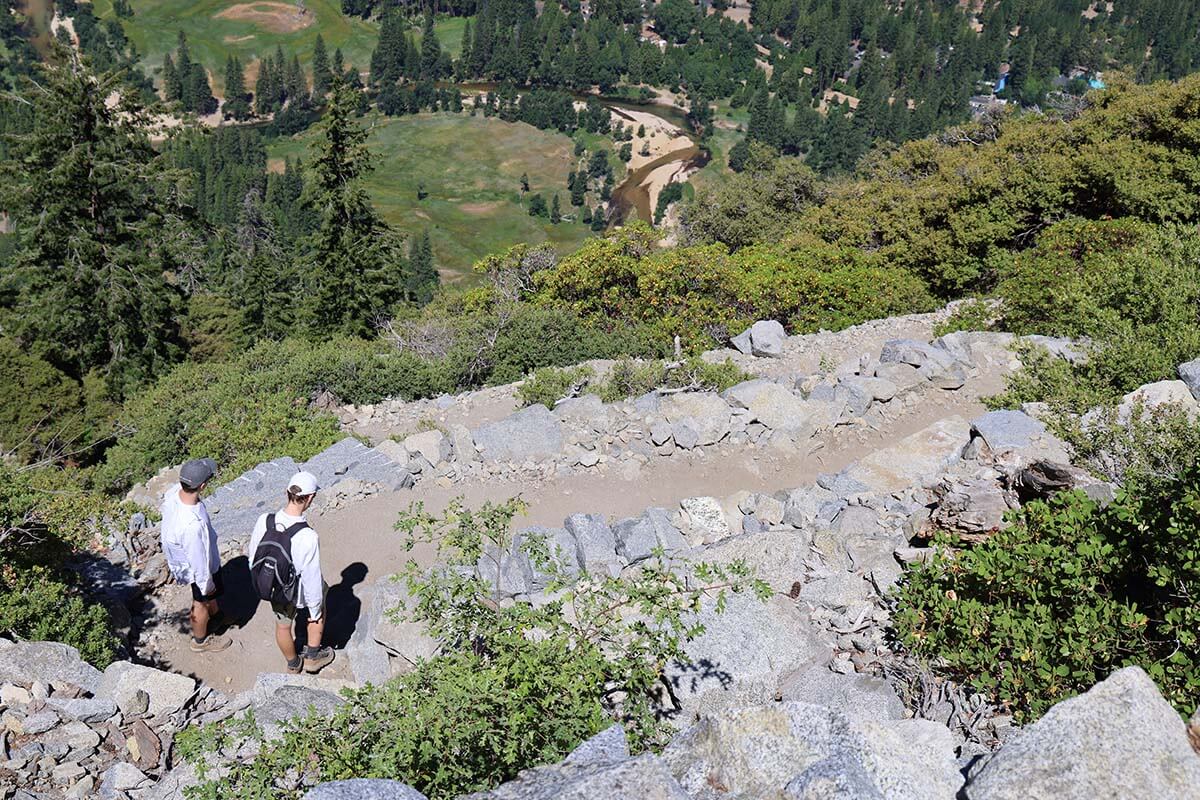
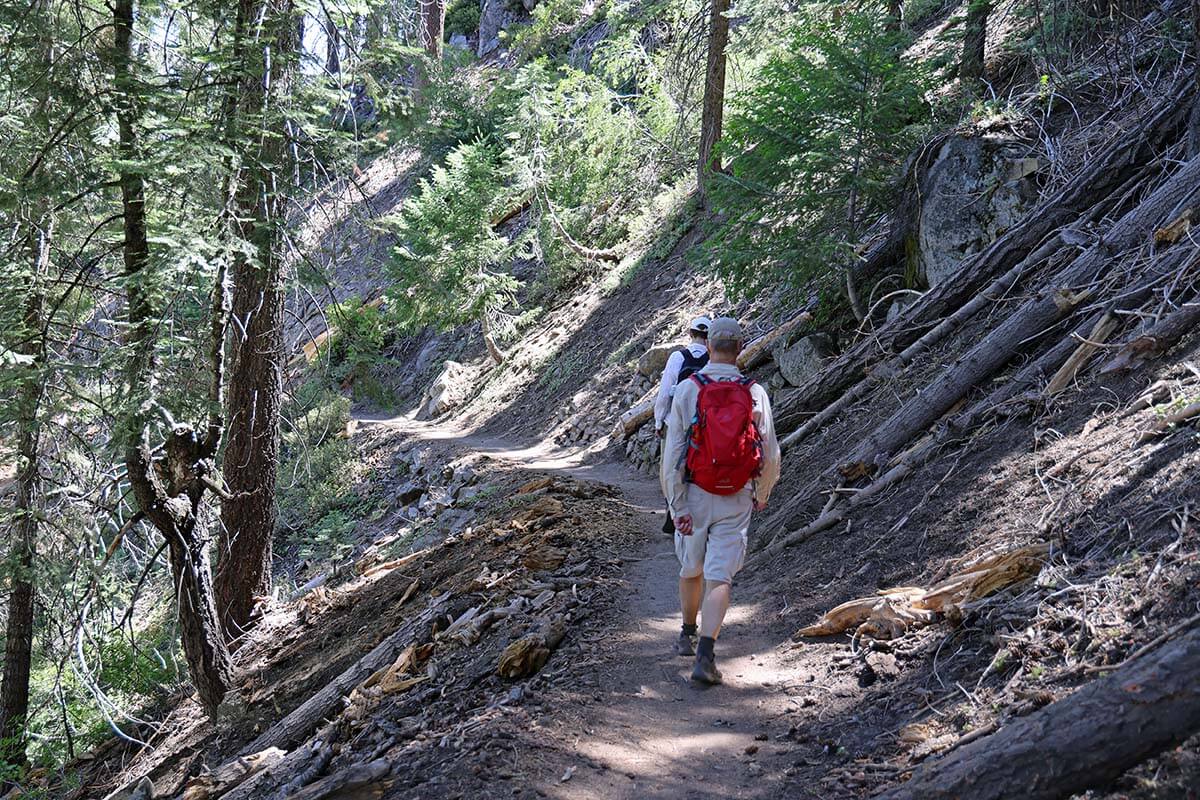
The Four Mile Trail is a demanding uphill hike with constant switchbacks and a big elevation gain. Most people start in Yosemite Valley and hike up to Glacier Point and back down, making it one of the hardest day hikes in the park.
Don’t underestimate this hike! If you start in the valley, you’ll be climbing for 3-4 hours, and the higher you get, the less shade there is – and it can get really warm in Yosemite in the summer! Plus, once at the top, you’ll have to get back down, which is not a walk in the park either.
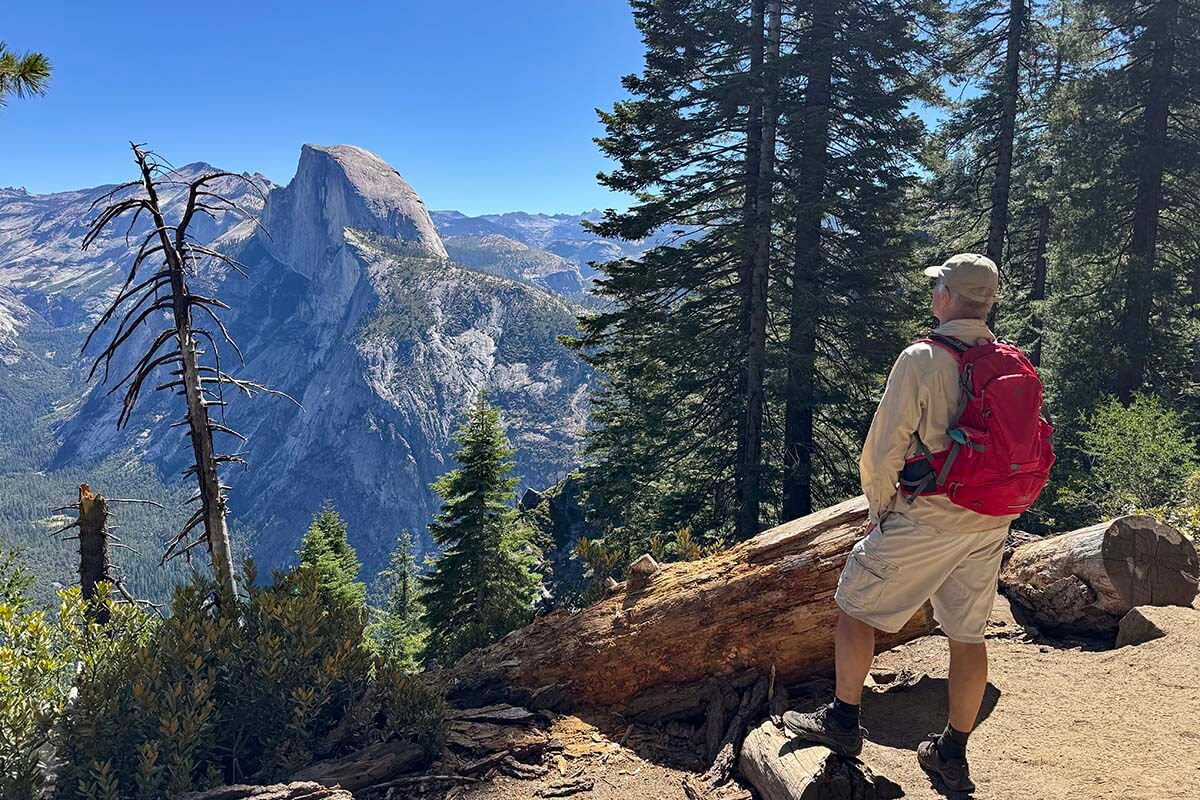
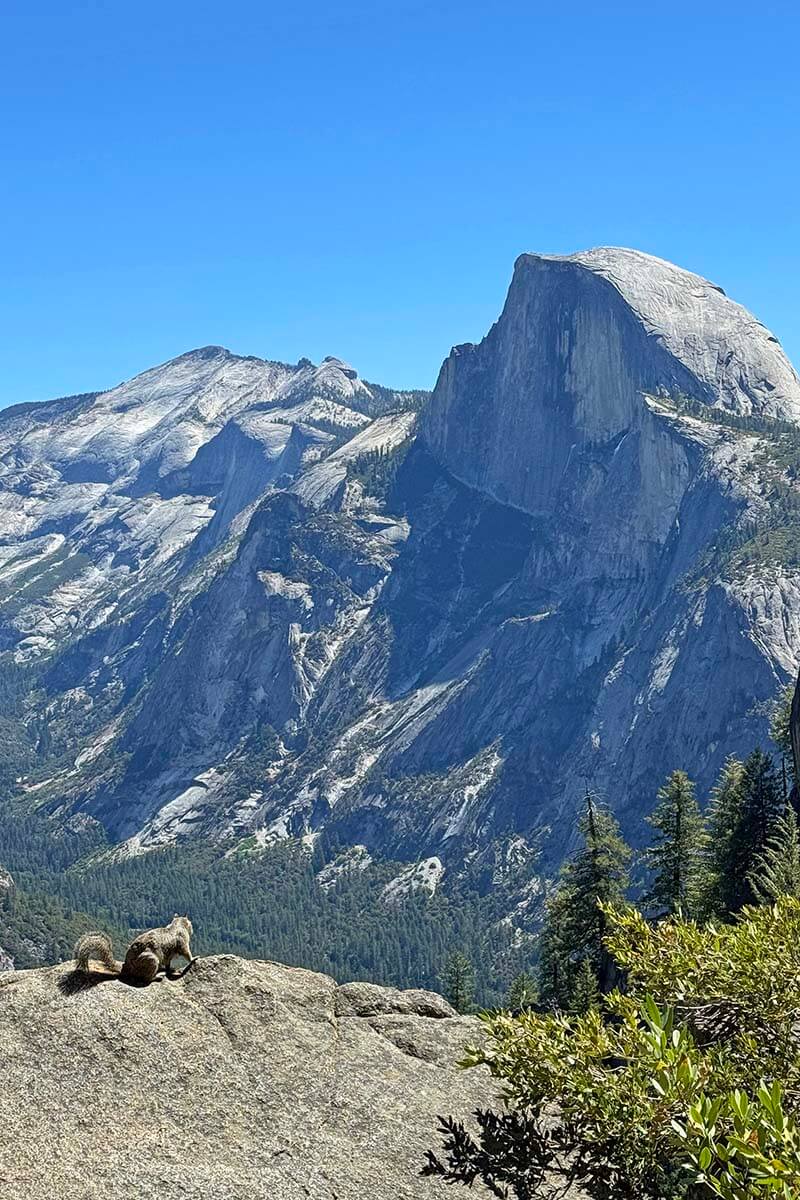
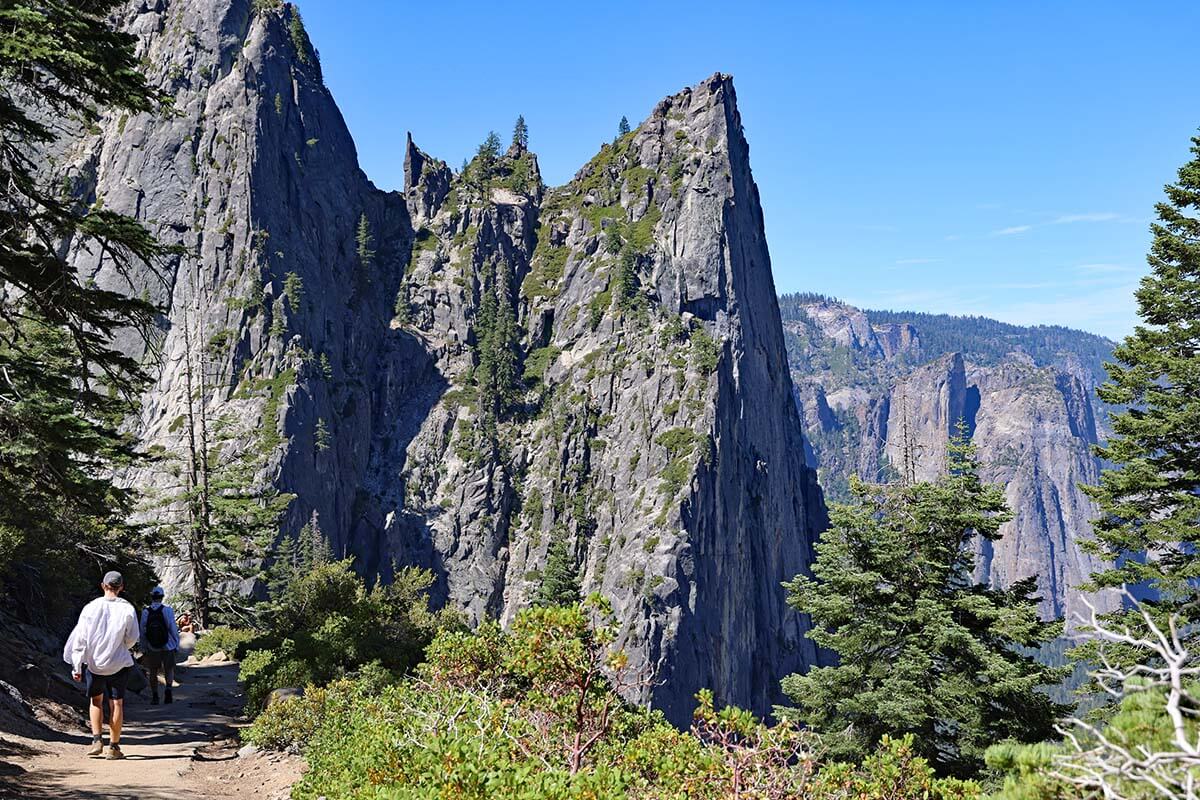
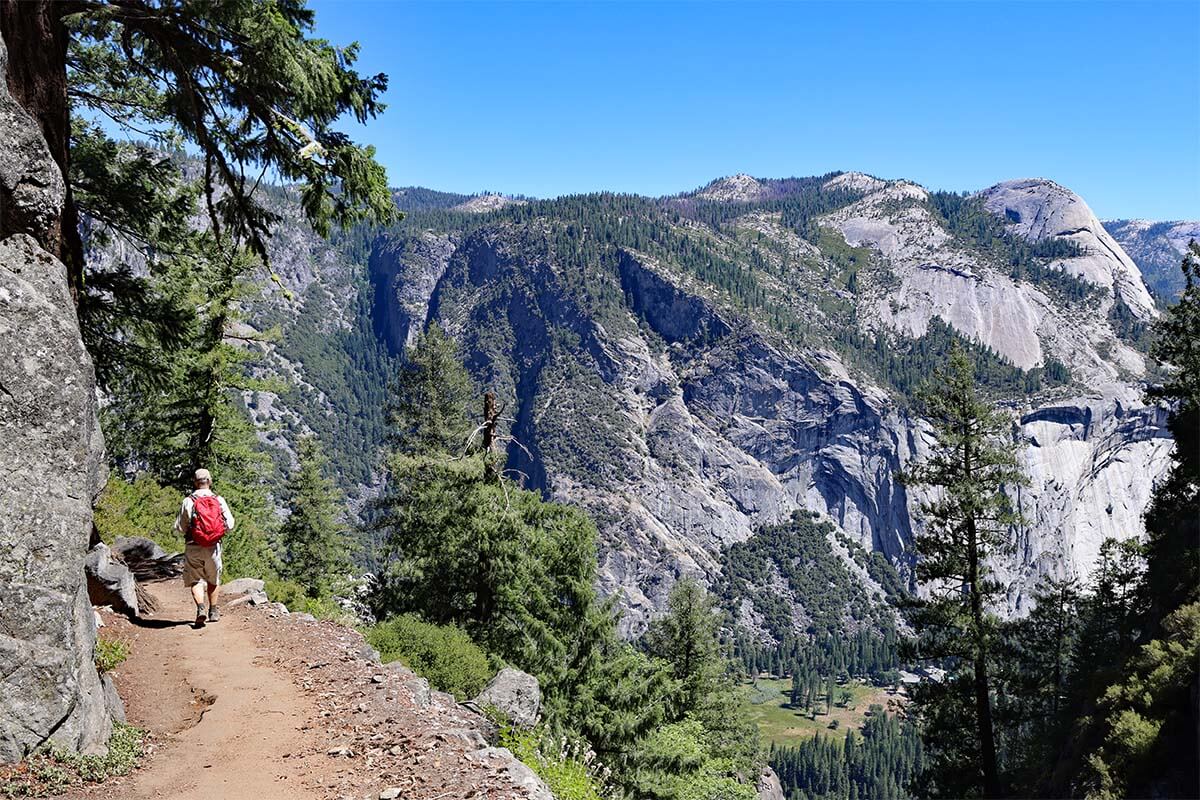
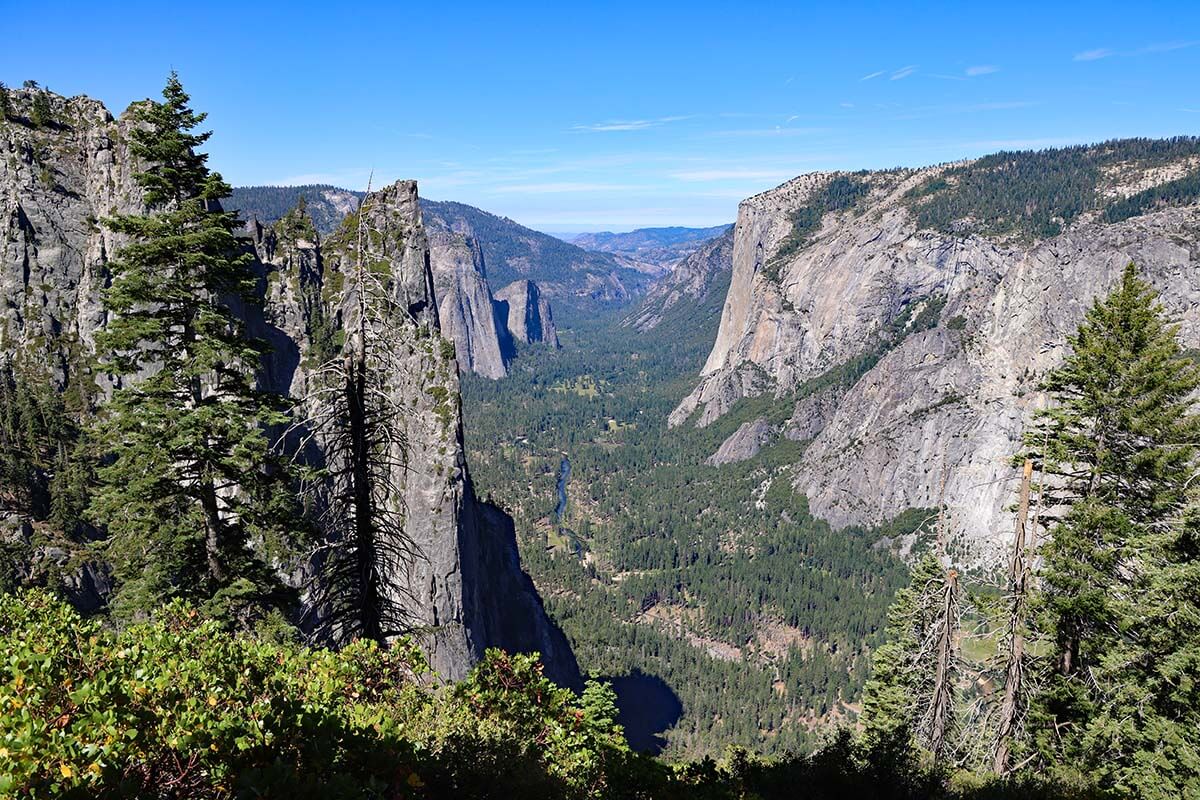
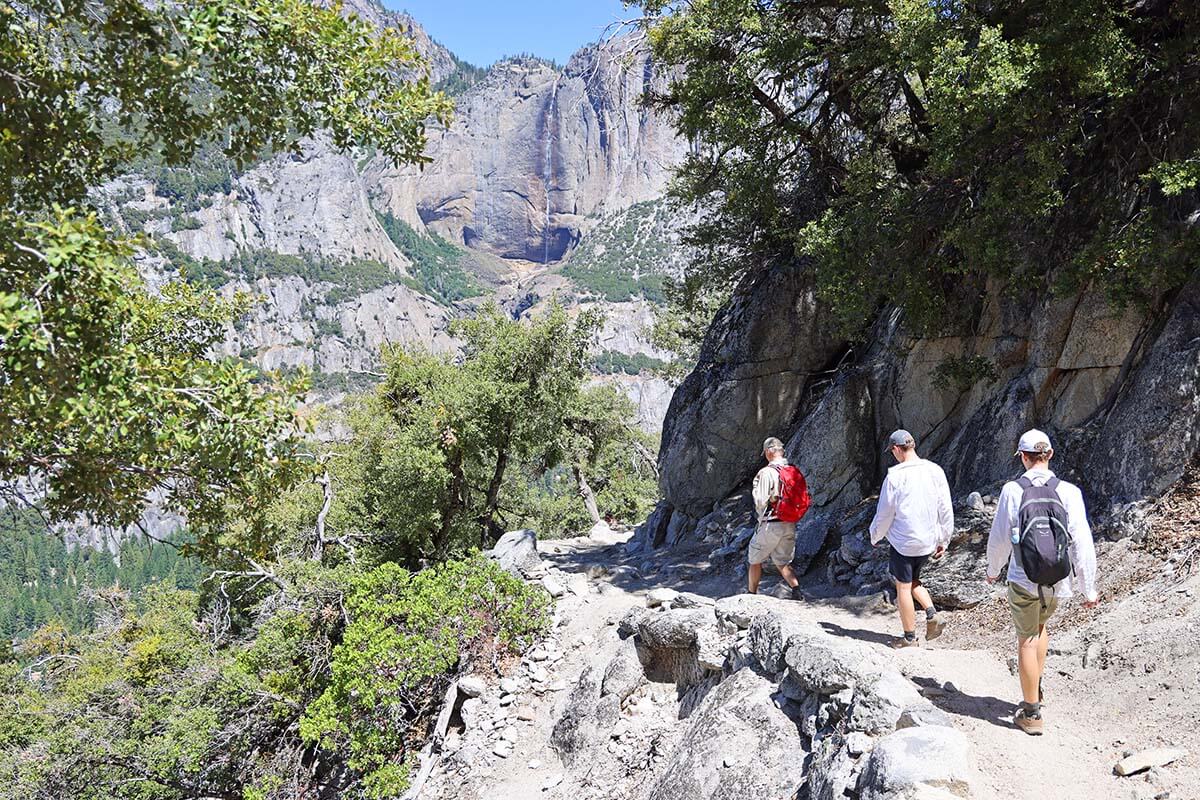
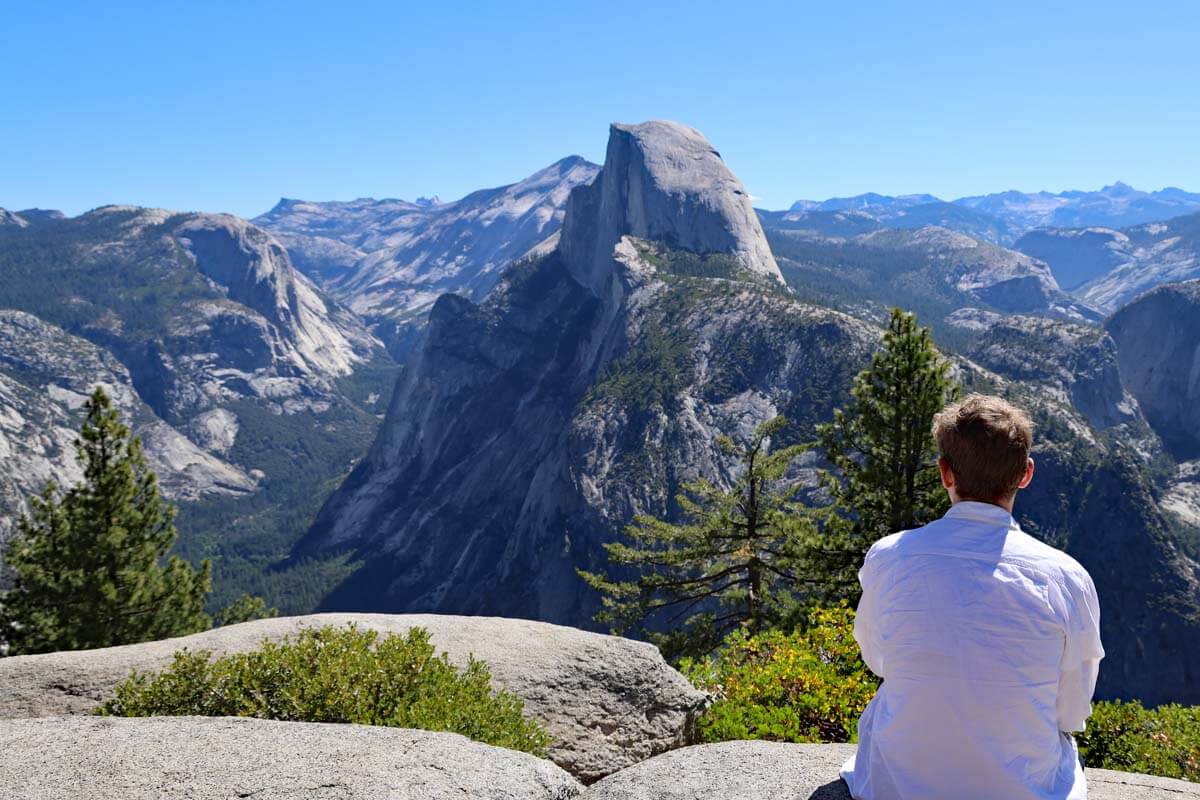
The best views are at the top half of the trail, more or less between Union Point and Glacier Point. Here you get sweeping panoramas of Yosemite Valley, El Capitan, Yosemite Falls, and Half Dome. The lower part of the trail runs through forest, where views are less frequent.
The Best Way to Do The Four Mile Trail
By far the best way to do this hike is to start at Glacier Point and hike down into Yosemite Valley. Going downhill is still strenuous (and can be tough for your knees), but much more manageable. Plus, if you hike downhill, the valley is always in front of you, making the scenery even more impressive. Hiking uphill, you’ll spend much of the time with your back to the valley.
Another thing to keep in mind is that most people hike the Four Mile Trail uphill, which means the trail can feel crowded at times. Faster hikers often need to squeeze past slower ones on the narrow sections, so there’s a lot of stopping and waiting.
When hiking downhill, it’s a completely different experience. We met fewer than 10 people on our way down, while there were dozens heading up. You can move at your own pace without constantly having to step aside or let others pass, making the hike far more relaxed and enjoyable.
Our Experience
We visited Yosemite in July when temperatures are often in the 90s (30°+C), so we decided to do the Four Mile Trail the easier way – downhill. To get to the top, we booked seats on the early morning Glacier Point Tour Bus at 8:30 am.
This is officially a 4-hour sightseeing tour from Yosemite Valley to Glacier Point and back, with several scenic stops on the return journey. If you book it one-way, as we did, you simply hop off at the first stop – Glacier Point – and use it as a convenient shuttle. The driver’s commentary along the way is a nice bonus, and the ride to the top takes just under an hour.
TIP: Seats on the Glacier Point Tour Bus are limited and sell out quickly, especially in peak season, so book well in advance.
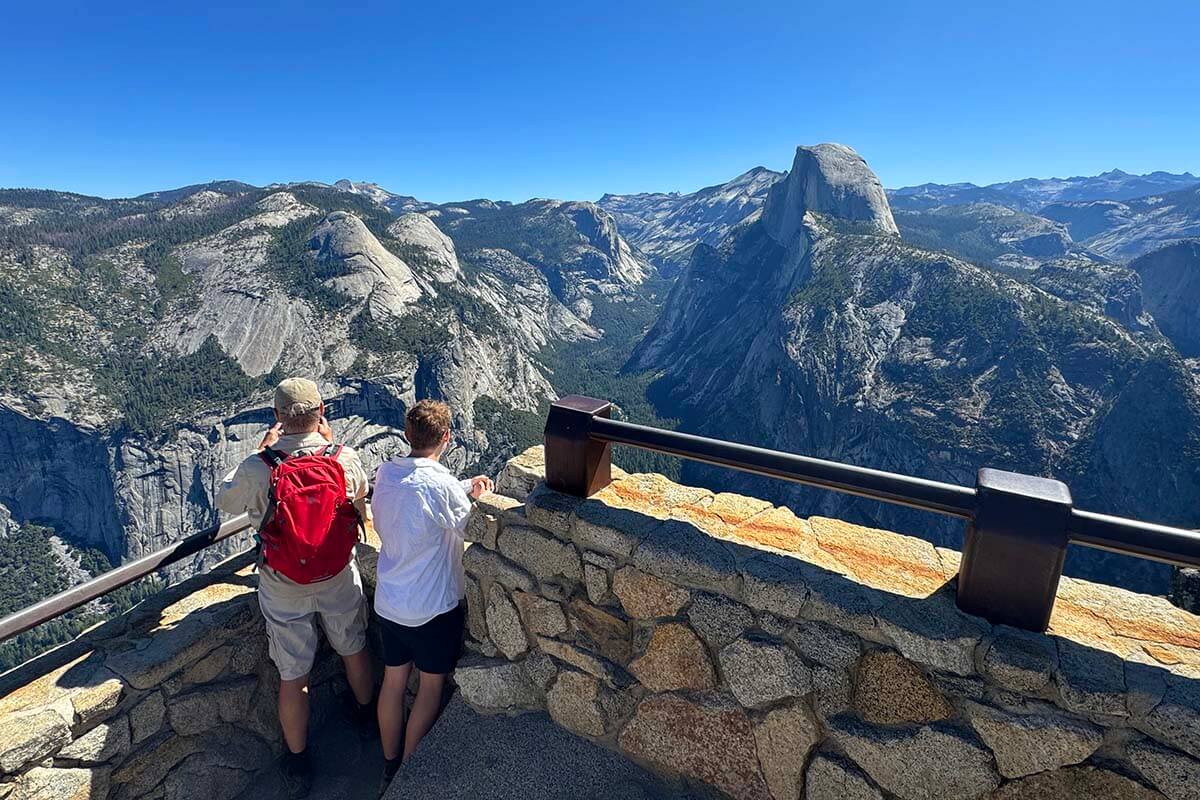
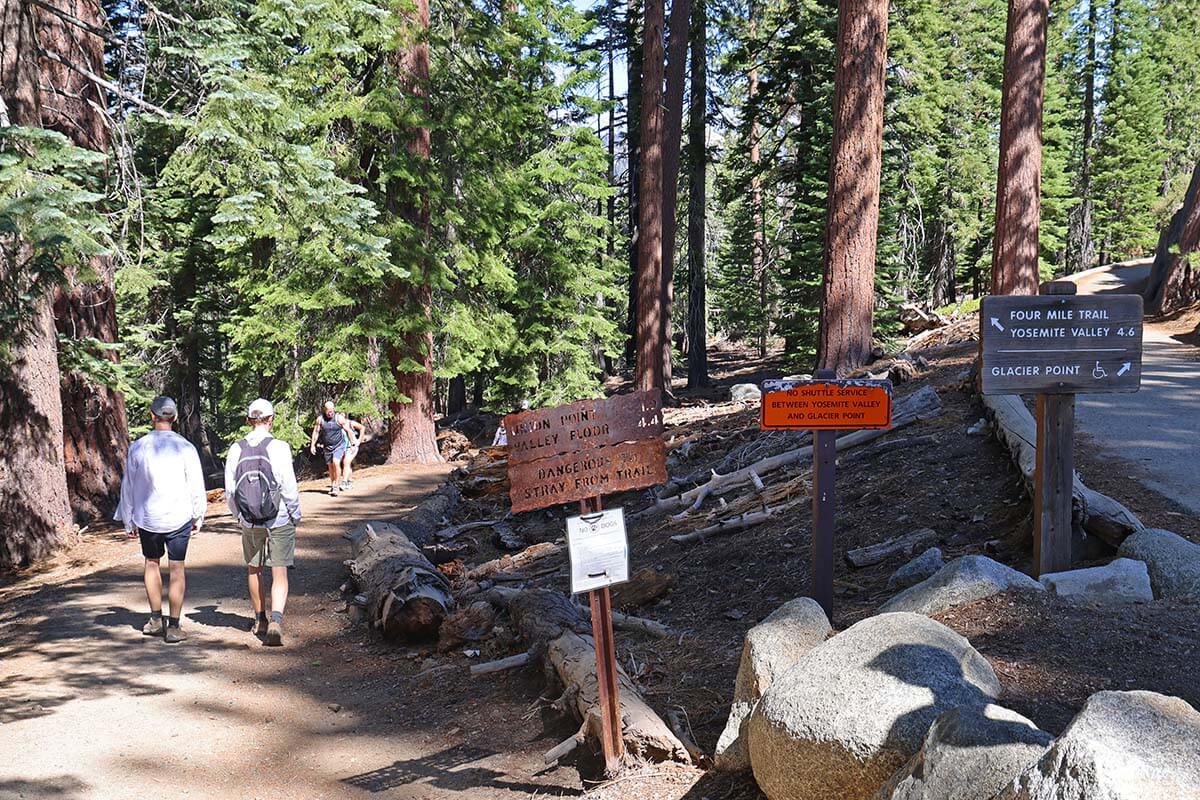
After taking some time to enjoy the different viewpoints at Glacier Point, we found the Four Mile Trail trailhead and started our hike down around 9:20 am. It took us about 2 hours and 15 minutes to reach Yosemite Valley, including photo stops along the way. The descent is steady and requires focus, but the scenery makes every step worth it.
The upper section of the trail has the best views, with Half Dome and Yosemite Falls right in front of you, so don’t rush this part. Lower down, the trail goes mostly through forest. The views are less dramatic here, but the grade is gentler, making it easier to keep a steady pace.
Overall, hiking downhill was the perfect way for us to experience the Four Mile Trail. We got the best views, avoided the toughest uphill climb, and finished back in the valley just in time for lunch, with the whole afternoon still ahead of us to enjoy the rest of Yosemite.
TIP: The Four Mile Trail ends in Yosemite Valley, near the Swinging Bridge Picnic Area. There is a small beach here – a great place to relax or dip your toes in the river after the long hike. We even saw some people swimming here.

Best Views without Hiking
If you want Yosemite’s iconic views without a tough hike, simply drive to Glacier Point and take in the views from the several easily accessible lookout points. From here, you’ll get incredible panoramas of Yosemite Valley, Half Dome, and Yosemite Falls.
For a little extra adventure, hike 10–15 minutes down the Four Mile Trail and then back up. This gives you a taste of the trail and its best views without much effort.
You can also combine Glacier Point with nearby short hikes like Taft Point or Sentinel Dome for even more spectacular scenery, all without tackling a strenuous climb.
TIP: Parking at Glacier Point fills quickly. Go early or later in the afternoon for fewer crowds and better light.
READ ALSO: Taft Point Hike (with Info on Sentinel Dome)
Practical Tips & Info
Here are some things to know before tackling the Four Mile Trail:
- Season: The trail is usually open late May through November, depending on snow. Glacier Point Road access also depends on snow conditions.
- Fitness: This is a very strenuous hike with a steep, continuous climb. Attempt the full round trip only if you’re in excellent shape and used to big elevation gains. We saw families carrying young kids uphill and could only imagine how exhausting that must be. And if you are already exhausted after the first 15 minutes, do yourself a favor and turn around.
- Parking: Limited at the trailhead in Yosemite Valley. Arrive early or use the shuttle system.
- Bus option: If you want to do this hike one way, take the Glacier Point Tour Bus to the top and hike down into the valley – it’s a lot easier and far more enjoyable. You can find more information and the links to book the bus tour on the Yosemite website. Another option is to hike up and take the bus down, but this is much tougher and less reliable. Downhill bus tickets are only sold on the spot and are subject to availability, so you’d need to be at Glacier Point when the bus departs and hope there’s a seat available.
- Timing: If you’re hiking uphill, start early in the day to avoid the afternoon heat and to give yourself plenty of time to complete the hike safely. If you’re hiking downhill, plan for at least half a day for the bus ride to Glacier Point and the hike back to the valley.
- Footwear: This is a steep and rocky trail. Good hiking shoes are a must. Hiking poles can be useful.
- Water: Bring plenty, especially if hiking uphill. There is no water available on the trail, but you can get some at Glacier Point, where there’s a seasonal gift shop and snack stand.
- Facilities: Restrooms are available at Glacier Point, but not on the trail itself.
- Pets are not allowed on hiking trails in Yosemite.
- Wildlife: You’ll likely spot squirrels and birds along this trail. Don’t feed them! If you come across larger animals like deer or even a bear, stay at a safe distance.
So, this is our complete guide to the Four Mile Trail. It’s one of Yosemite’s toughest hikes, but also one of the most rewarding. I hope this article helps you understand what to expect and decide whether (and how) to tackle this iconic trail.
TIP: Check out our Yosemite Travel Guide for more tips, itineraries, and practical information to help you plan your visit to the park.
More Travel Inspiration for California:
- San Francisco 2-Day Itinerary
- Best Day Trips from San Francisco
- Monterey 1-Day Itinerary
- San Diego Itinerary
- Los Angeles 3-Day Itinerary
- Warner Bros vs. Universal Studios Hollywood
- Tips for Visiting Universal Studios Hollywood
- Northern California Road Trip
If you found this post helpful, don’t forget to bookmark it and share it with your friends. Are you on Pinterest? Pin this image!